¶ Overview
¶ System Overview
Morpheus ONE provides an integrated development environment for the entire mobile application development process.
- Web IDE : Provides a development environment where you can view and execute code in your browser. (Refer to Development Environment)
- Version Control : Manages source code to systematically track and control software changes. (Refer to Project Code)
- Build : Converts and manages source code into a form executable on a computer. (Refer to Project Build)
- Device Test : Provides an environment where you can test devices in your browser. (Device Management)
¶ Menu Configuration
| 1st Depth Menu | 2nd Depth Menu | 3rd Depth Menu | Description |
|---|---|---|---|
| My Info | My Info | Screen to view and modify my information. | |
| My Info | Logout | Function to log out the currently logged-in user. | |
| Workspace | Screen to view and manage the workspace list. | ||
| Workspace | Project | Screen to view and manage the project list within the workspace. Selecting a project moves to the detailed screen for that project. |
|
| Workspace | Project | Code | Screen to view project source code. |
| Workspace | Project | Build | Screen to execute project builds and download the execution results. |
| Workspace | Project | Settings | Screen to manage the project. You can modify project information and add/remove collaborators within the project. |
| Workspace | Development Environment | Screen to view and manage the project development environment. Provides a Web IDE environment to check and run the project's source code. |
|
| Workspace | Device | STF Device List | Screen to view and manage the STF device list. Provides an environment for device testing in the browser. |
| Workspace | Team Members | Screen to view and manage the list of team members within the workspace. | |
| Workspace | Settings | License Management | Screen for managing licenses to be used in Morpheus projects. |
| Device | Emulator Management | Screen to manage emulators. | |
| Device | STF Device List | Screen to view and manage the STF device list. Provides an environment for device testing in the browser. |
|
| Settings | SDK Environment Settings | Screen to view and manage SDKs required for the project development environment and devices. | |
| Settings | User Management | Screen to view and manage the user list. | |
| Settings | Password Policy Management | Screen to manage password policies. |
¶ 1. Login
¶ 1.1 Login
- [Login]
| No. | Category | Description |
|---|---|---|
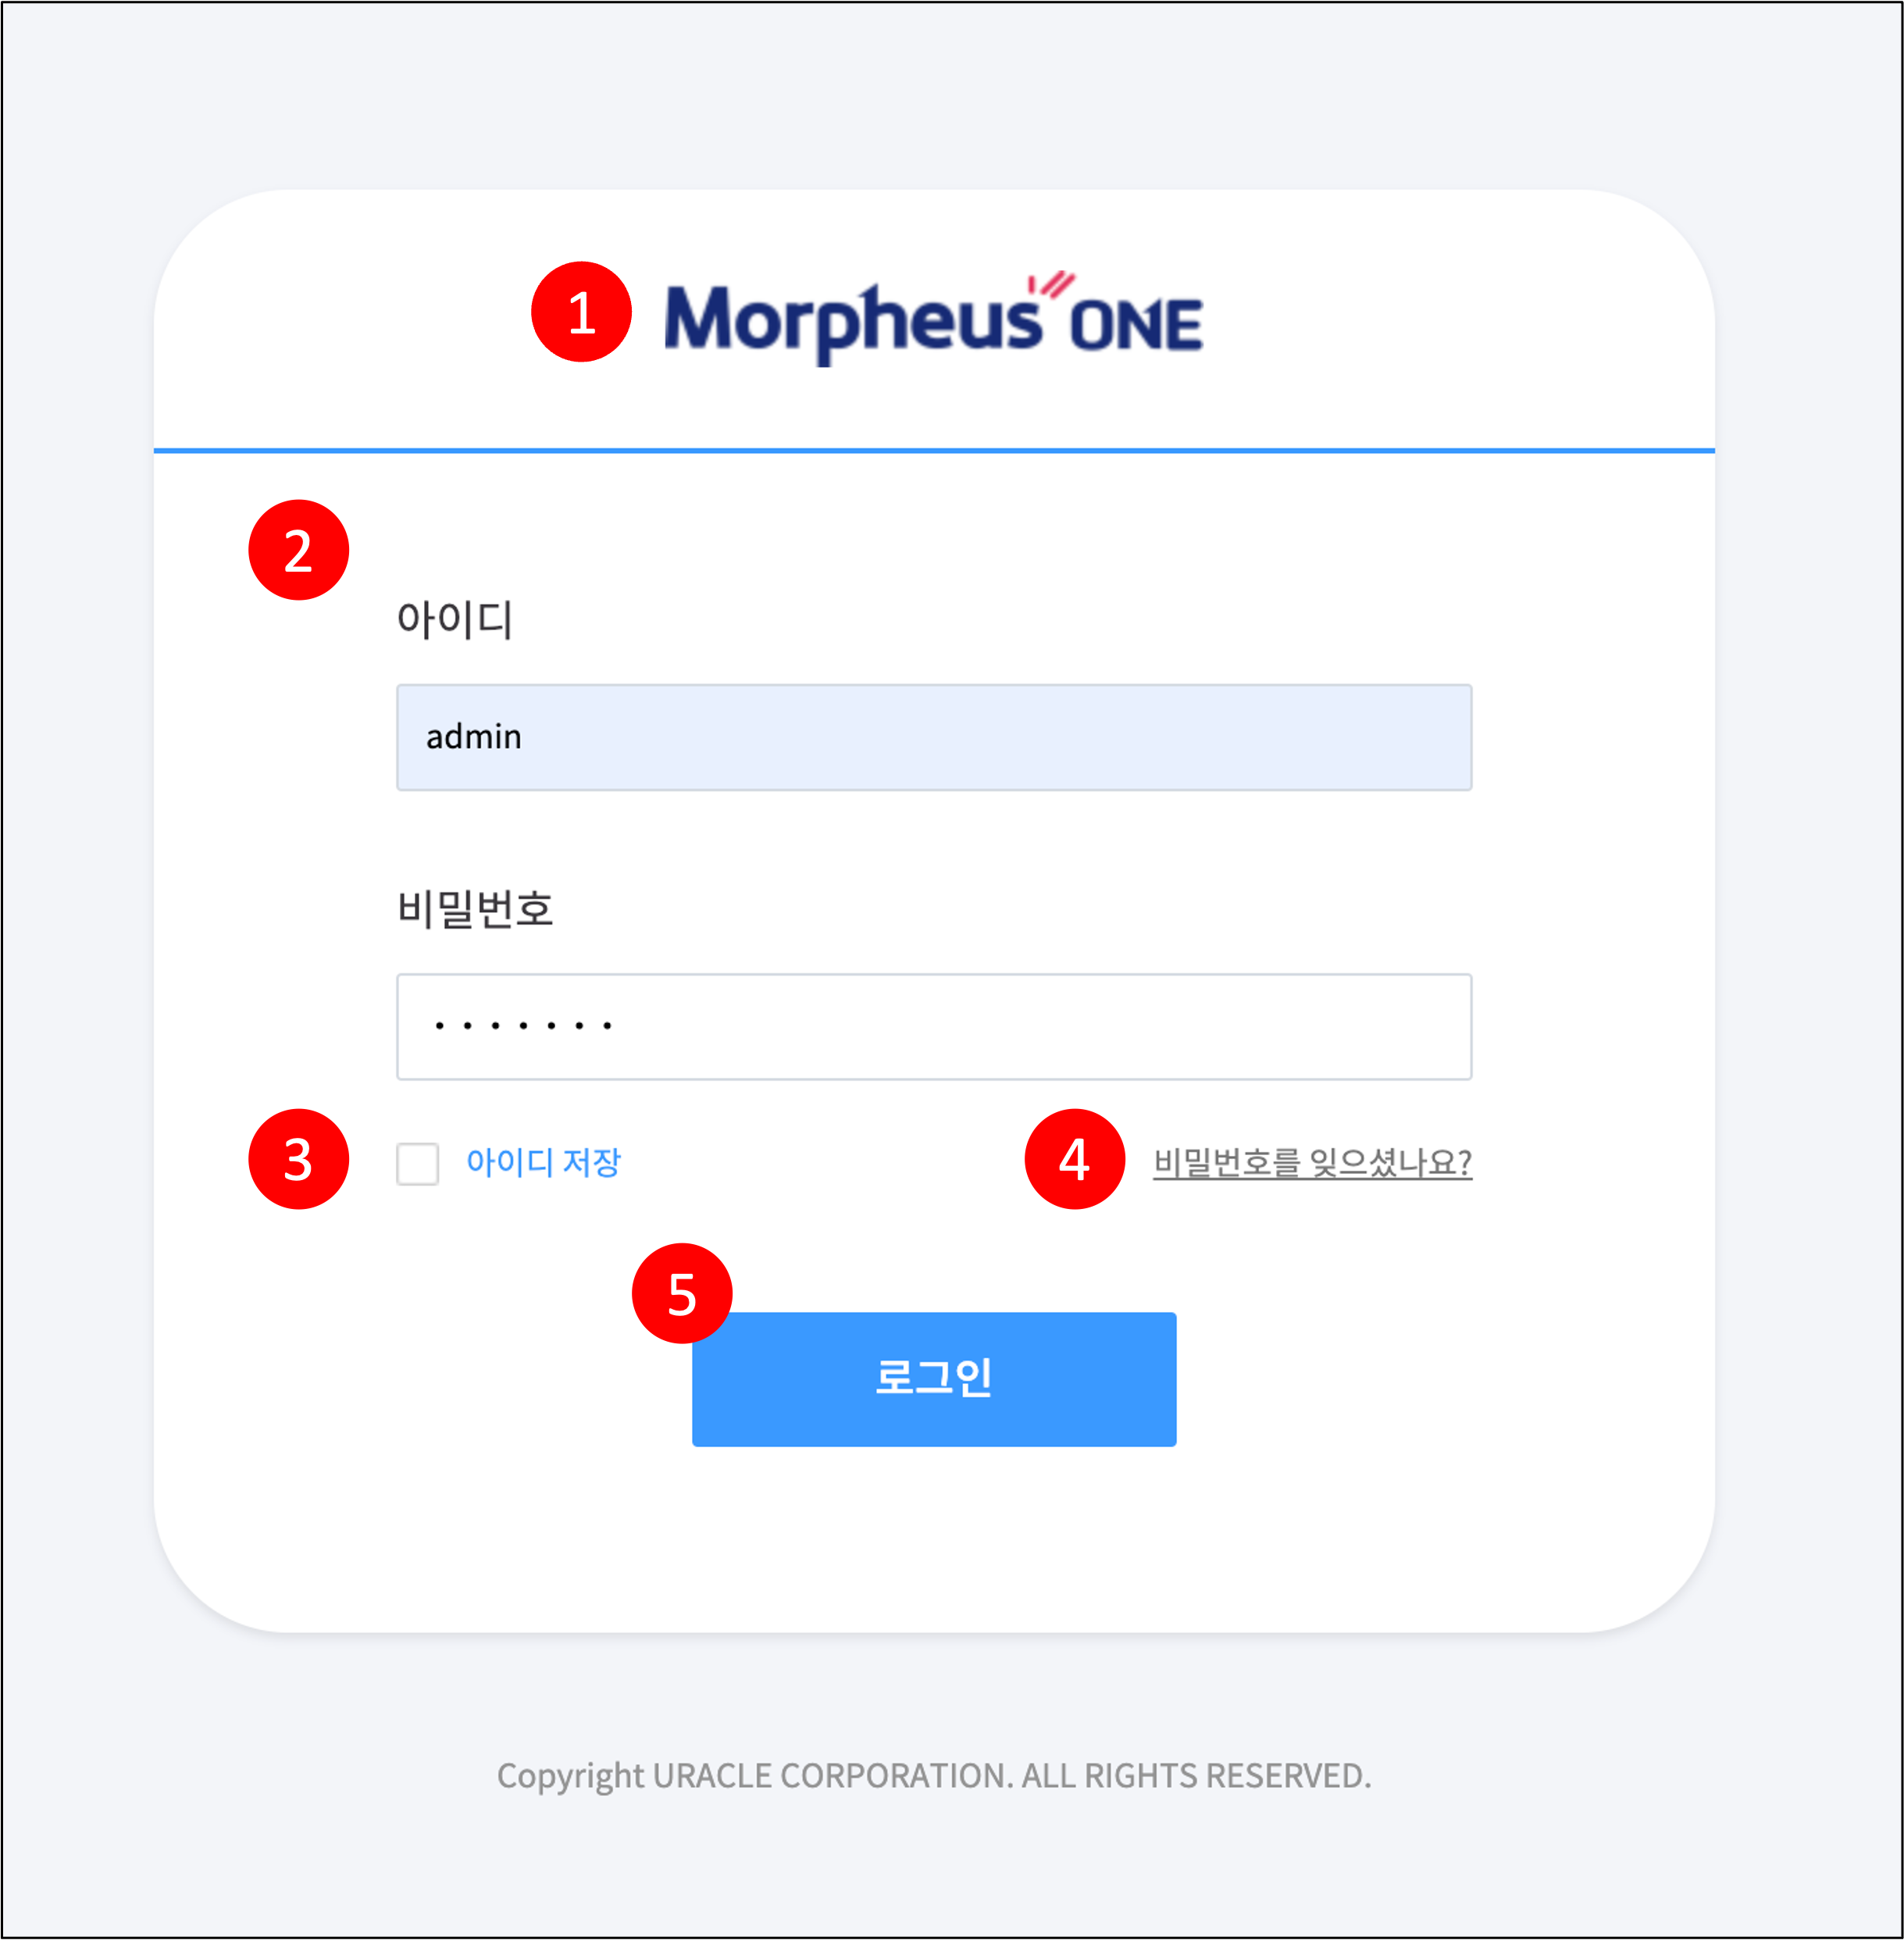
| 1 | Screen Overview | This is the login screen. Please enter your login information to access the Morpheus ONE page. |
| 2 | ID/Password | Enter the administrator ID and password. |
| 3 | Save ID | If checked and login is successful, the ID will be automatically entered from then on. |
| 4 | Change Password | Moves to the password change request screen. (Reference) |
| 5 | Login | Select to log in with the entered information. |
¶ 1.2 Change Password
- [Password Change Request]
| No. | Category | Description |
|---|---|---|
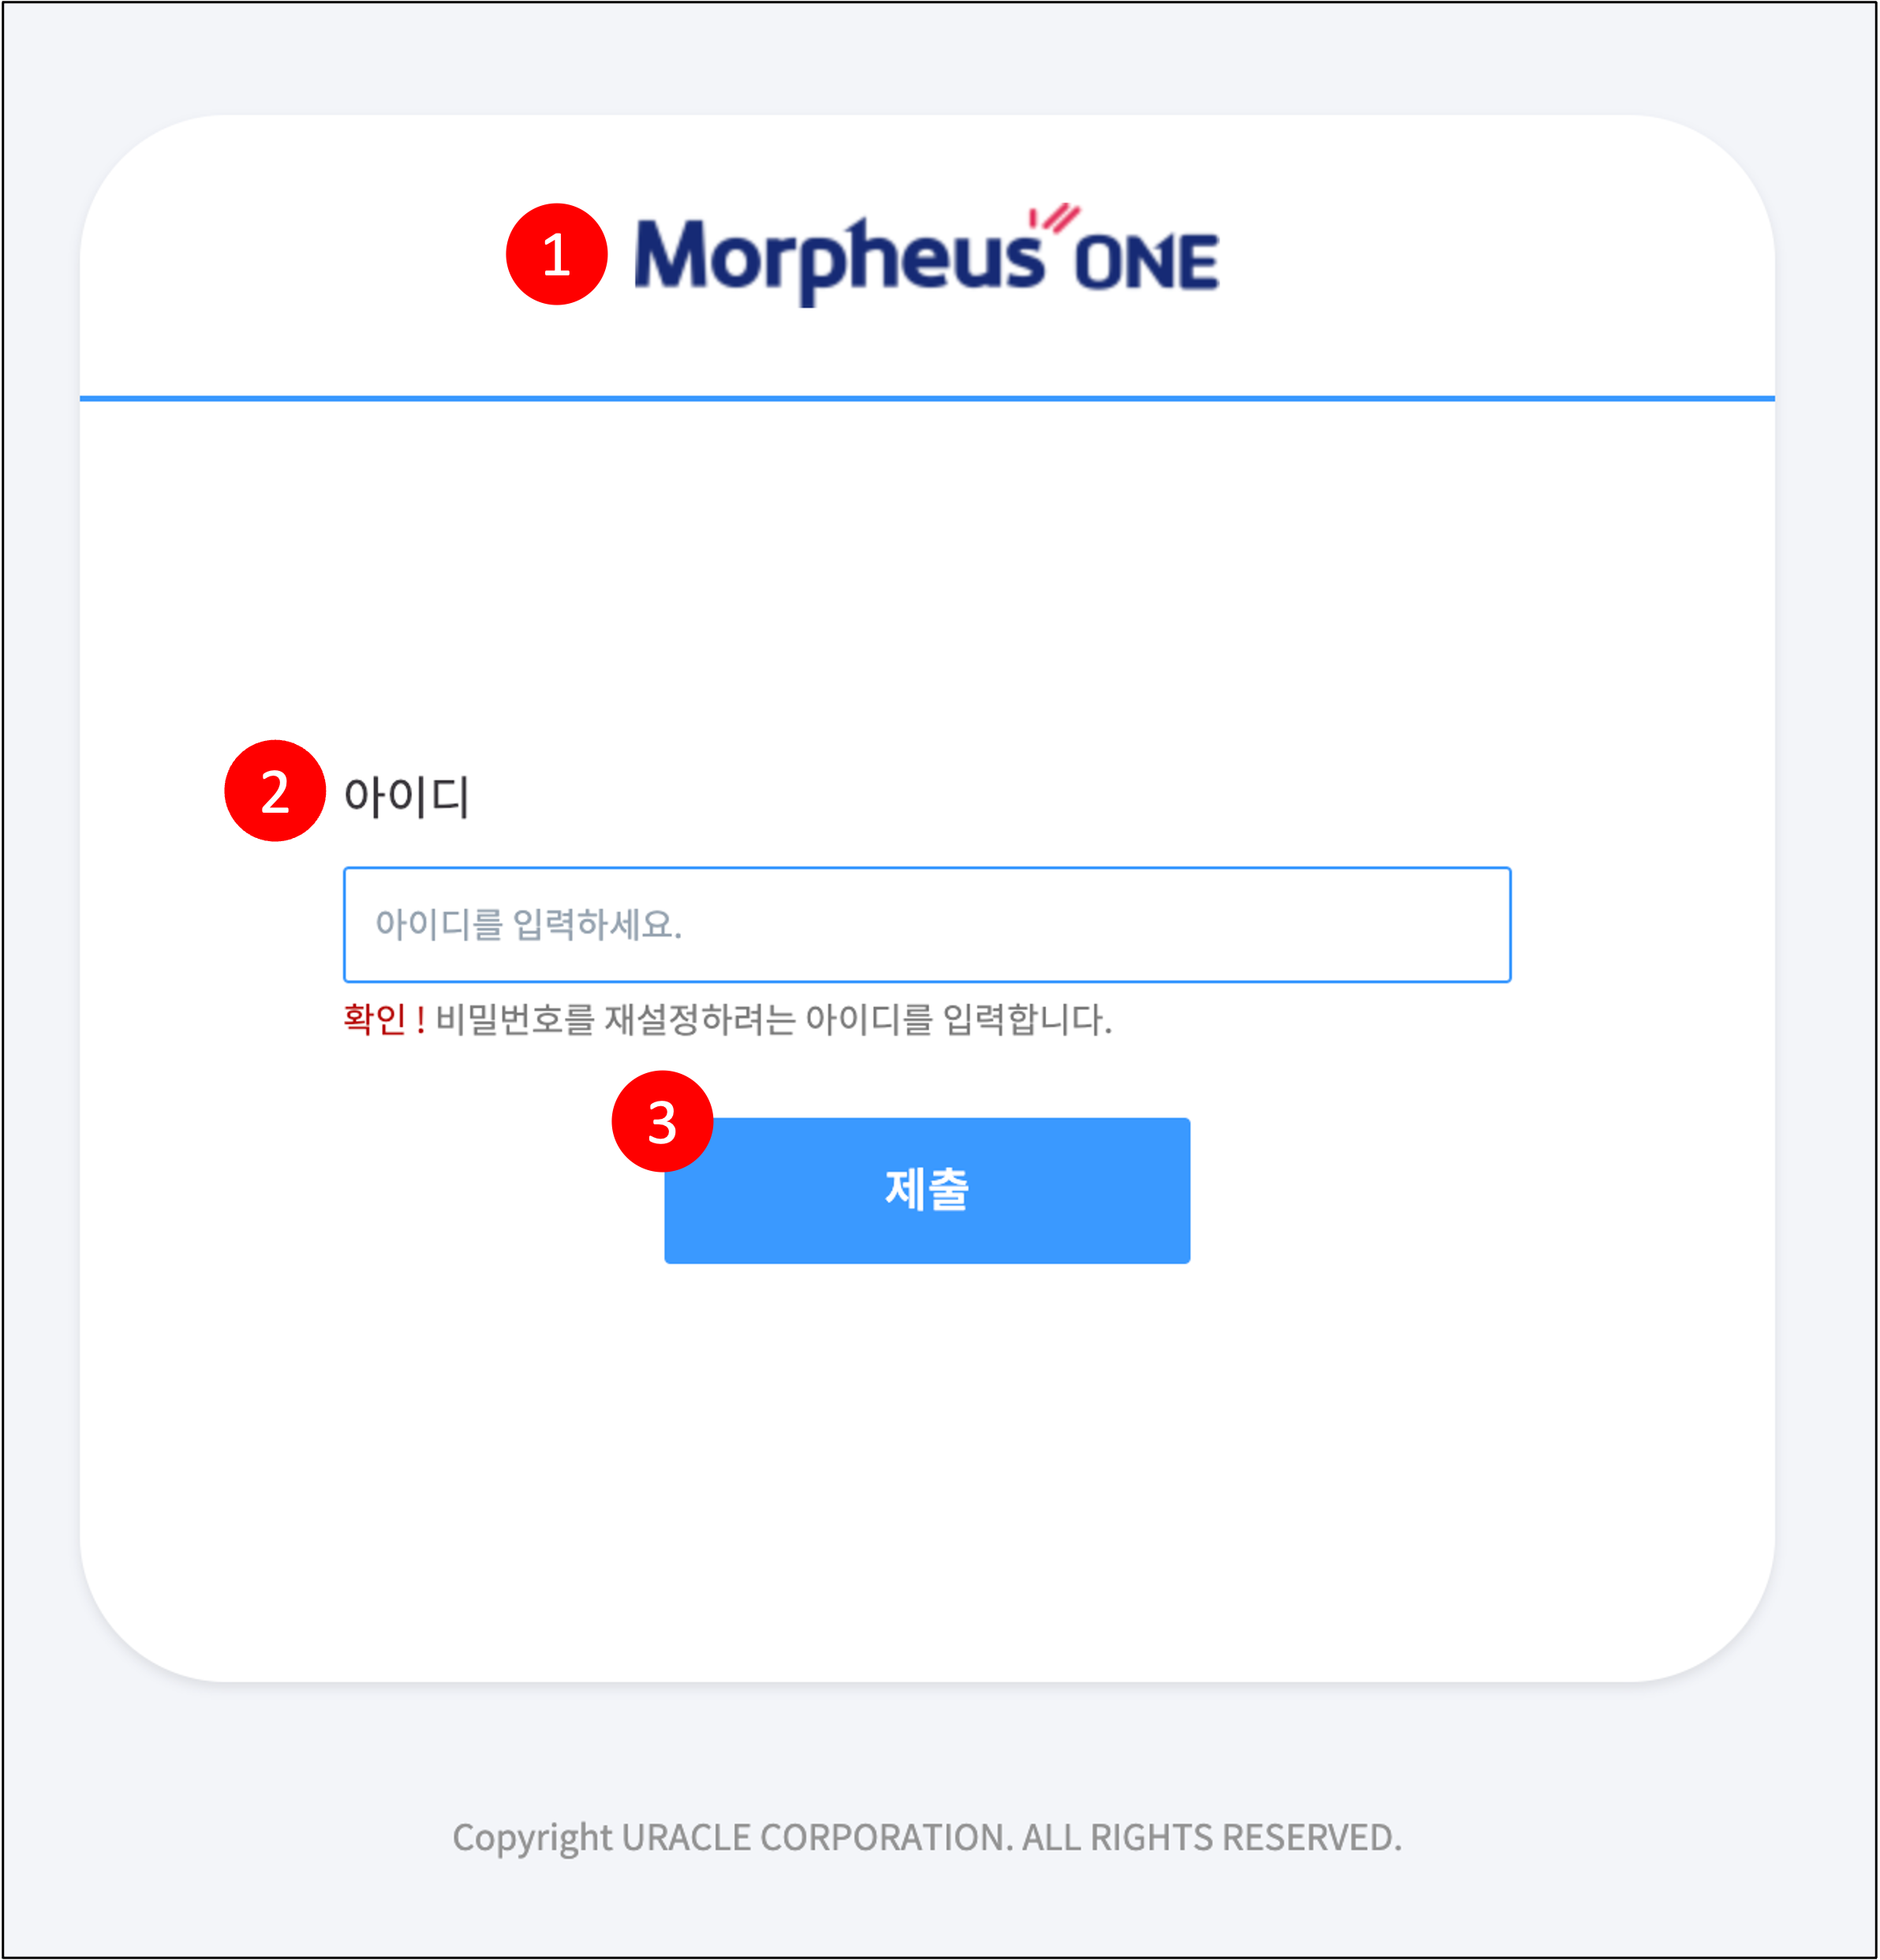
| 1 | Screen Overview | This screen is for resetting your password if you have forgotten it. |
| 2 | ID | Please enter the ID for which you need to change the password. |
| 3 | Submit | A link to change the password will be sent to the email of the entered account. (Caution) If you signed up with an invalid email, you cannot change your password. Please contact the administrator to change to a valid email address before proceeding. |
- [Change Password]
| No. | Category | Description |
|---|---|---|
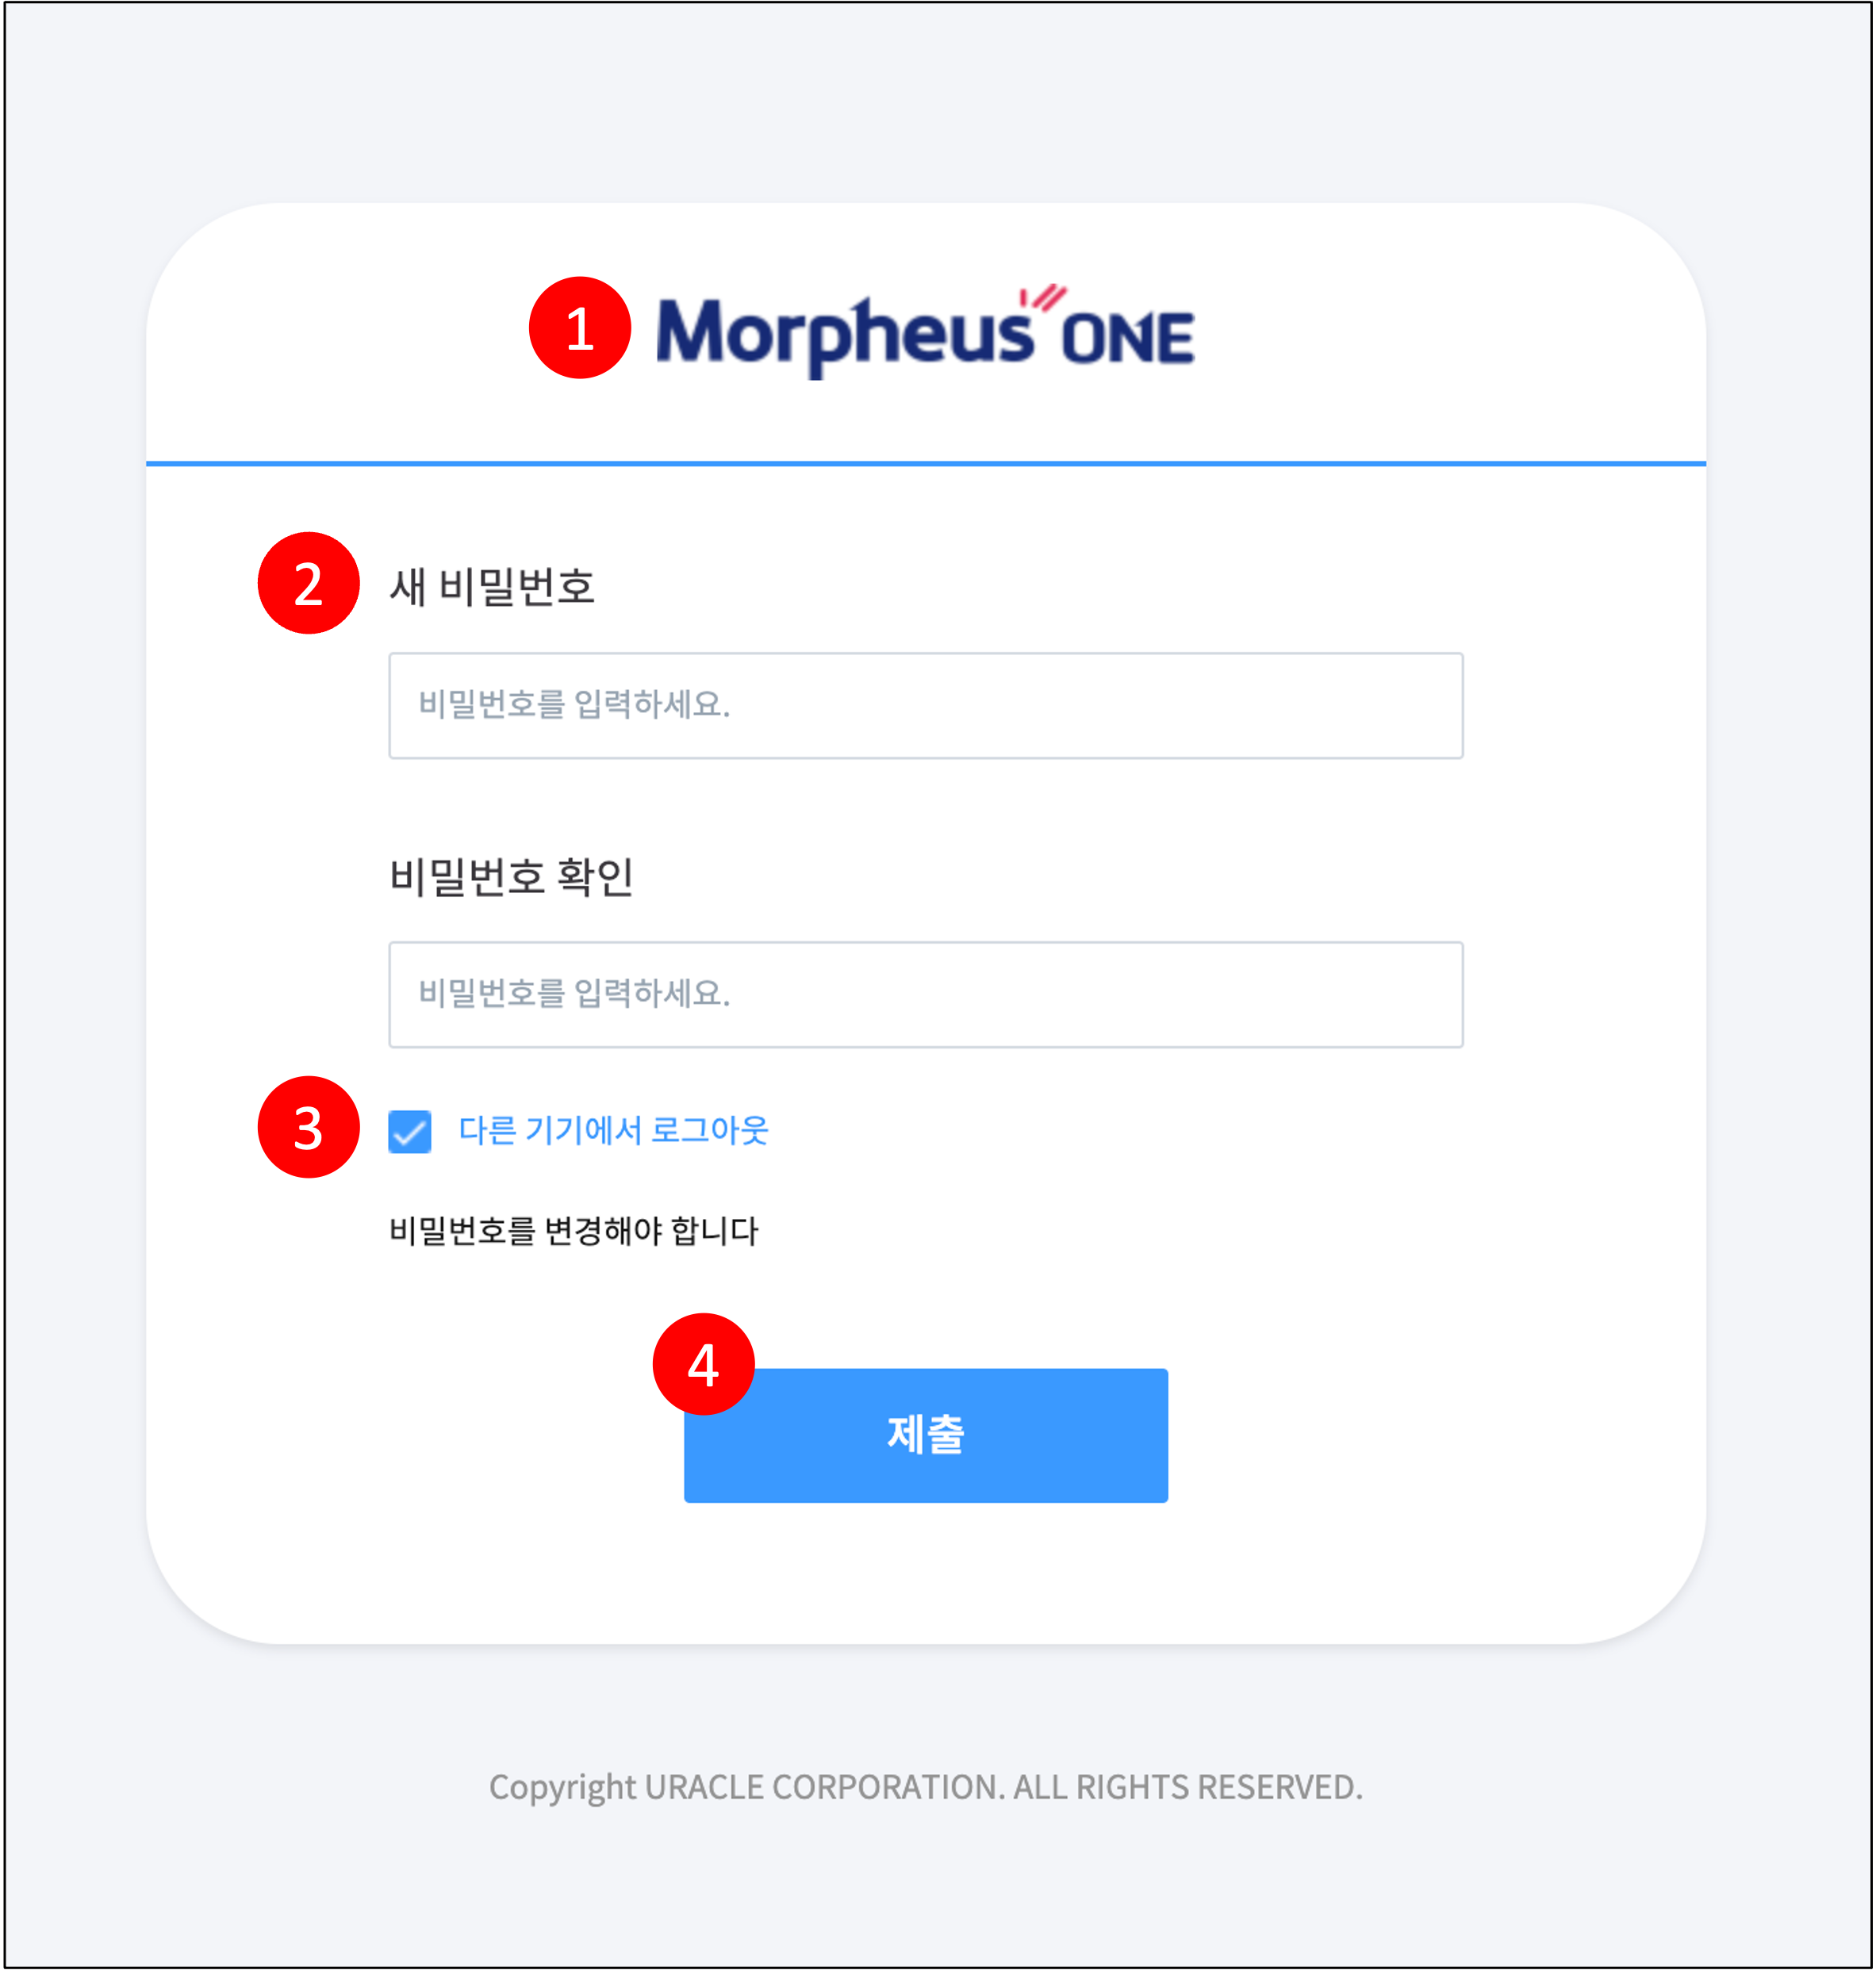
| 1 | Screen Overview | This is the screen for changing your password. This screen can be accessed via a link sent to the user's email in the following two cases: (1) If the user forgets their password, request a password change via email from the login screen. (2) If the administrator resets the user's password, request a password reset from the user management screen. |
| 2 | New Password / Confirm Password | Enter the password you want to change to. |
| 3 | Log out from other devices | If checked, upon successful password change, you will be logged out from other logged-in devices. |
| 4 | Submit | The password will be changed with the information you entered. (Caution) If the "New Password" and "Confirm Password" values do not match, the password cannot be changed. |
¶ 2. My Info

| No. | Category | Description |
|---|---|---|
| 1 | My Info | Navigates to the screen where you can check your information. |
| 2 | Logout | Logs out the currently logged-in account. |
- [My Info]
| No. | Category | Description |
|---|---|---|
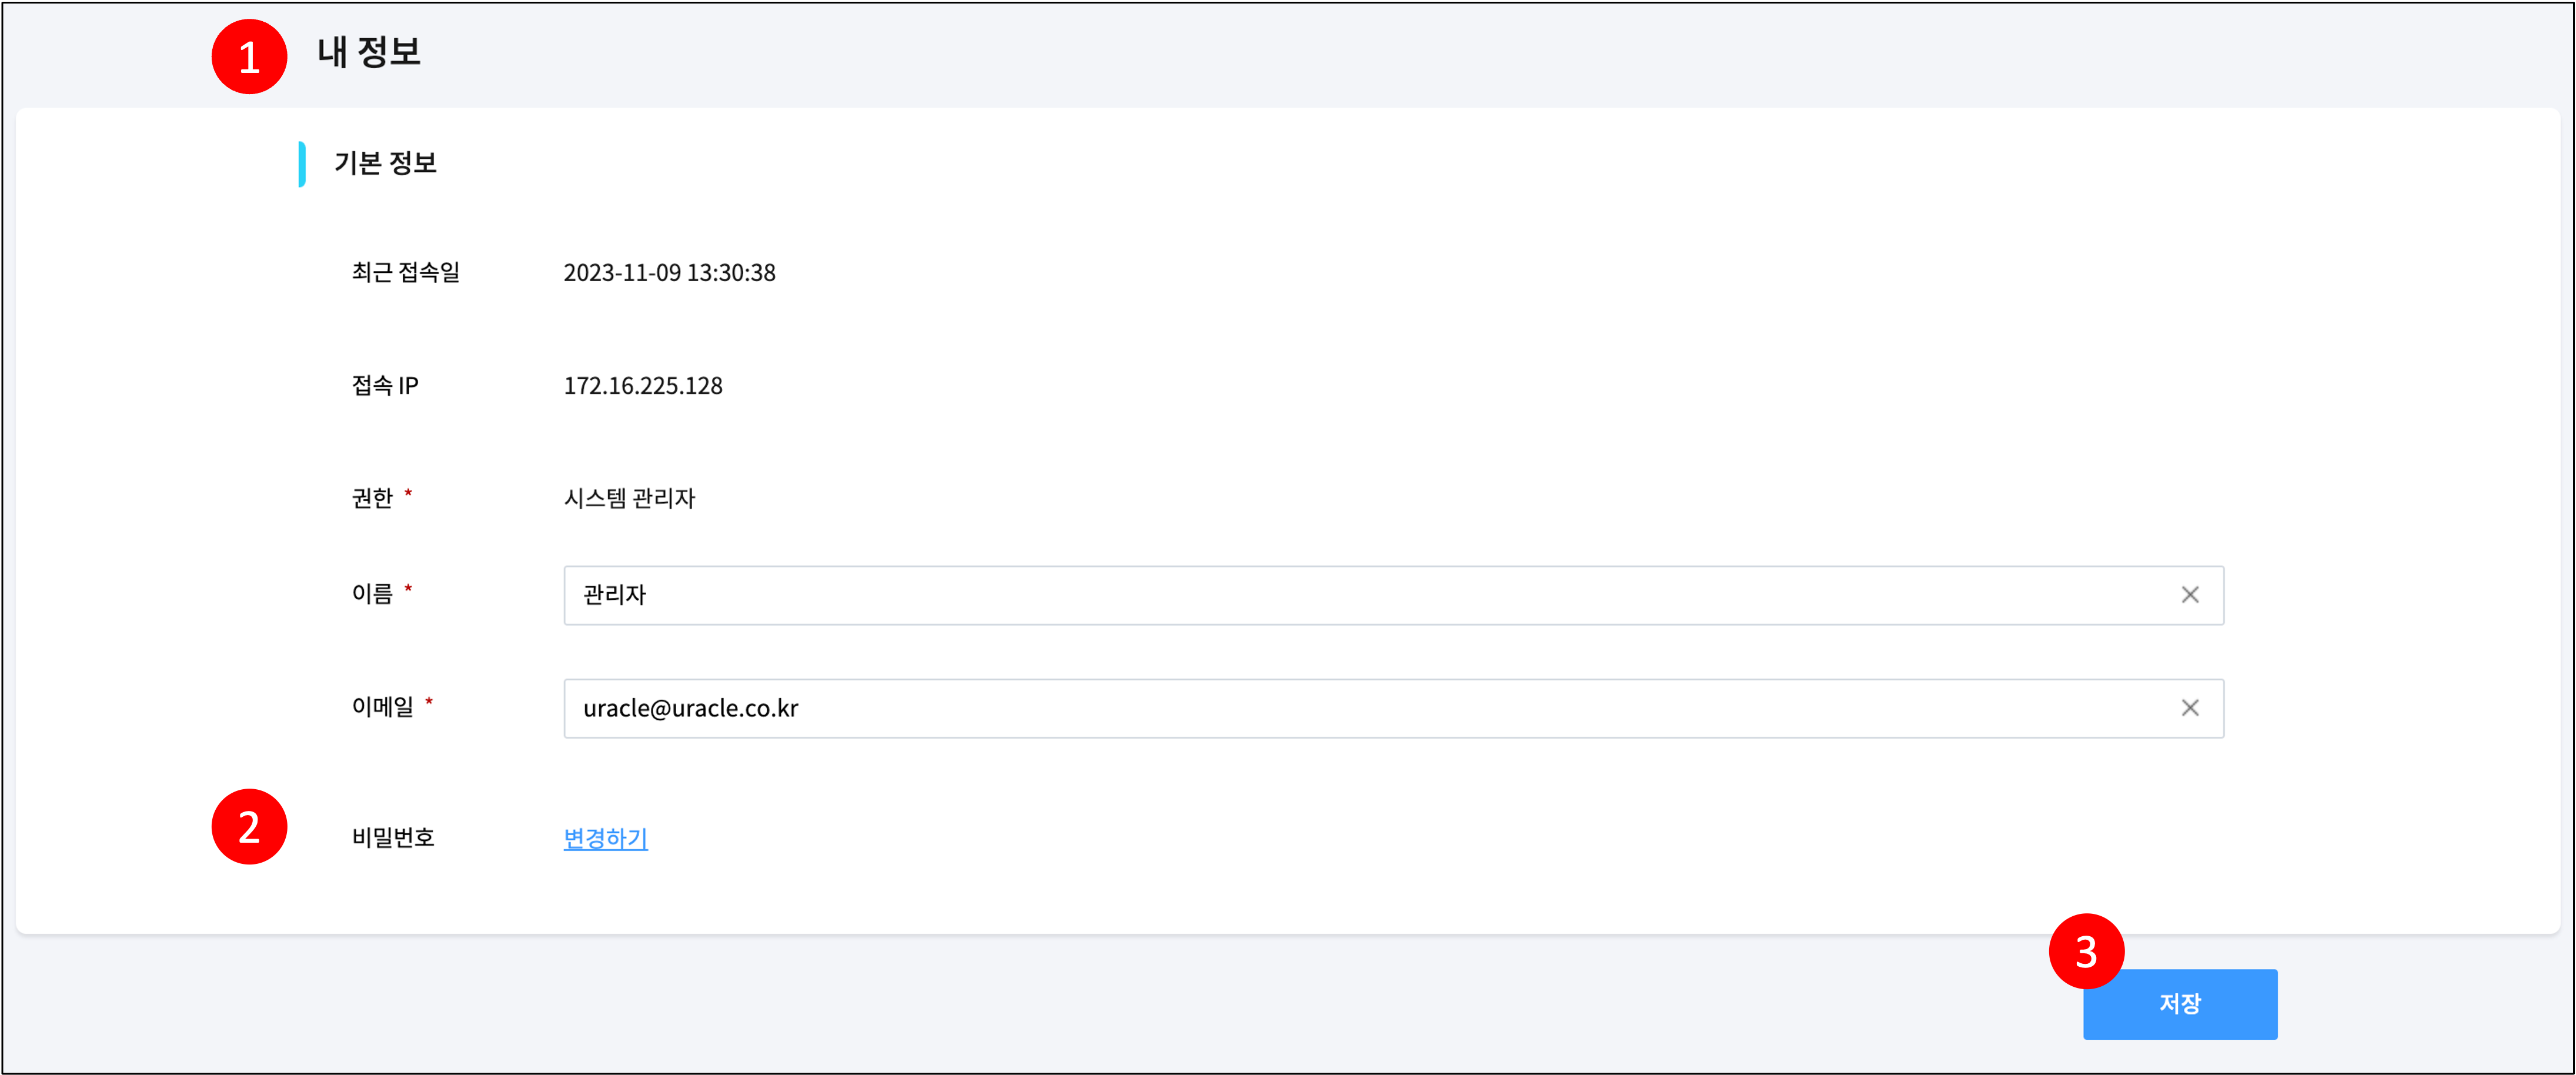
| 1 | Screen Overview | This screen allows you to view your basic information or change your password. Basic information is as follows: (1) Last Login Date: Date of the most recent login (2) Access IP: IP information of the user who last logged in (3) Authority: Authority of the currently logged-in user (4) Name: Name of the currently logged-in user (5) Email: Email information of the currently logged-in user |
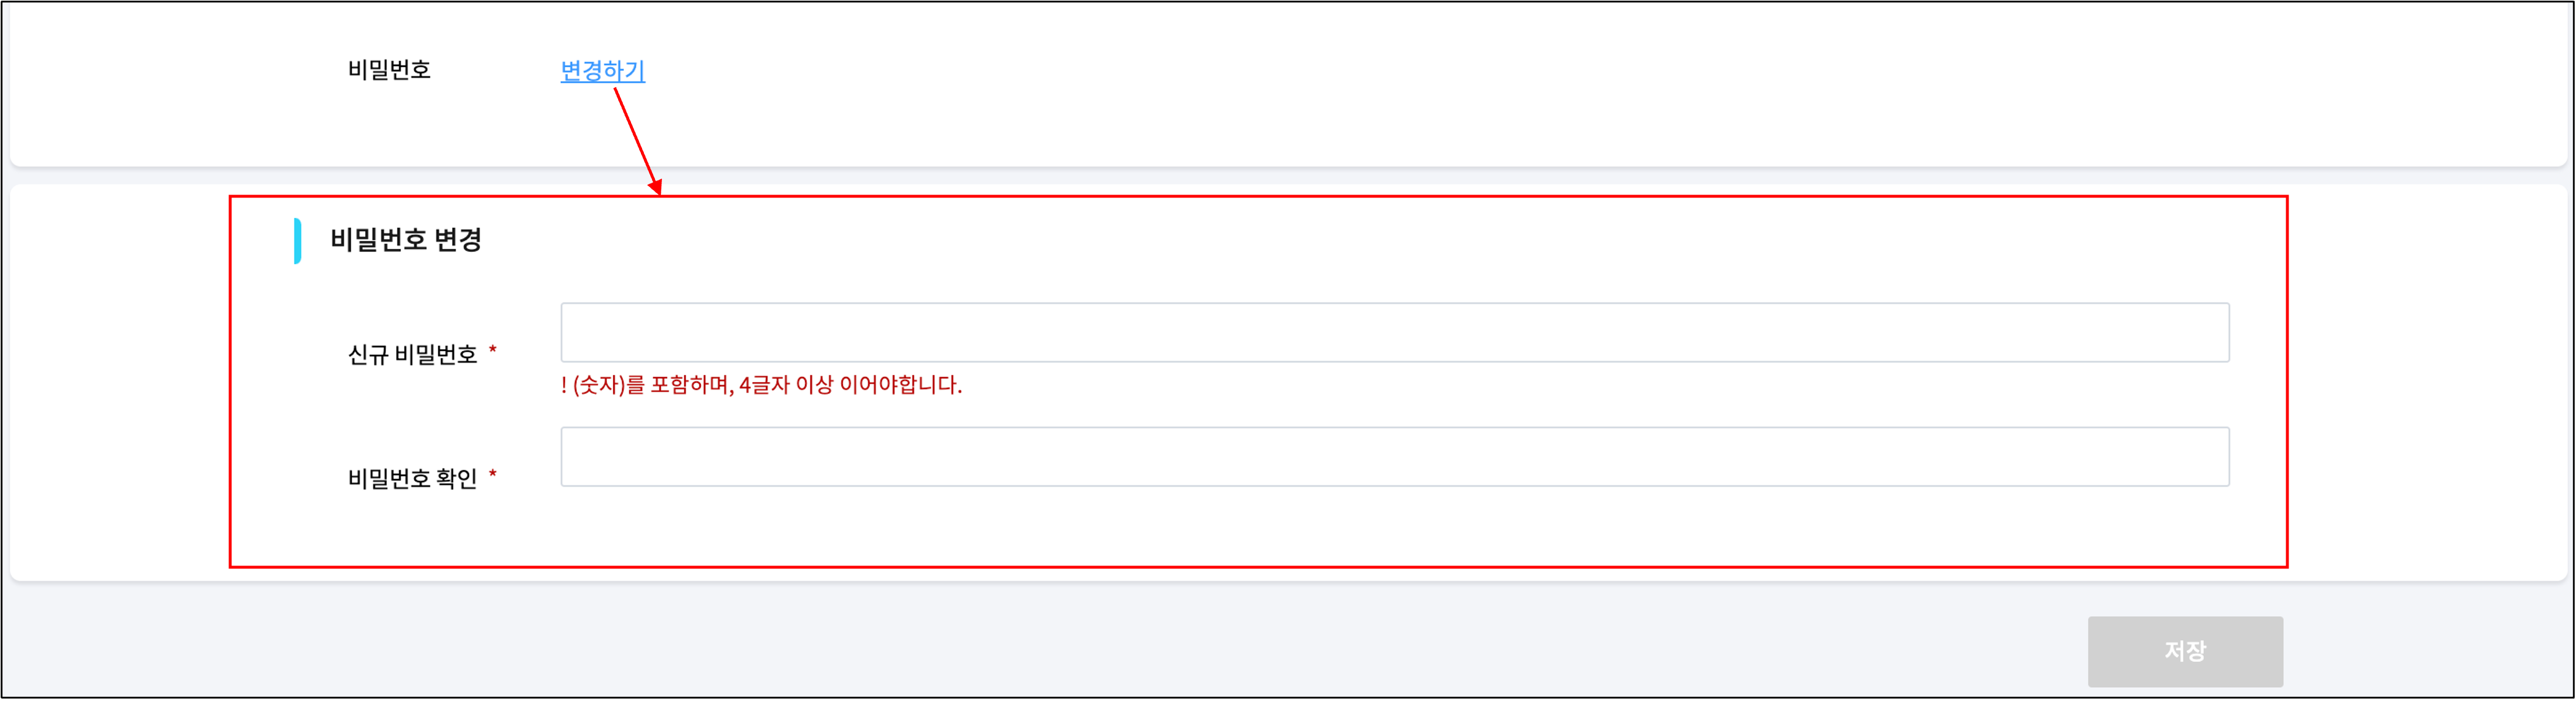
| 2 | Password | When selected, a block for password change appears as shown in the image below. The password to be changed must comply with the password rules, which can be set on the Settings > Password Policy Management page. |
| 3 | Save | Saves the entered information. |
- [Change Password in My Info]
¶ 3. Workspace
- [Workspace]
| No. | Category | Description |
|---|---|---|
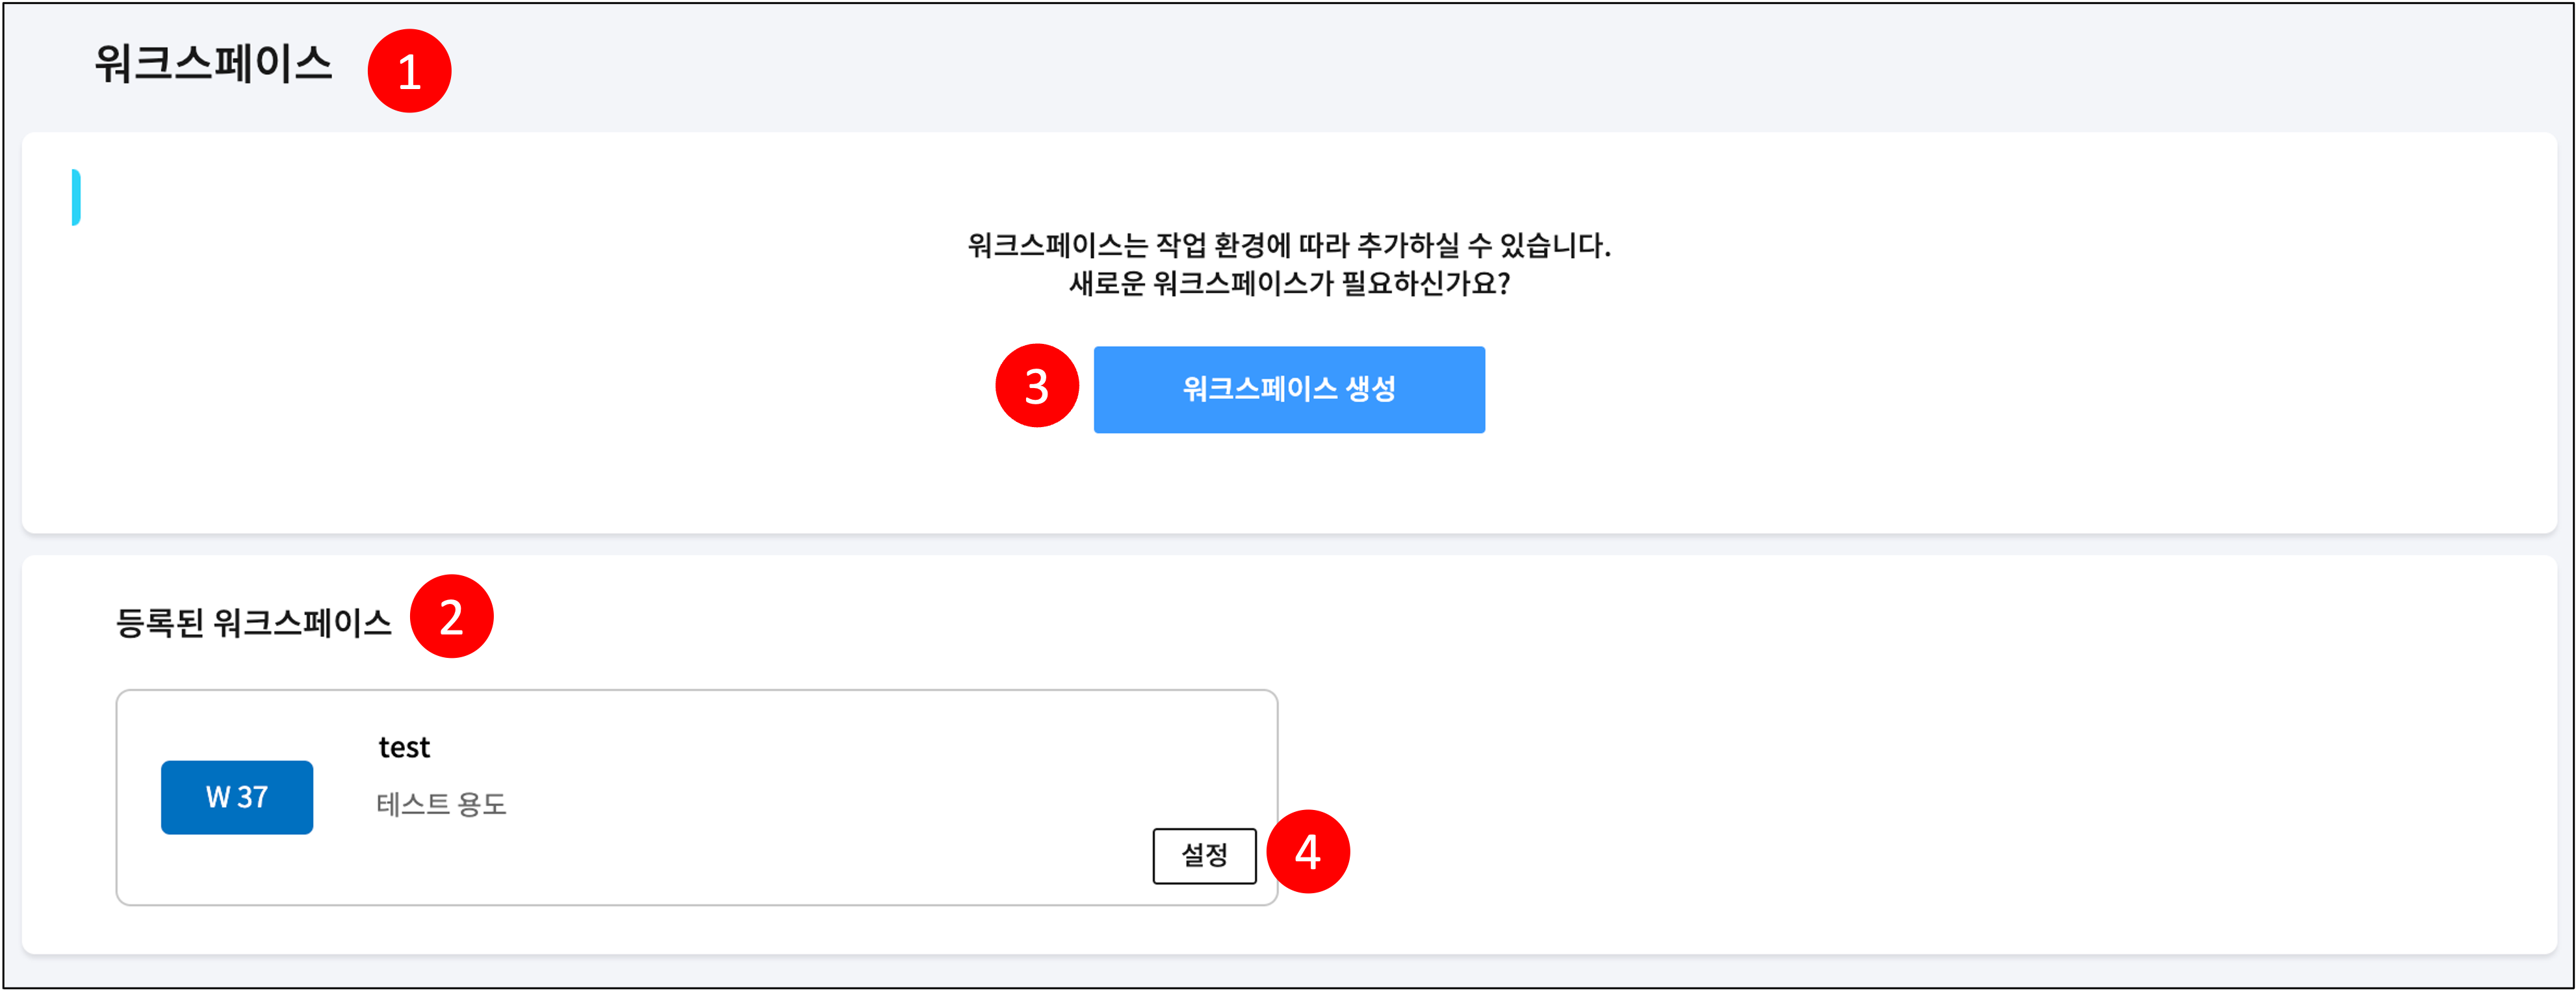
| 1 | Screen Overview | Screen to view and manage the workspace list. A workspace is a work area for managing projects, development environments, devices, etc. Permissions for menus within the workspace follow Team Member Permissions. |
| 2 | Registered Workspaces | View the list of workspaces registered so far. |
| 3 | Create Workspace | A pop-up window for registering a workspace appears. (Reference) |
| 4 | Settings | A pop-up window for managing the workspace appears. (Reference) |
¶ 3.1 Register Workspace
| No. | Category | Description |
|---|---|---|
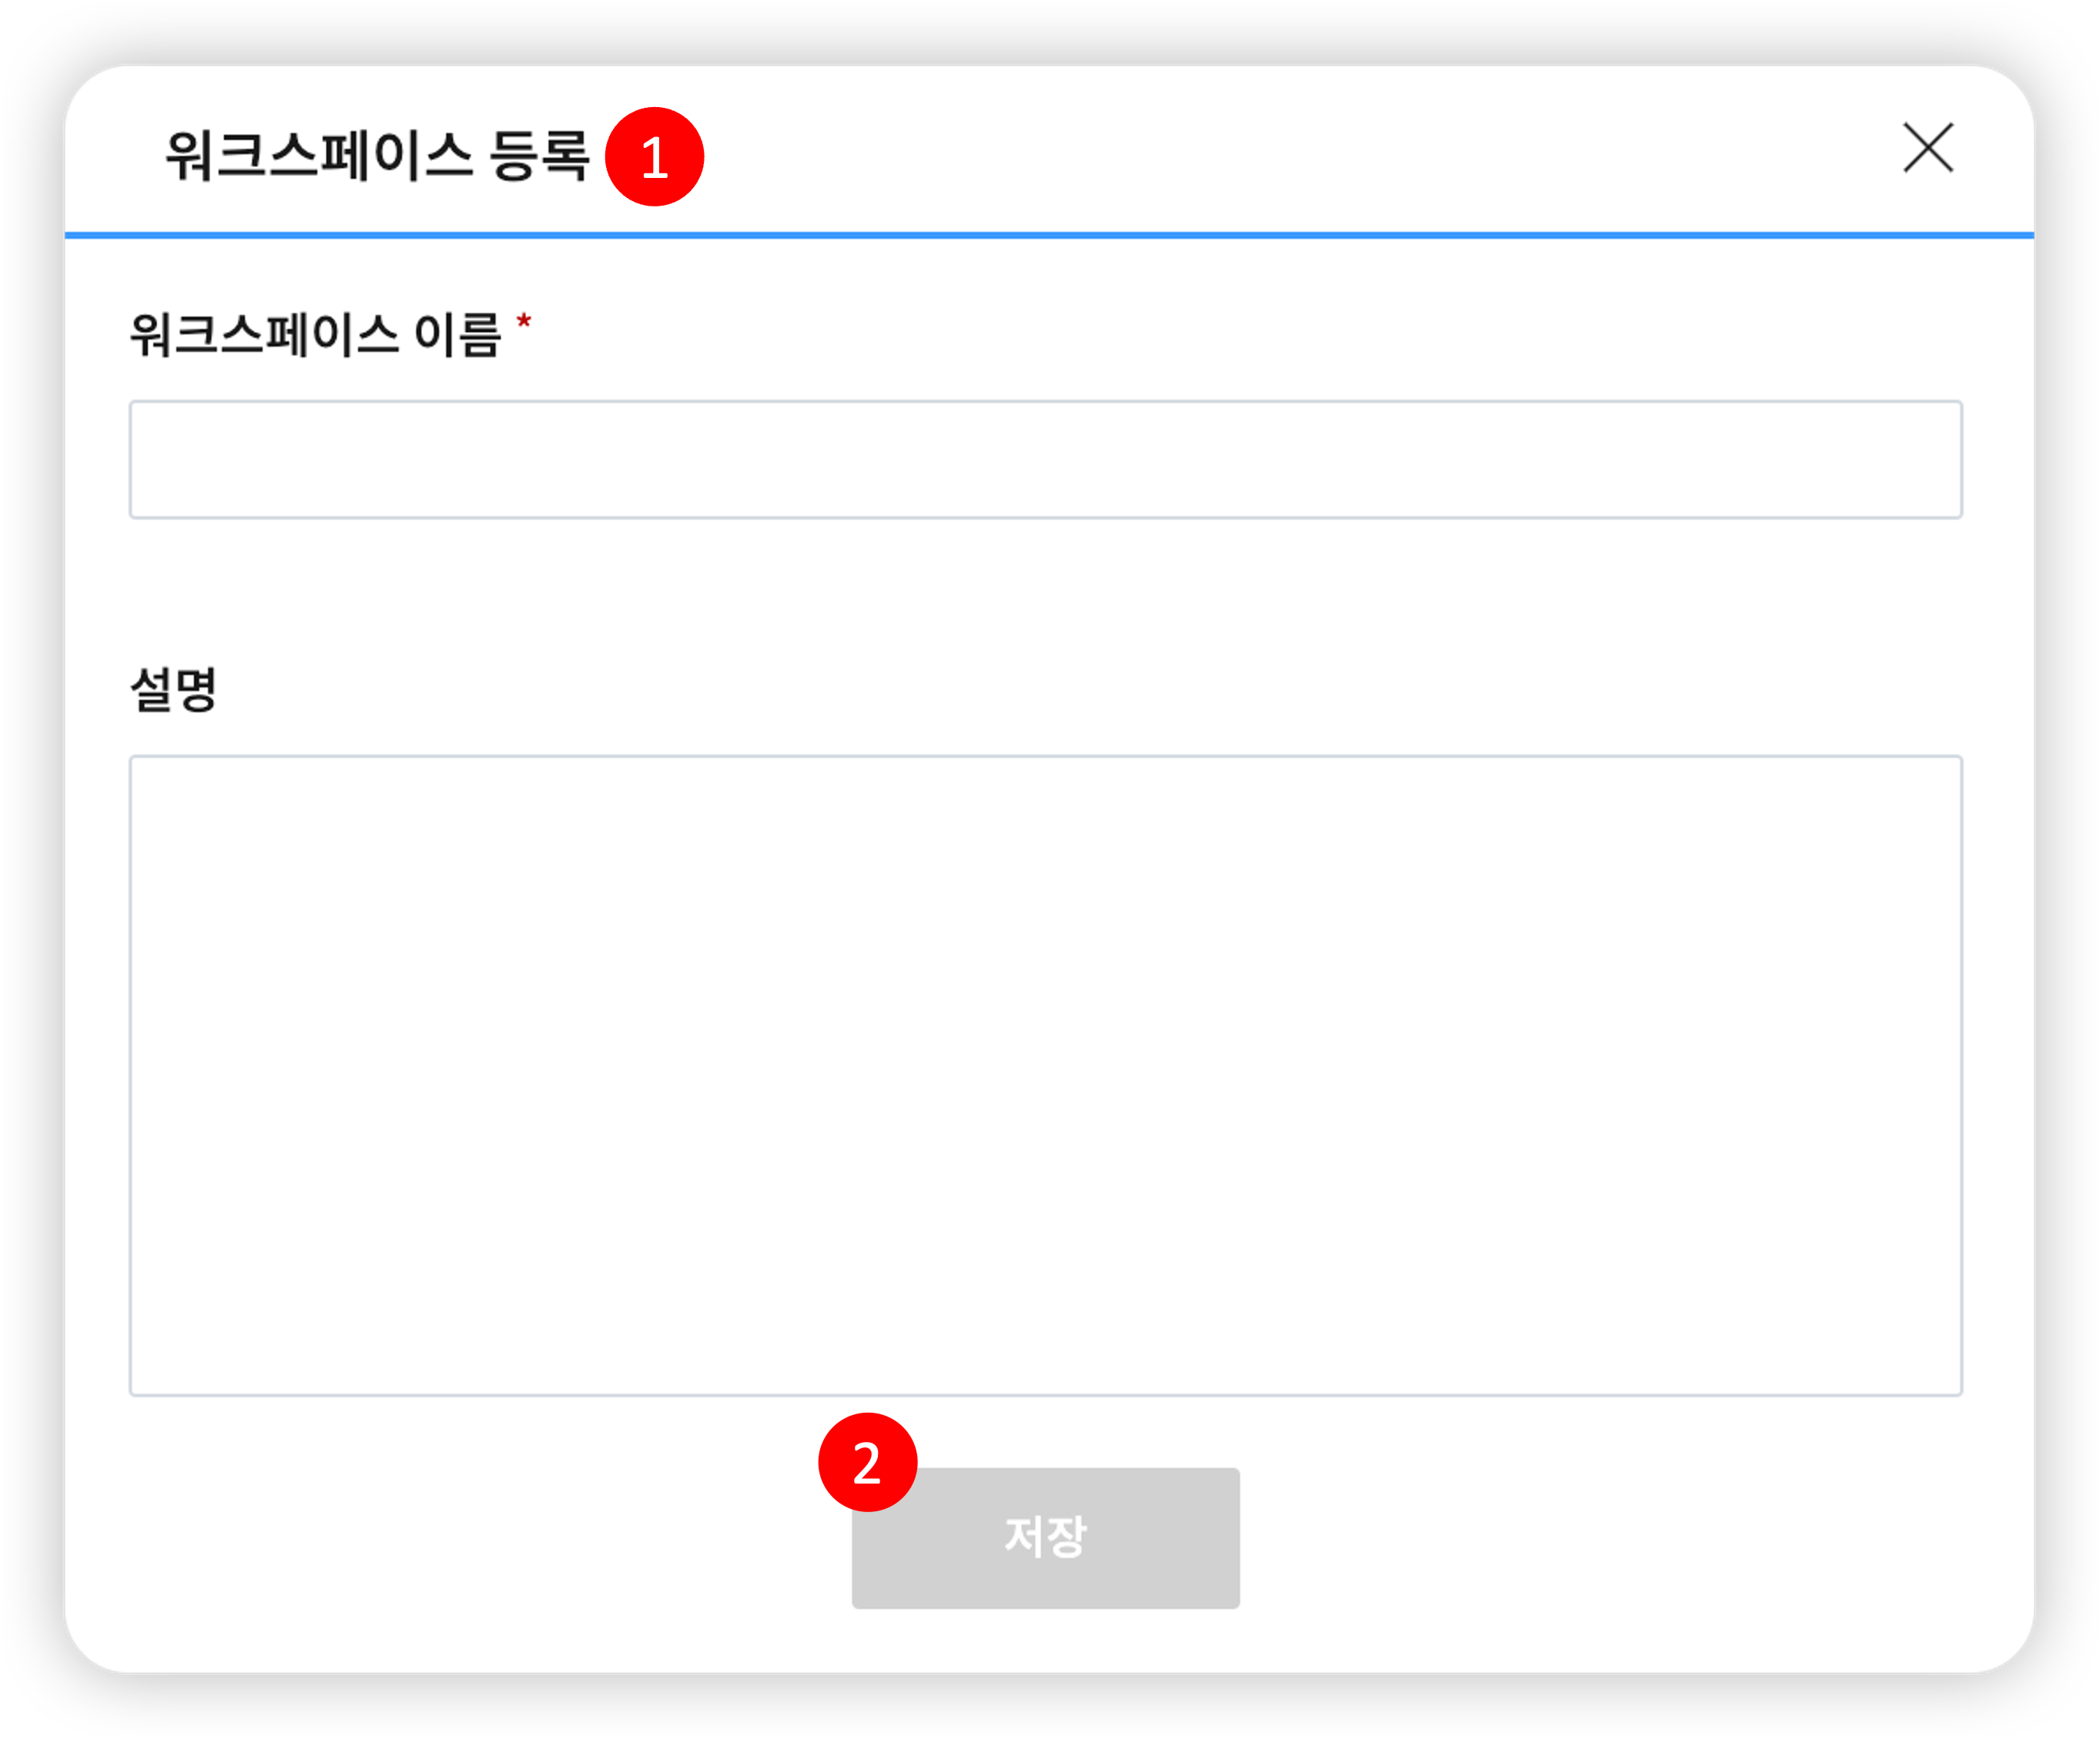
| 1 | Screen Overview | This is a pop-up window for registering a workspace. Please enter the workspace name and description. |
| 2 | Save | The workspace is created with the information you entered. |
¶ 3.2 Workspace Details
| No. | Category | Description |
|---|---|---|
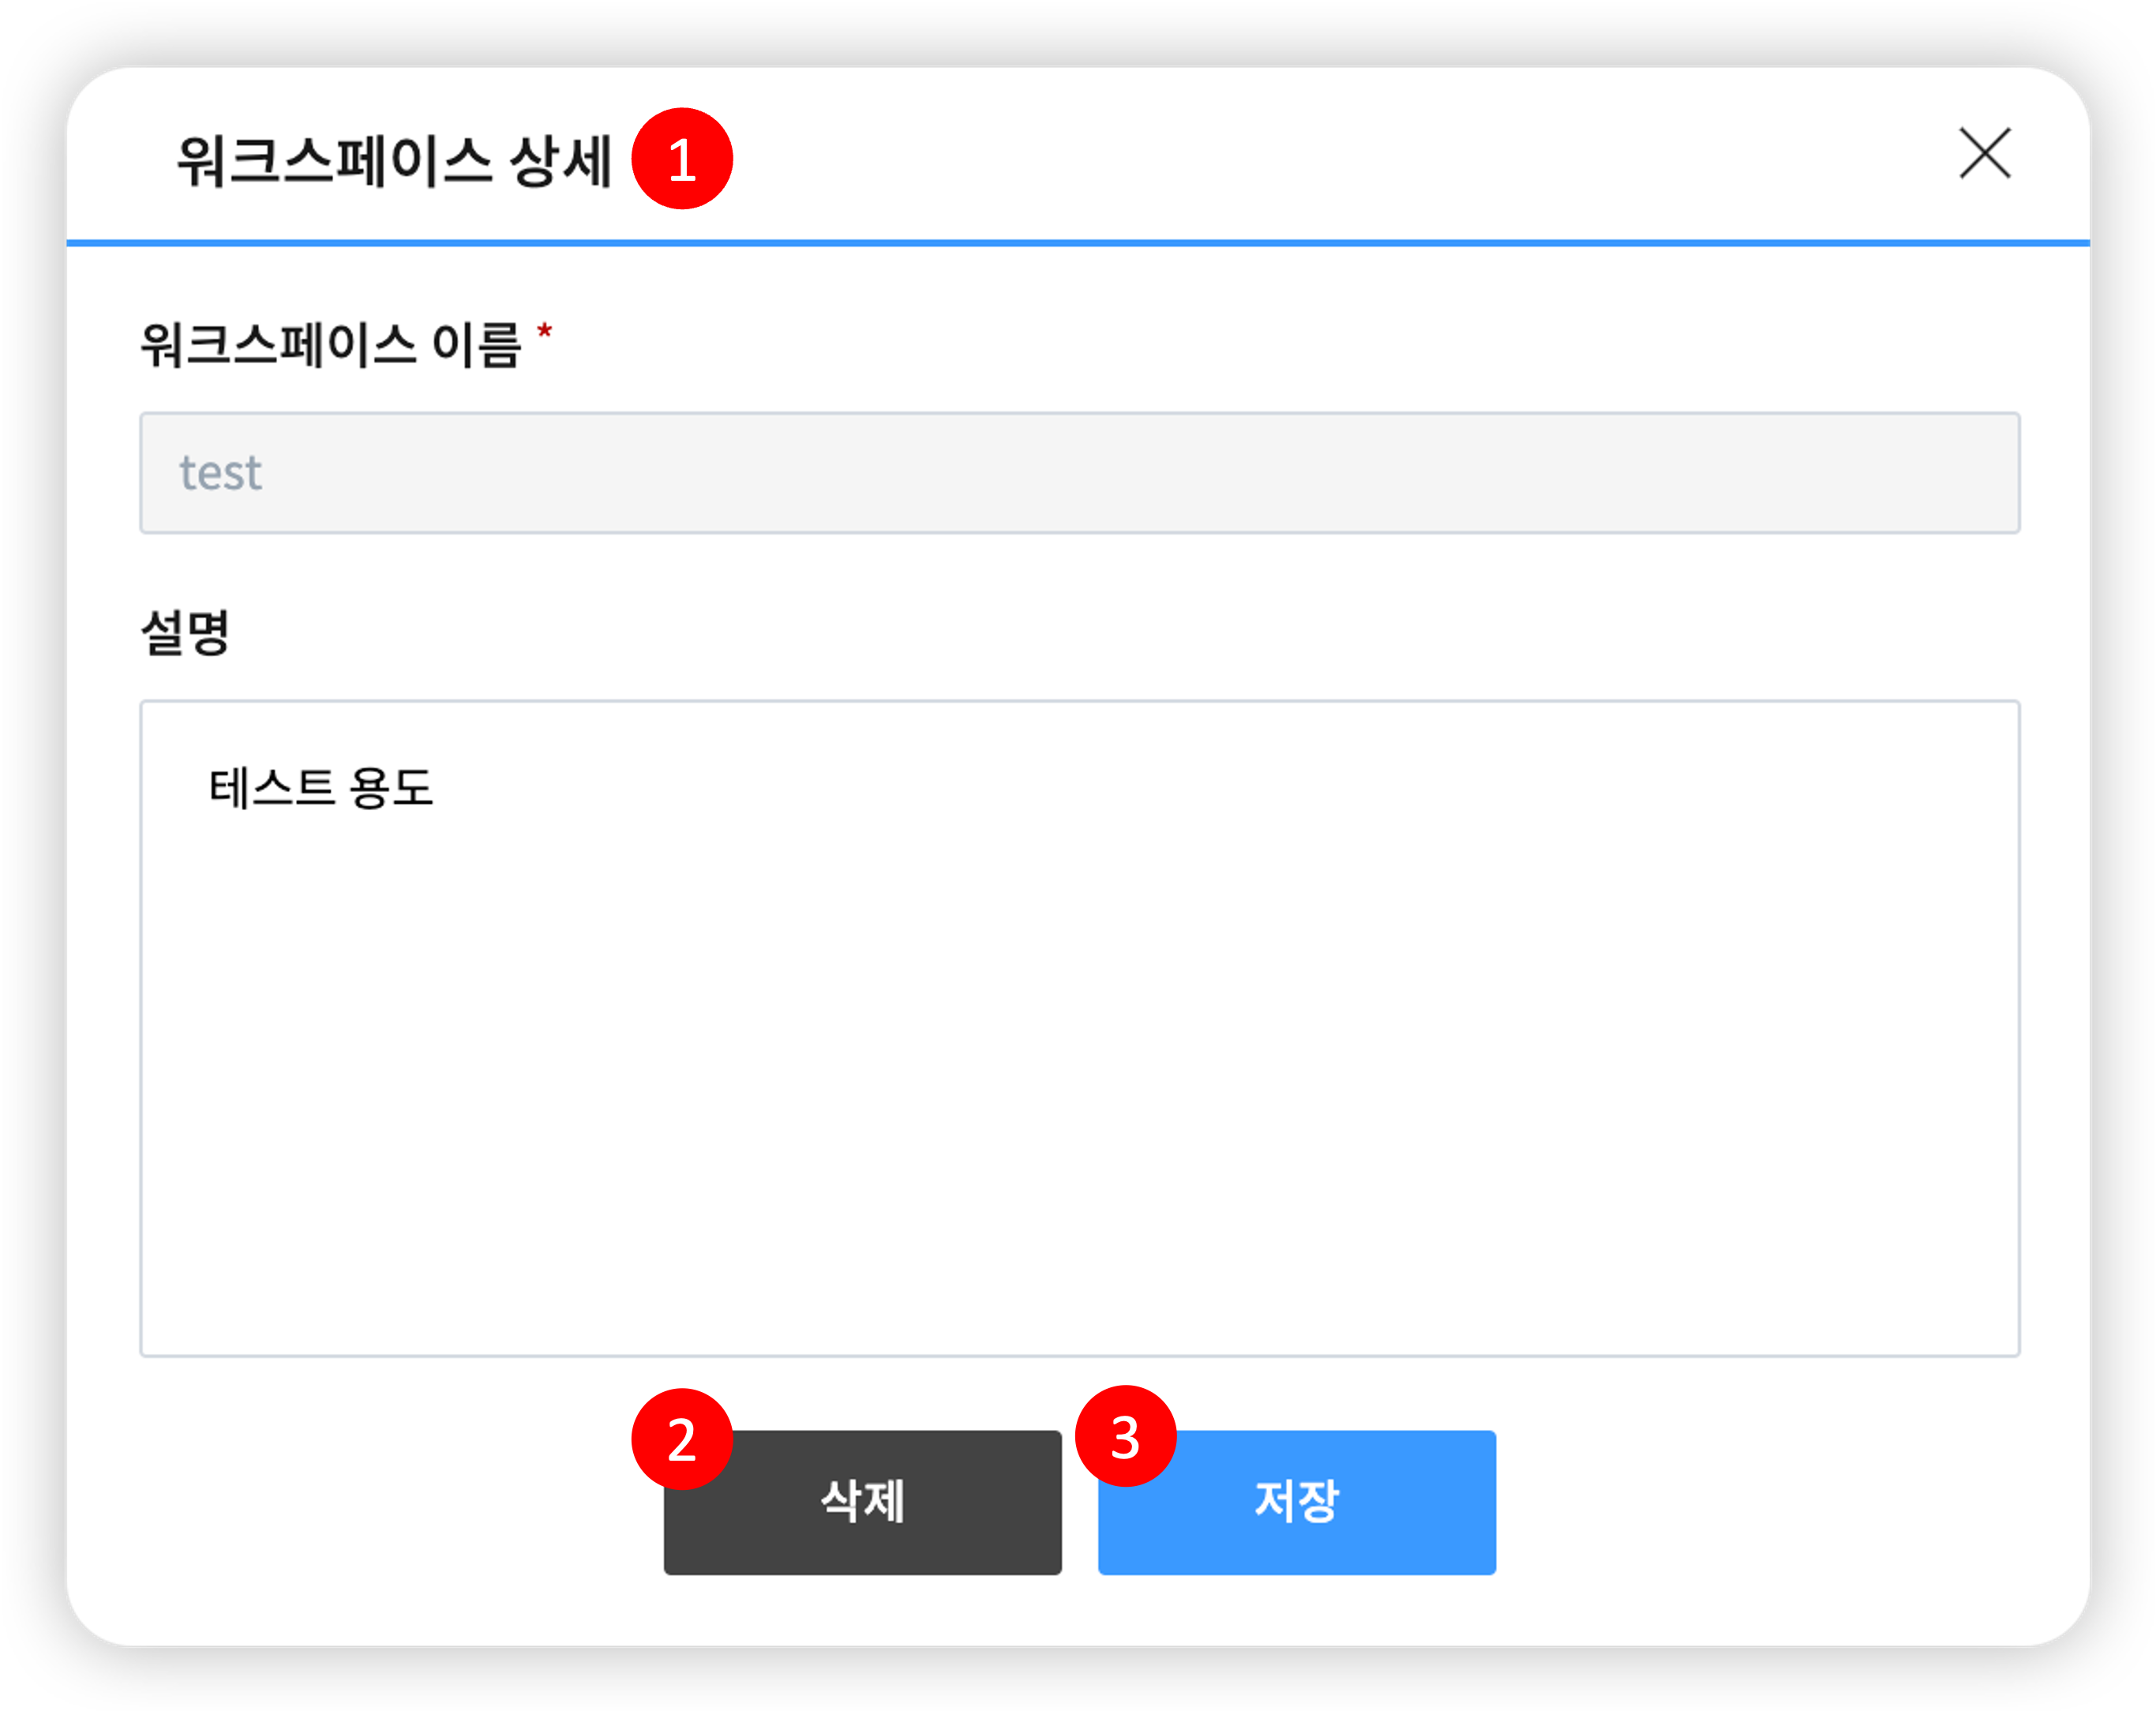
| 1 | Screen Overview | This pop-up window allows you to view, modify, and delete workspace details. |
| 2 | Delete | The workspace is deleted. (However, deletion is not possible if projects remain in the workspace.) When a workspace is deleted, internal resources (development environment, licenses) are automatically deleted. |
| 2 | Save | The workspace is changed with the information you entered. |
¶ 4. Project
| No. | Category | Description |
|---|---|---|
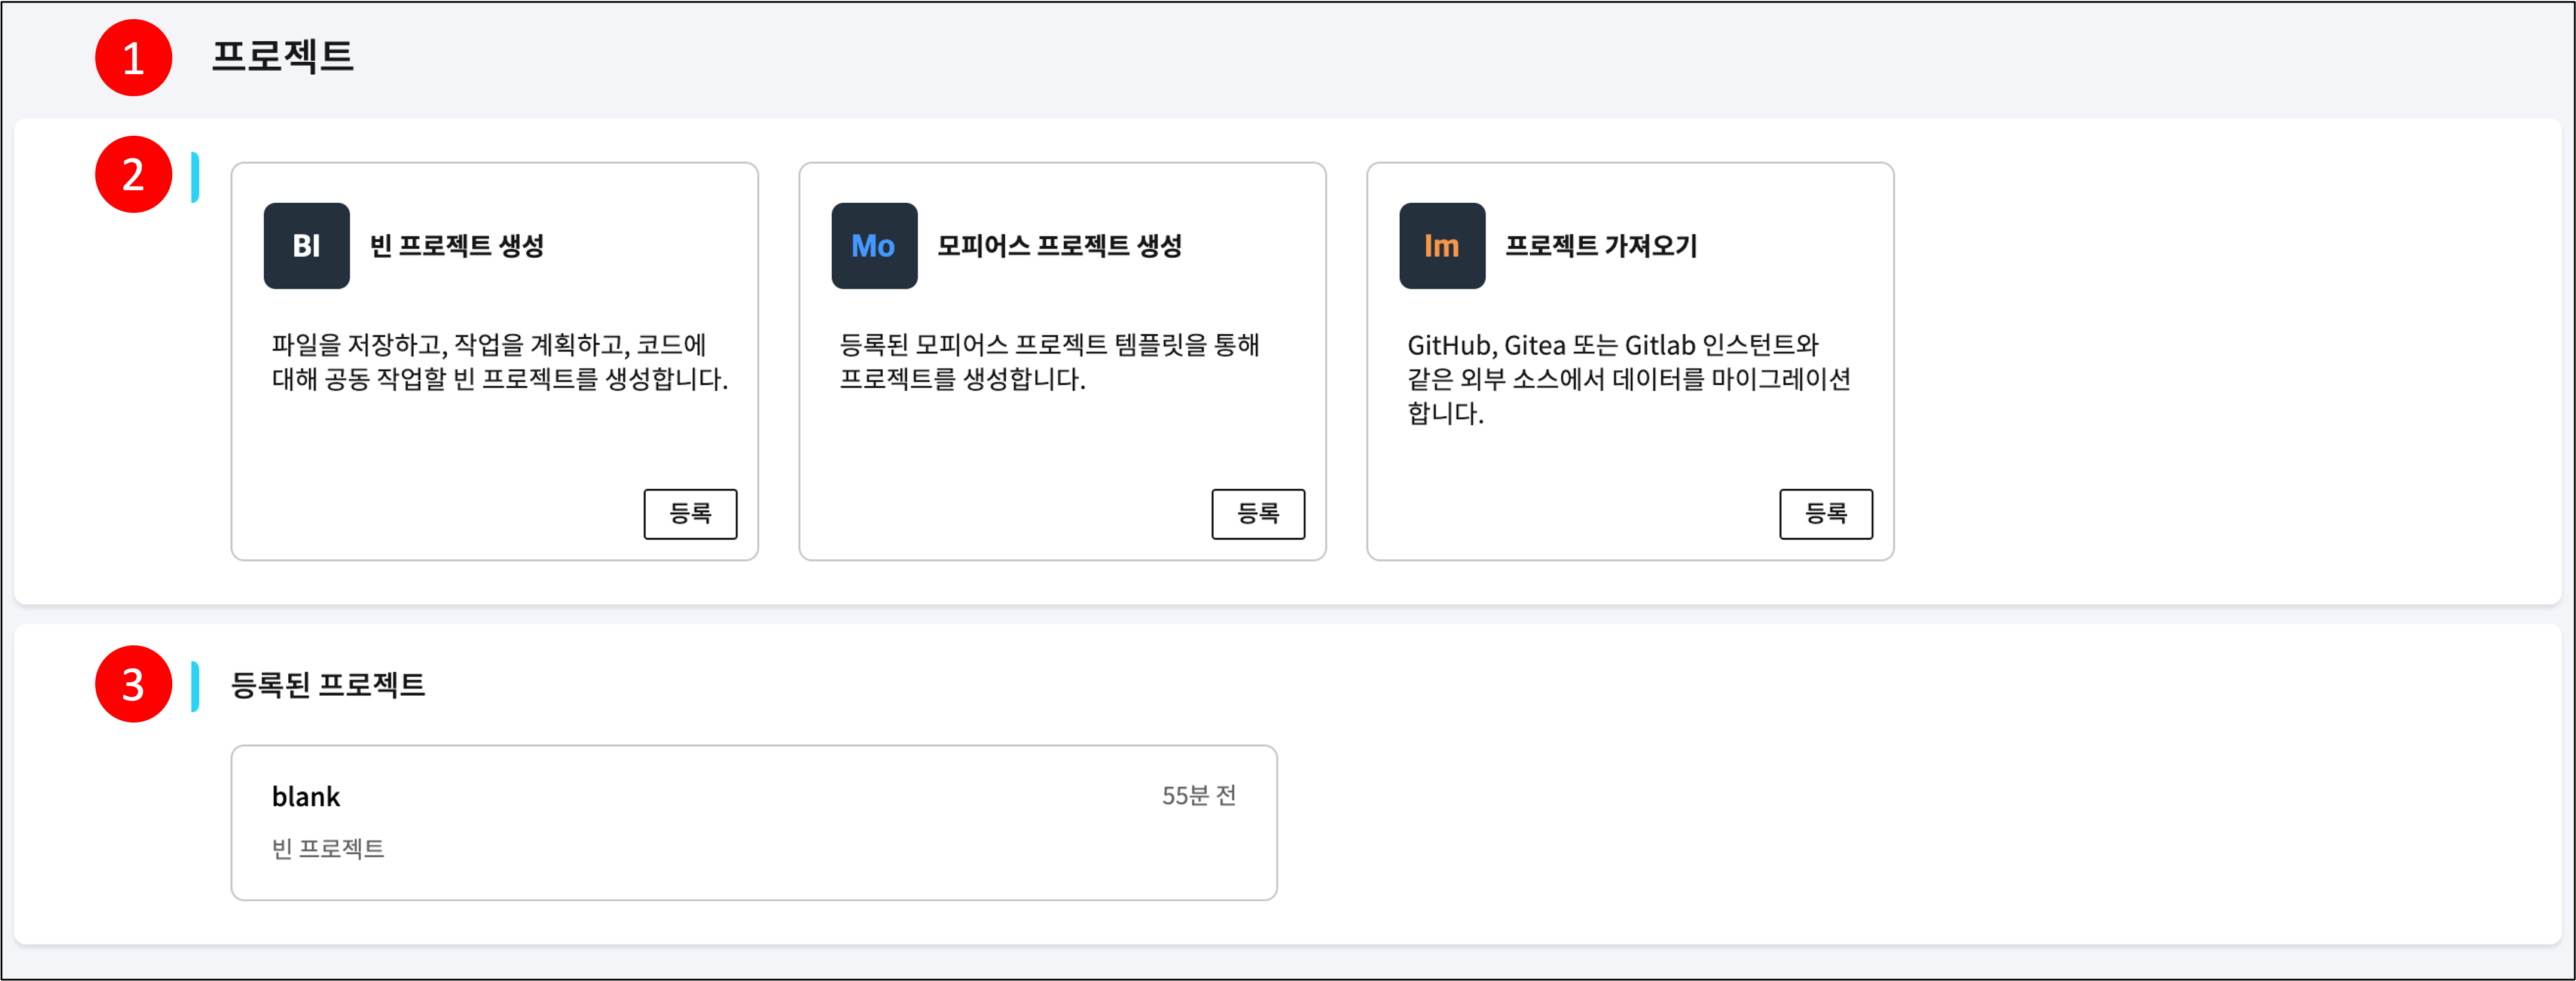
| 1 | Screen Overview | Screen to view and manage the project list within the workspace. Projects provide an environment for storing source code and building and deploying it. |
| 2 | Create | Create a project. There are three types of projects that can be created: (1) Empty Project: Refers to an empty project with no code. (Reference) (2) Morpheus Project: A project provided as a template by Uracle. (Reference) (3) Import Project: A project created by importing code from an external Git repository. (Reference) |
| 3 | Registered Projects | View the list of projects registered so far. Selecting a project moves to the detailed screen for that project. (Reference) |
¶ 4.1 Create Project
¶ 4.1.1 Create Empty Project

| No. | Category | Description |
|---|---|---|
| 1 | Screen Overview | Screen for creating an empty project. Creates an empty project with no code. |
| 2 | Project Basic Information | Enter the basic information for the project. (1) Project Name: Required field. (2) Public/Private: Required field. Choose whether to make the project public to team members within the workspace. If set to private, only you and project collaborators can access it. (However, workspace Owner team members can access private projects.) (3) Description: Optional field. |
| 3 | Registered Projects | You can check the list of currently registered projects. Selecting each project will take you to the detailed screen where you can manage that project. |
¶ 4.1.2 Create Morpheus Project
- [Select Morpheus Project Template]
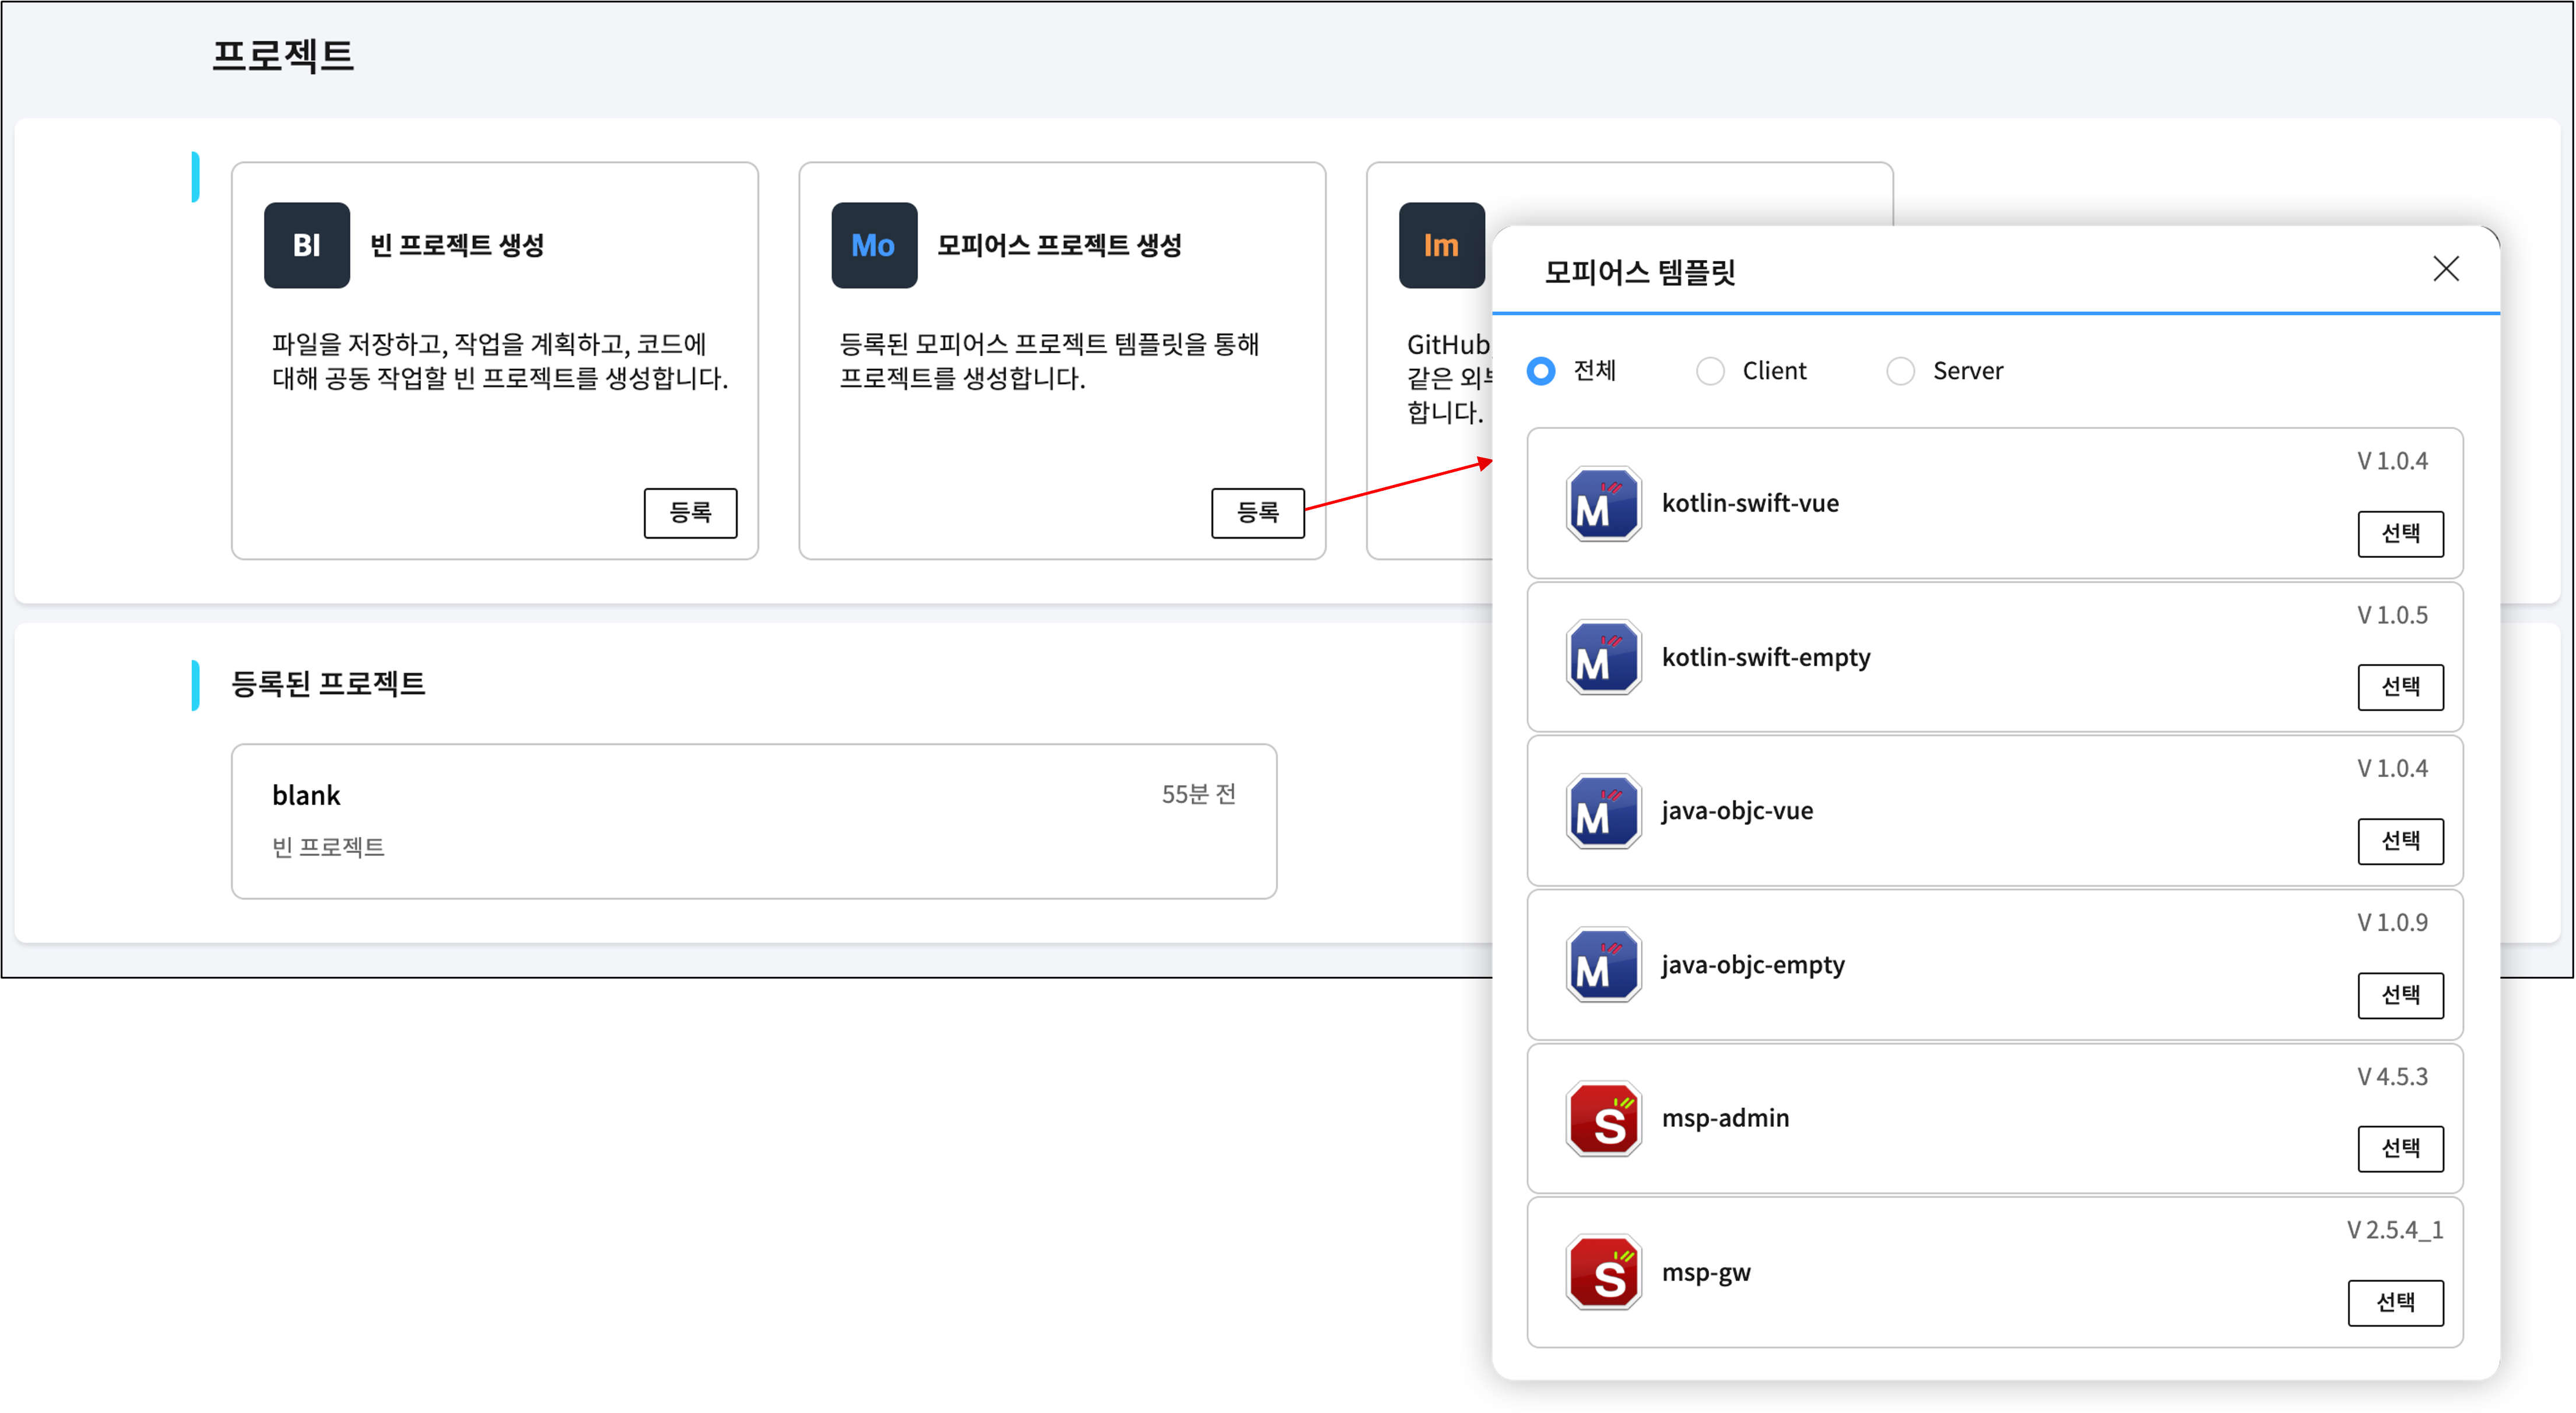
| A Morpheus project is a project provided as a template by Uracle. Selecting the "Register" button for Morpheus Project Creation on the project home screen will display a pop-up window for selecting a template as shown above. After selecting a template and entering the necessary information, the Morpheus project will be created. The information to be entered varies depending on the template type (client, server). Please refer to the details below. |
¶ 4.1.2.1 Create Morpheus Client Project
| No. | Category | Description |
|---|---|---|
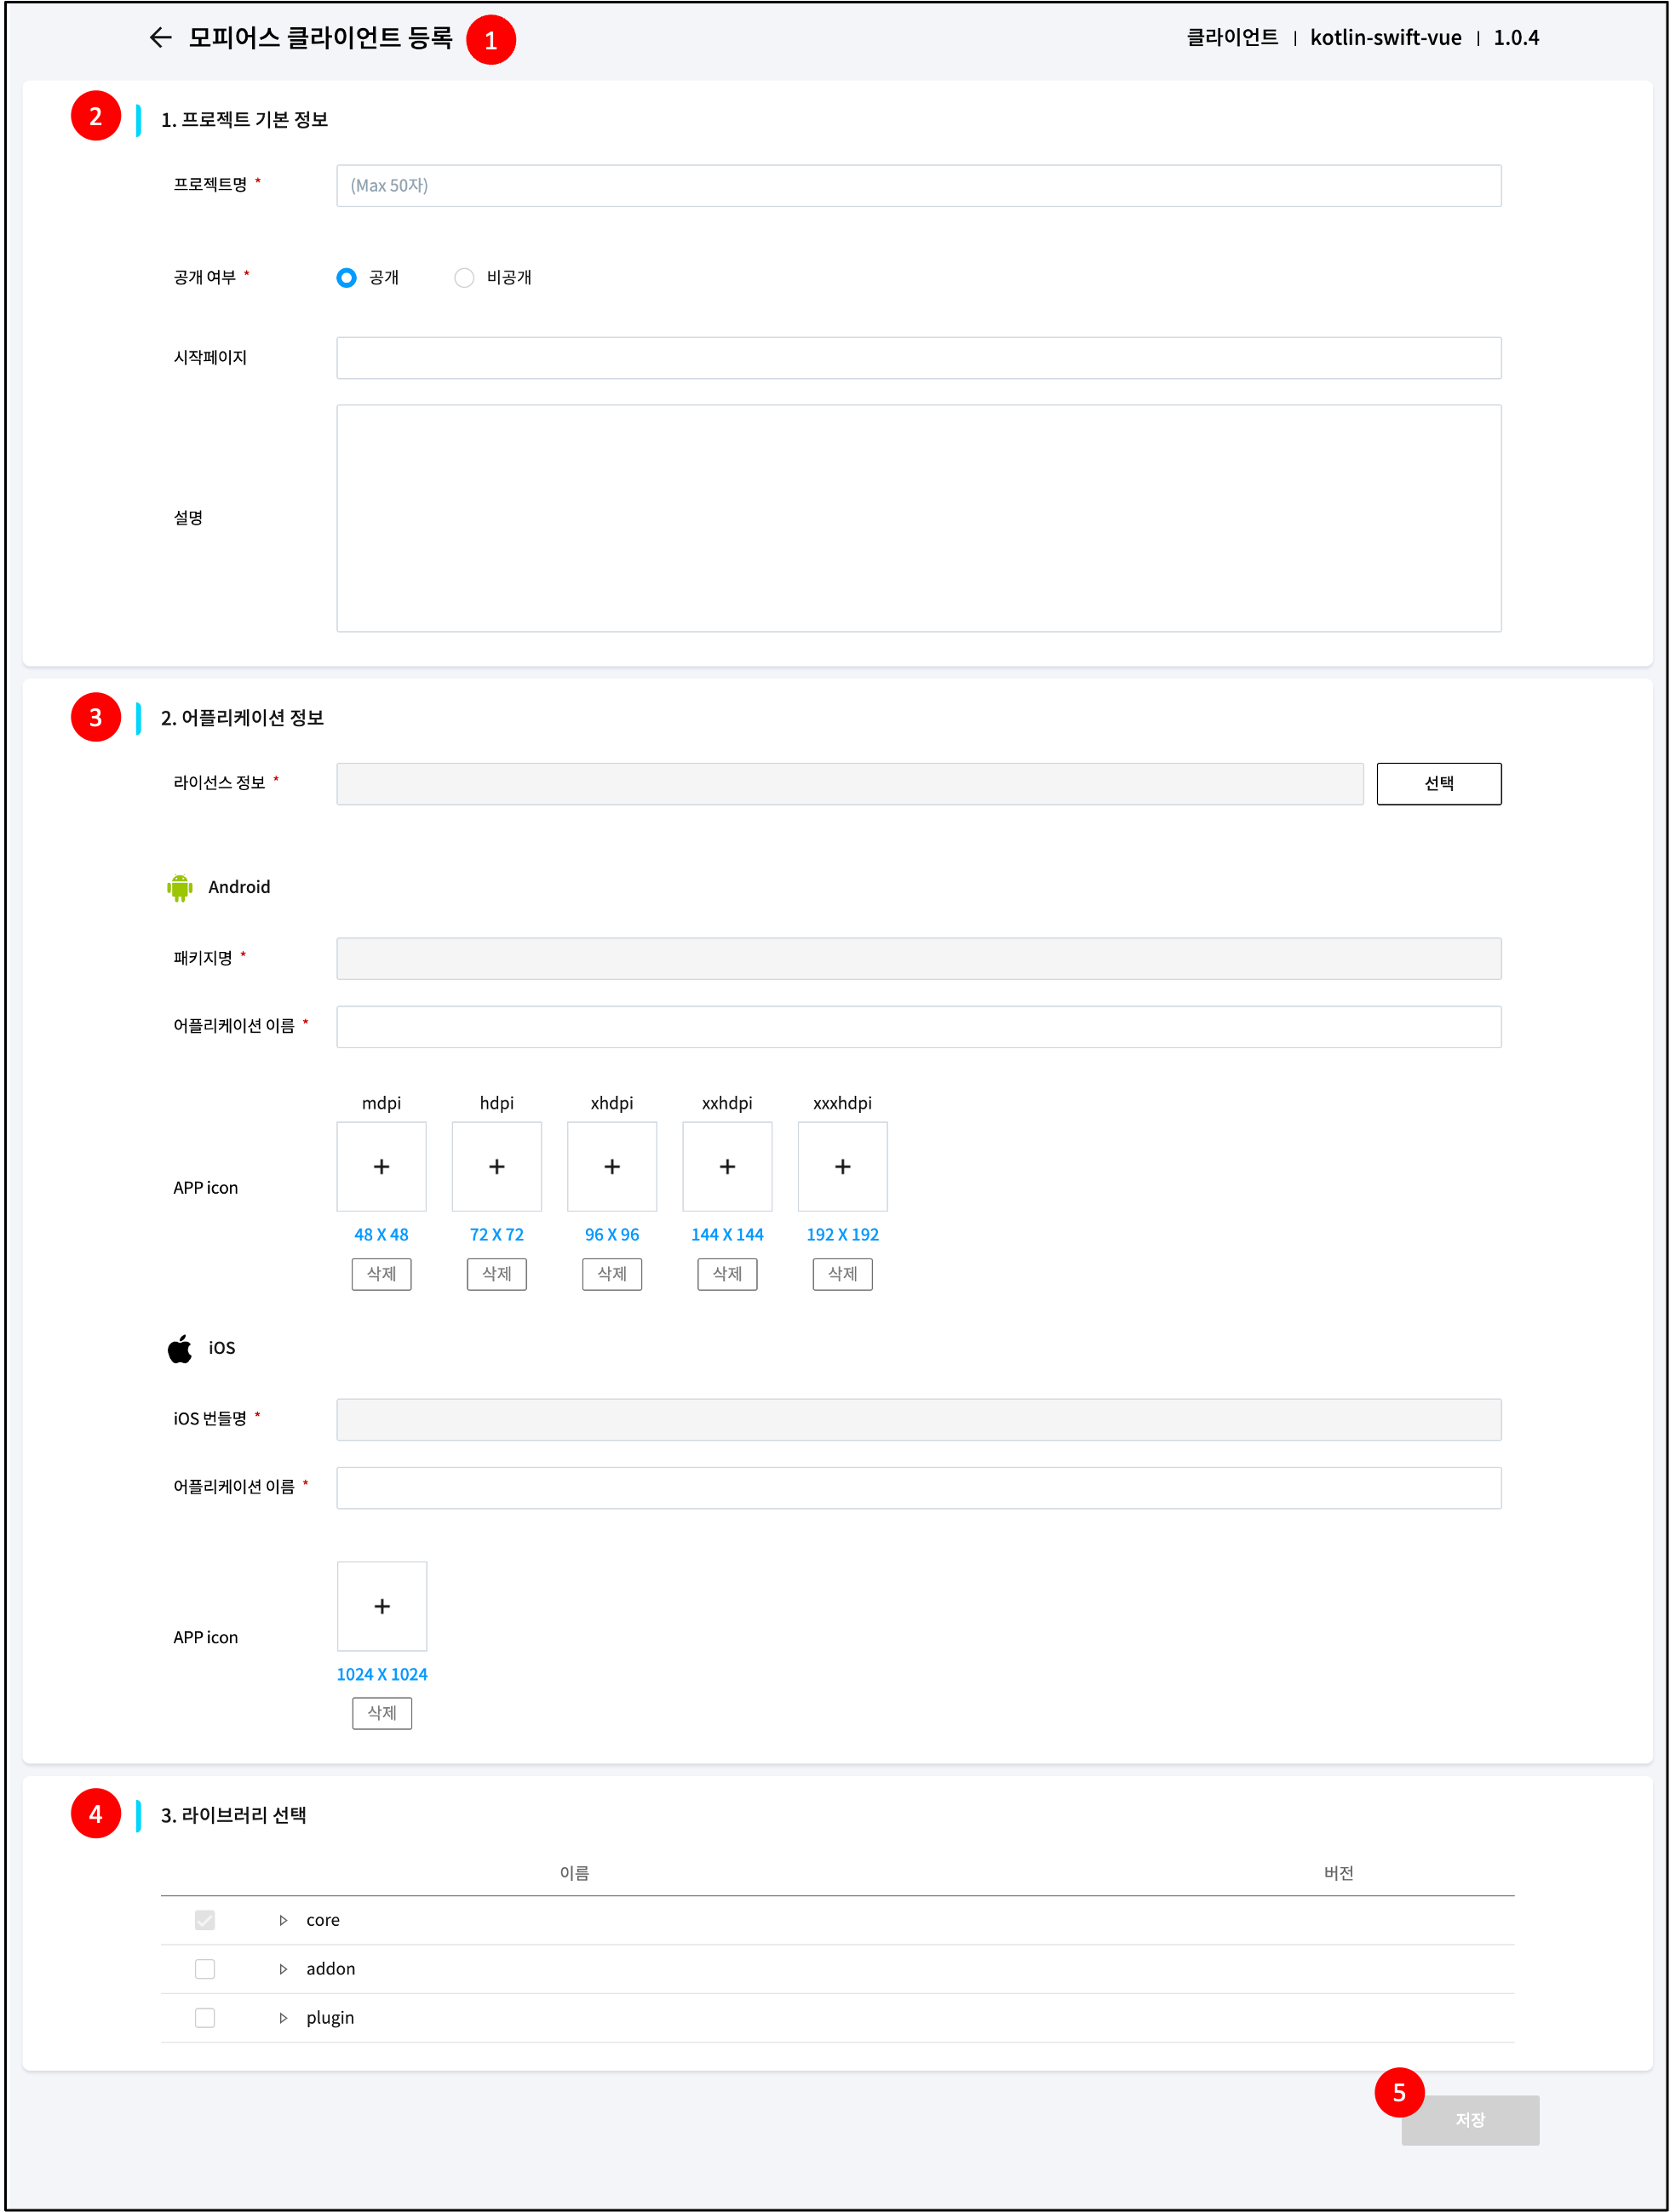
| 1 | Screen Overview | Screen for creating a Morpheus client project. |
| 2 | Project Basic Information | Please enter the basic information for the project. (1) Project Name: Required field. (2) Public/Private: Required field. Choose whether to make the project public to team members within the workspace. If set to private, only you and project collaborators can access it. (However, workspace Owner team members can access private projects.) (3) Start Page: Optional field. If no value is entered, the start page will be set to the default value of the selected template. (4) Description: Optional field. |
| 3 | Application Information | Please enter the application information. (1) License Information: Required field. Licenses can be registered through the License Management menu. (2) Android Package Name: Required field. This is included in the license information. (3) Android Application Name: Required field. Enter the application name to be displayed on the device. (4) Android APP icon: Select the application icon image to be displayed on the device. (5) iOS Bundle ID: Required field. This is included in the license information. (6) iOS Application Name: Enter the application name to be displayed on the device. (7) iOS APP icon: Please enter the application icon image to be displayed on the device. |
| 4 | Select Library | Please select the libraries required for application build. |
| 5 | Save | The project is created with the information you entered. |
¶ 4.1.2.2 Create Morpheus Server Project
| No. | Category | Description |
|---|---|---|
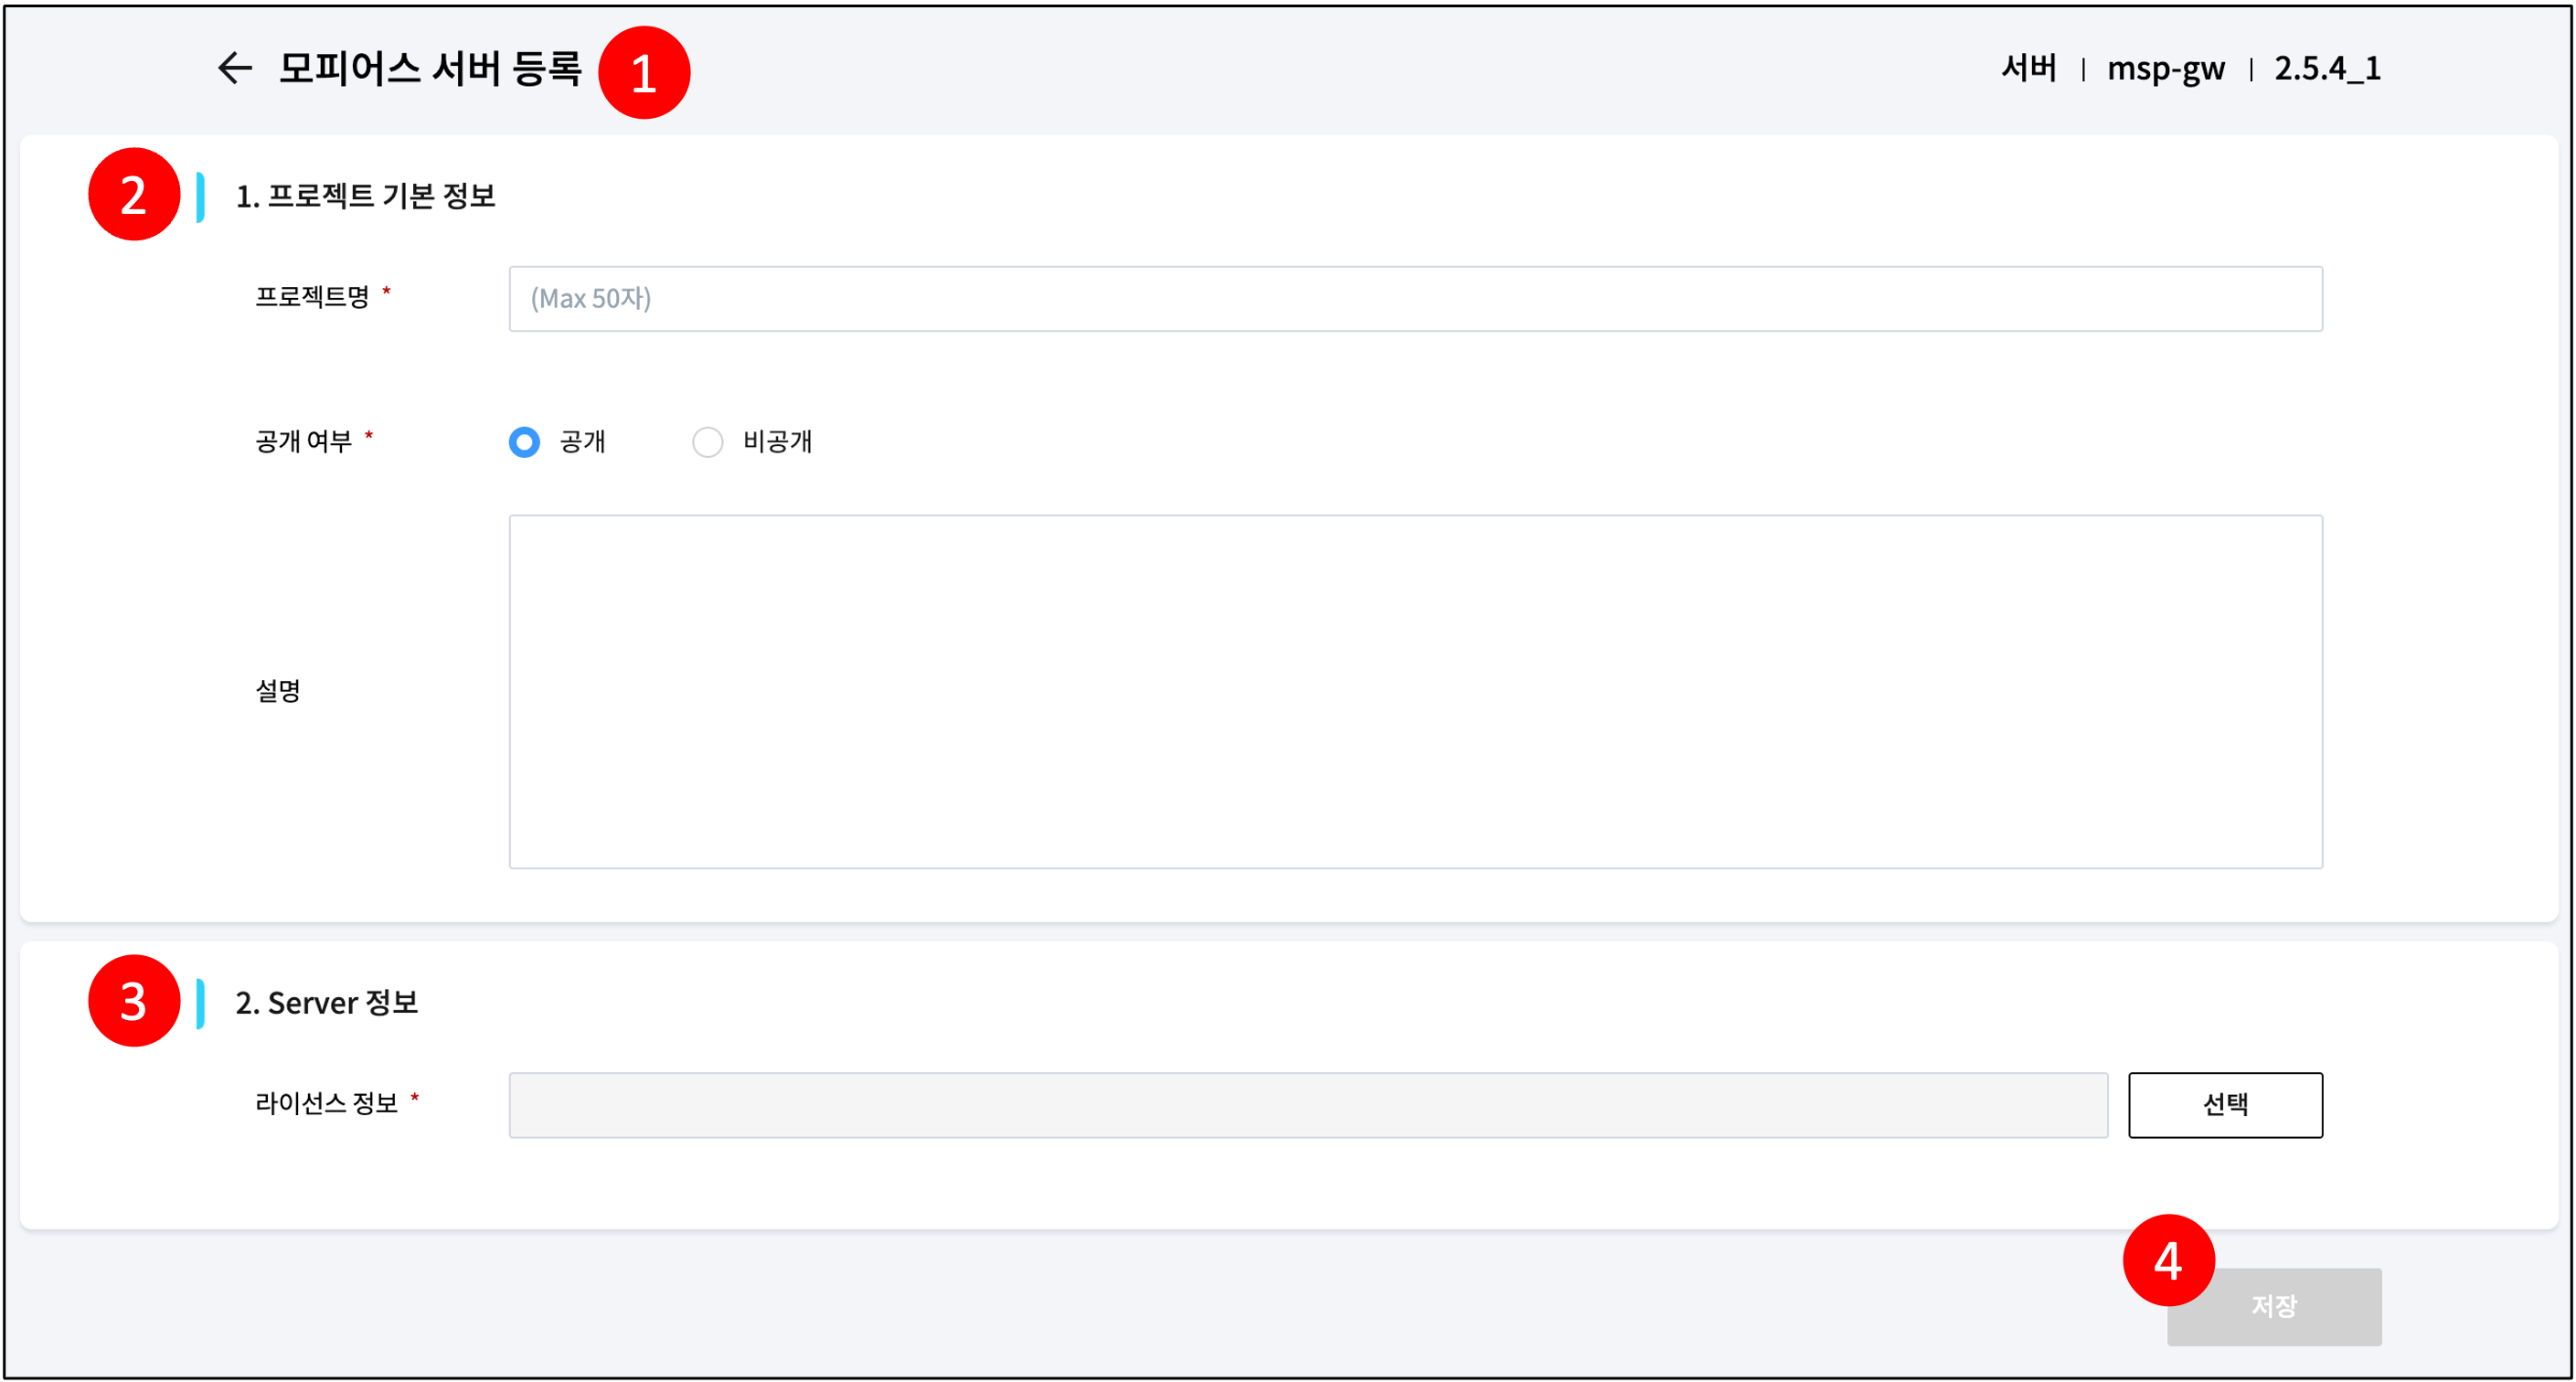
| 1 | Screen Overview | Screen where you can create a Morpheus server project. |
| 2 | Project Basic Information | Please enter the basic information for the project. (1) Project Name: Required field. (2) Public/Private: Required field. Choose whether to make the project public to team members within the workspace. If set to private, only you and project collaborators can access it. (However, workspace Owner team members can access private projects.) (3) Description: Optional field. |
| 3 | Server Information | Please enter the license information. License is a required field and can be registered through the License Management menu. |
| 4 | Save | The project is created with the information you entered. |
¶ 4.1.3 Import Project
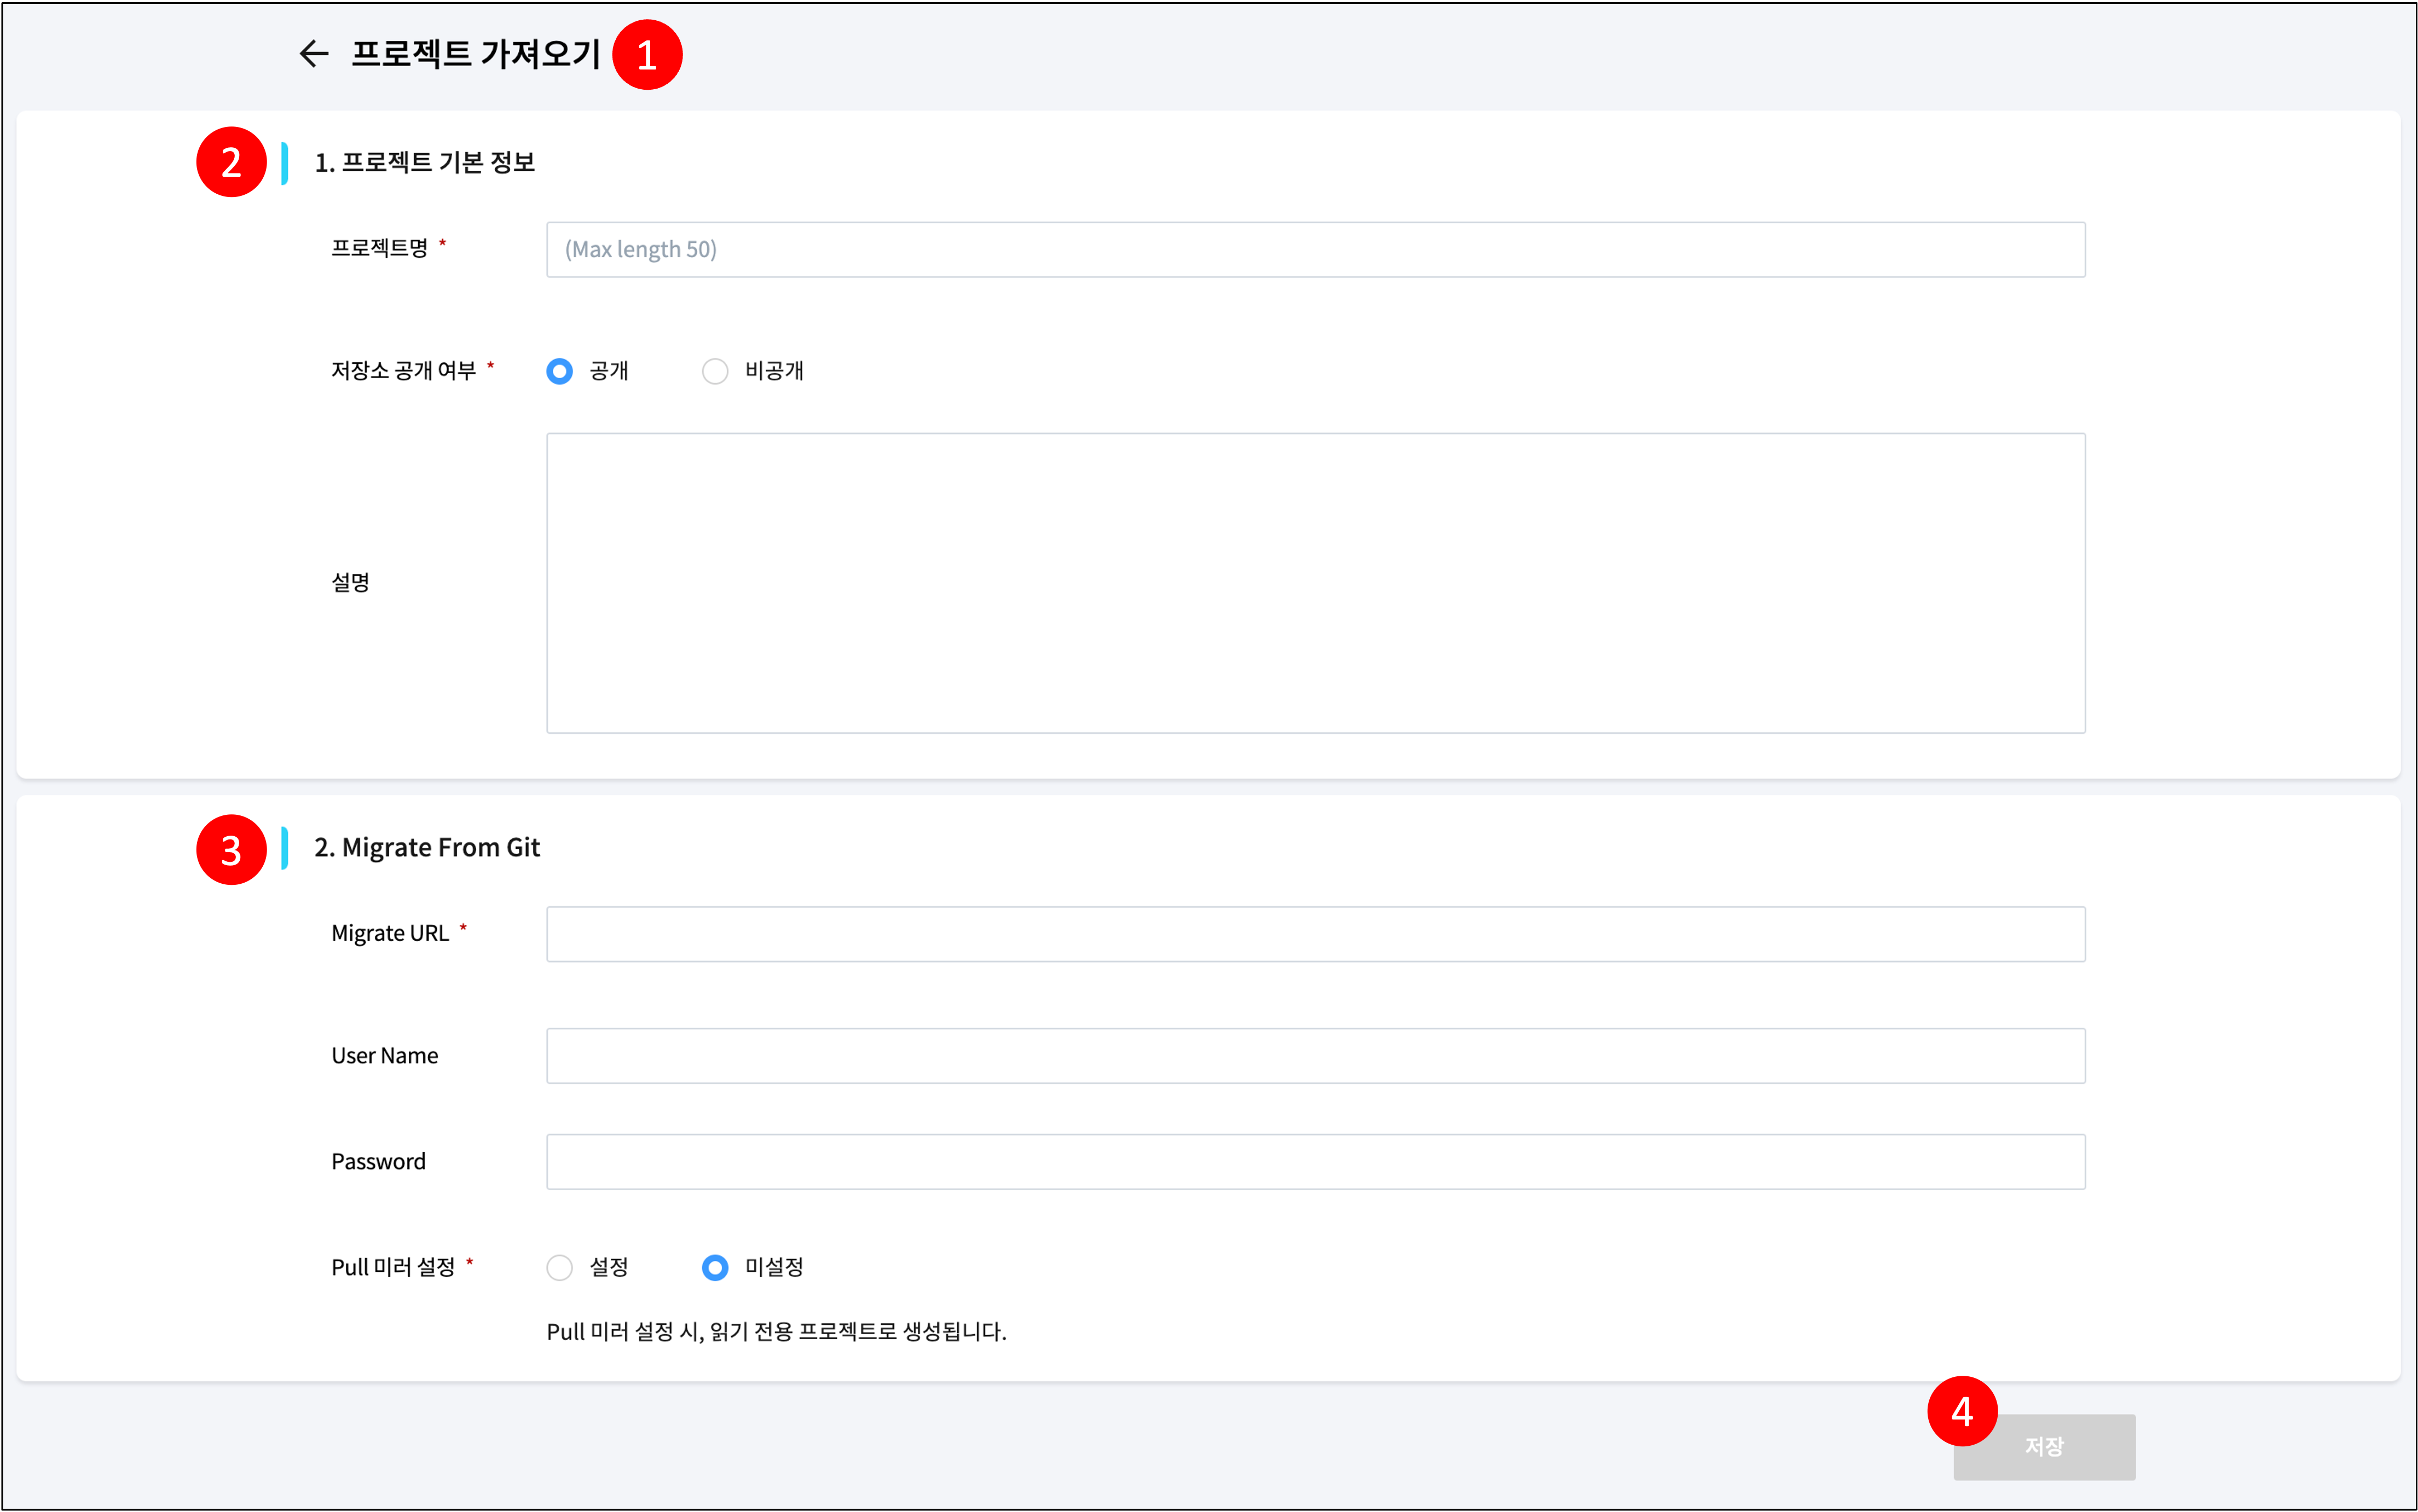
- [Import Project]
| No. | Category | Description |
|---|---|---|
| 1 | Screen Overview | Screen where you can create a project by importing source code stored in Git. |
| 2 | Project Basic Information | Please enter the basic information for the project. (1) Project Name: Required field. (2) Public/Private: Required field. Choose whether to make the project public to team members within the workspace. If set to private, only you and project collaborators can access it. (However, workspace Owner team members can access private projects.) (3) Description: Optional field. |
| 3 | Migrate From Git | Please enter the necessary values to import source code from a Git repository. (1) Migrate URL: Required field. Enter the target Git repository URL. (2) User Name: Optional field. If access permission is required for the target Git URL, enter an accessible user ID. (3) Password: Optional field. If access permission is required for the target Git URL, enter an accessible Git user password or access token value. (4) Pull Mirror Setting: If "Not Set", a default repository is created. If "Set", a read-only project mirroring the Migrate target repository is created. The specified Pull mirror target repository can be checked in the Project Settings > Repository Mirror tab. |
| 4 | Save | The project is created with the information you entered. |
¶ 4.2. Project Details

| No. | Category | Description |
|---|---|---|
| 1 | Screen Overview | This screen is displayed when a project is selected from the project home screen. It is used to view and manage project information. The project name is displayed at the top, and below it are tabs and buttons necessary for project management. |
| 2 | Code | Tab for checking the project's source code. This is the default tab displayed in the project details screen. (Reference) |
| 3 | Build | Tab for viewing the project's build information. You can view the project branch information to be built and the build history information. (Reference) |
| 4 | Settings | Tab for viewing and managing project information. Project collaborator management is also possible. (Reference) |
¶ 4.2.1 Project Code
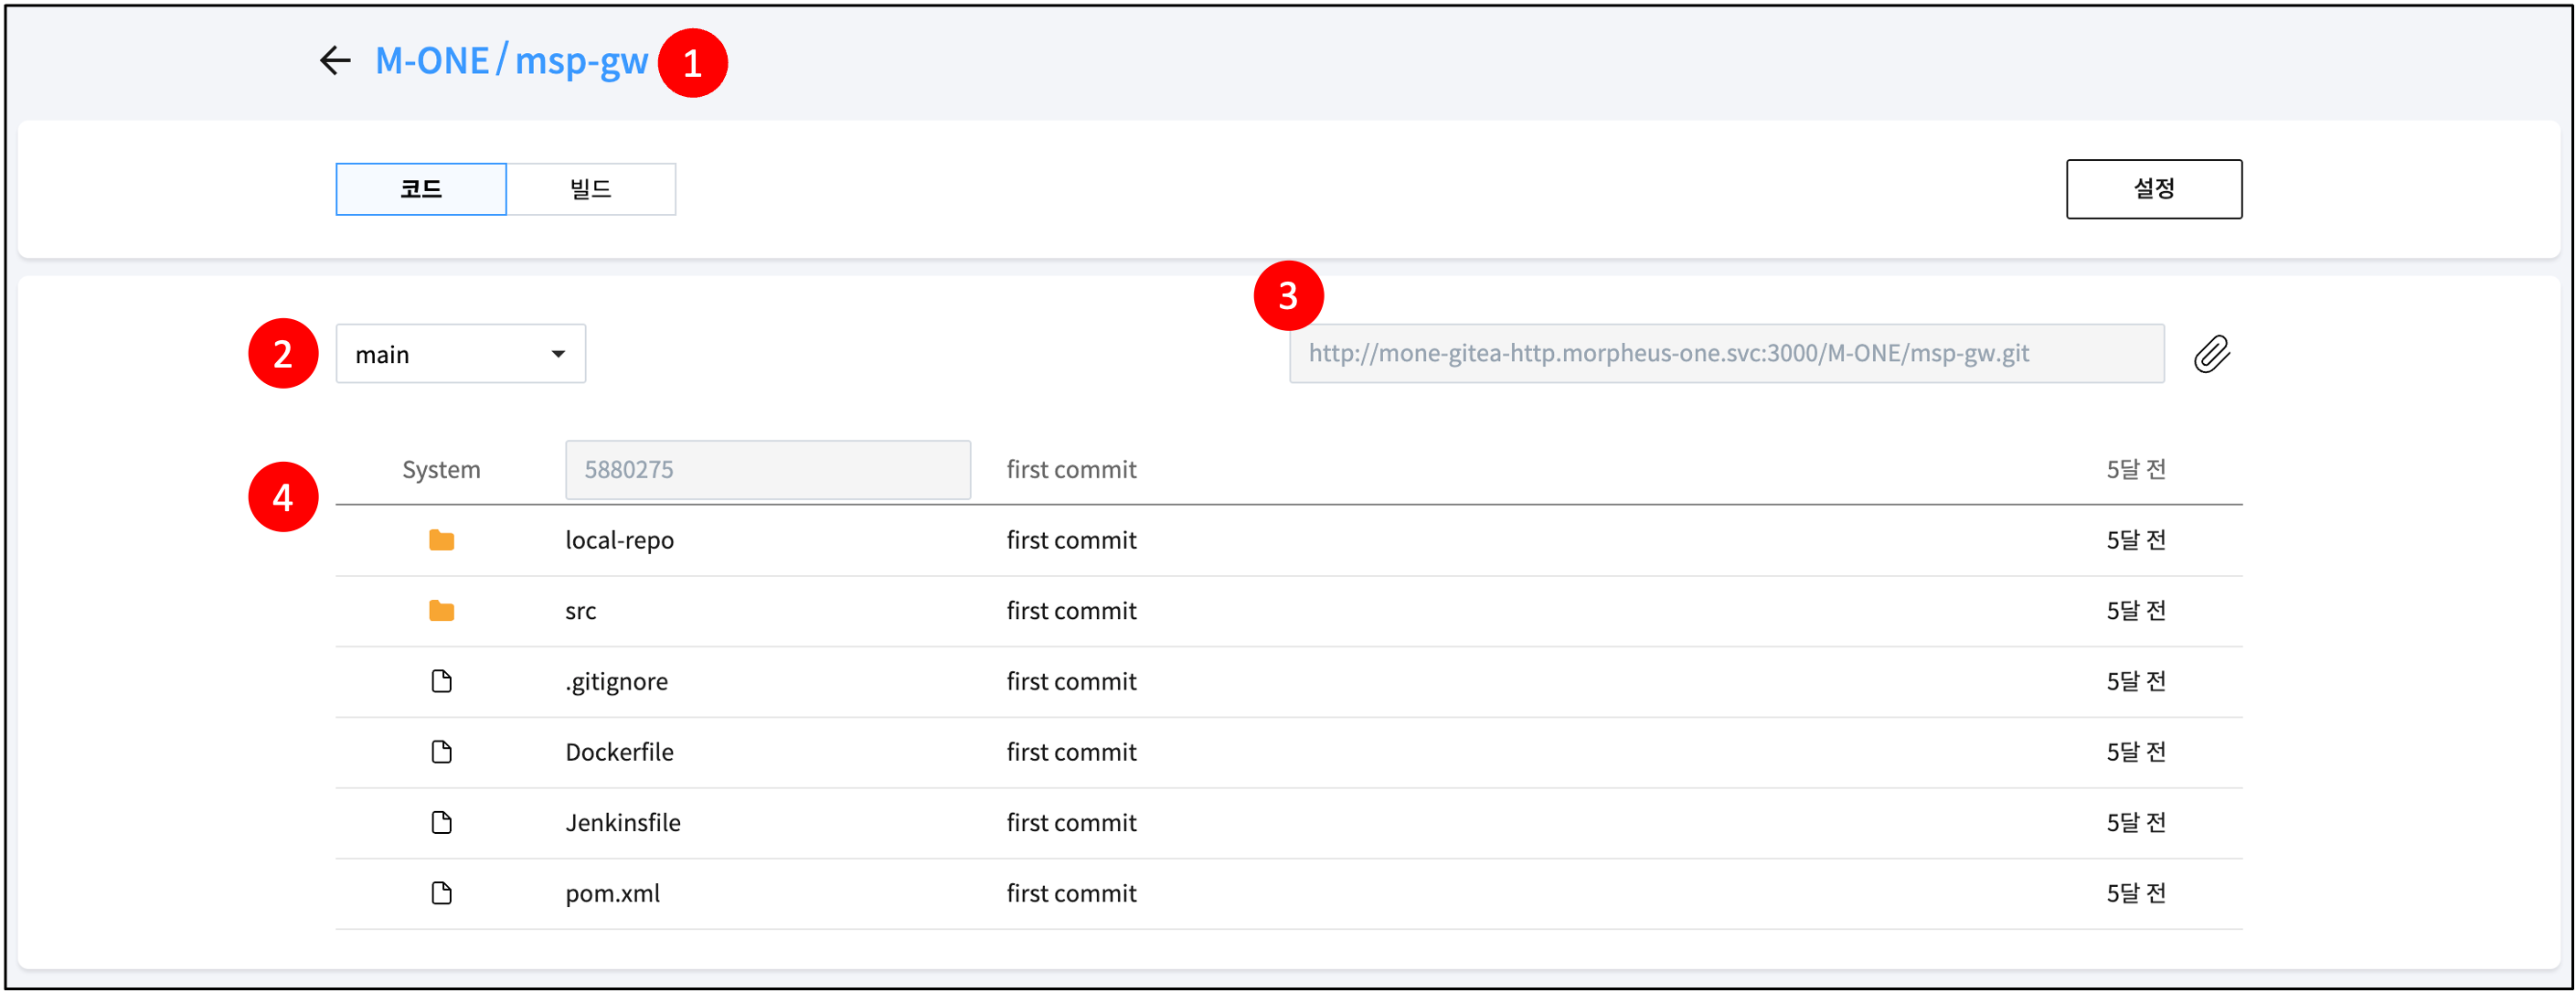
- [Project Code]
| No. | Category | Description |
|---|---|---|
| 1 | Screen Overview | Tab where you can check the project's source code. |
| 2 | Branch | This is the branch list. Selecting a branch will display the source code stored in that branch. |
| 3 | Git URL | The project's Git URL cannot be accessed externally. You must create a development environment (Reference) and then perform source management in that environment. In the case of an empty project, the Git repository must first be initialized in the terminal within the development environment. |
| 4 | Content | Displays the source code stored in the currently selected branch. Source code consists of files and folders. Folders are indicated by a yellow icon, and files by a white icon. |
¶ 4.2.2 Project Build
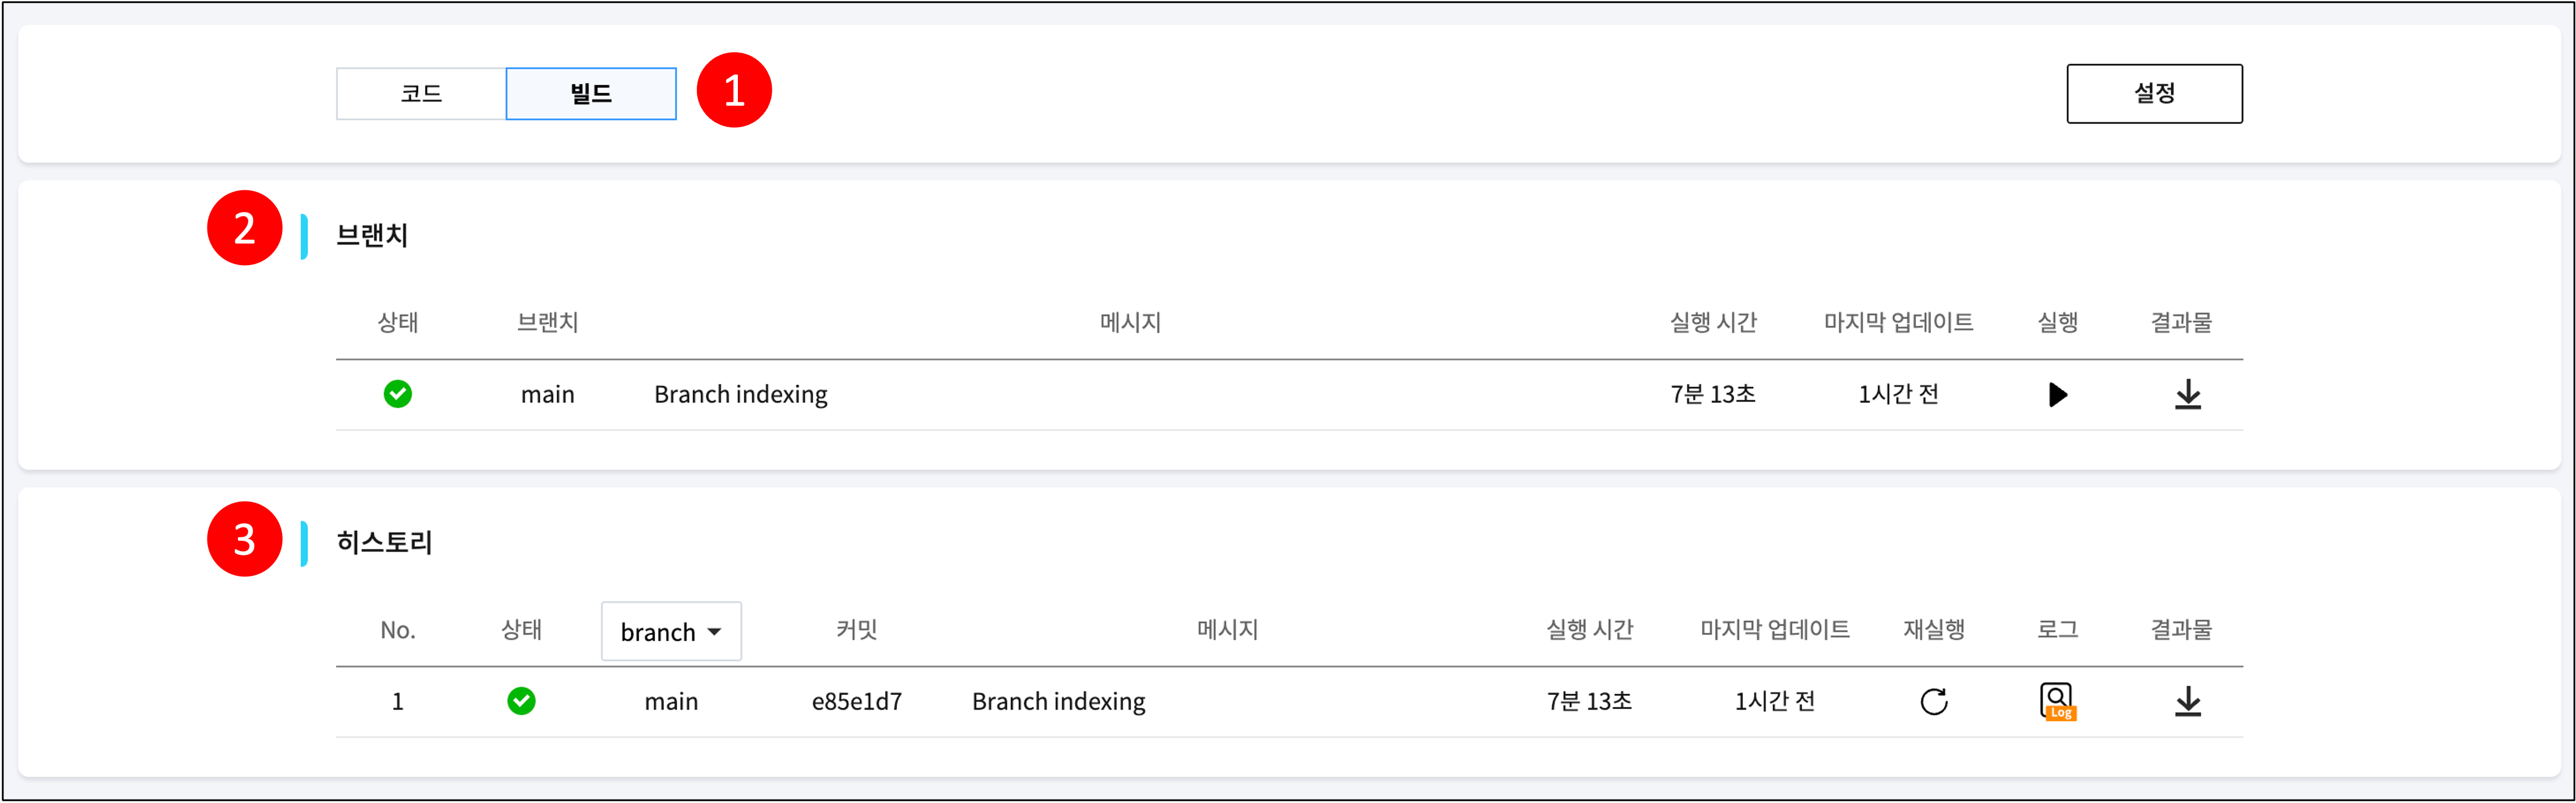
- [Project Build]
| No. | Category | Description |
|---|---|---|
| 1 | Screen Overview | Tab where you can check the project's *build information. * What is a build? It refers to the process of converting the source code stored in a project into a form that can be executed on a computer. |
| 2 | Branch | You can check build information for each branch. (1) Status: Latest build status (2) Branch: Branch name (3) Message: Latest build message (4) Execution Time: Latest build execution time (5) Last Update: Time elapsed since the last build (6) Execute: Select to build the contents of the branch's source code. (7) Artifacts: Select to download the latest build artifacts within the branch. (Caution) For the first time after project creation, a build needs to be generated. (Refer to the "Project Build Initial Creation" image below) |
| 3 | History | View build history. |
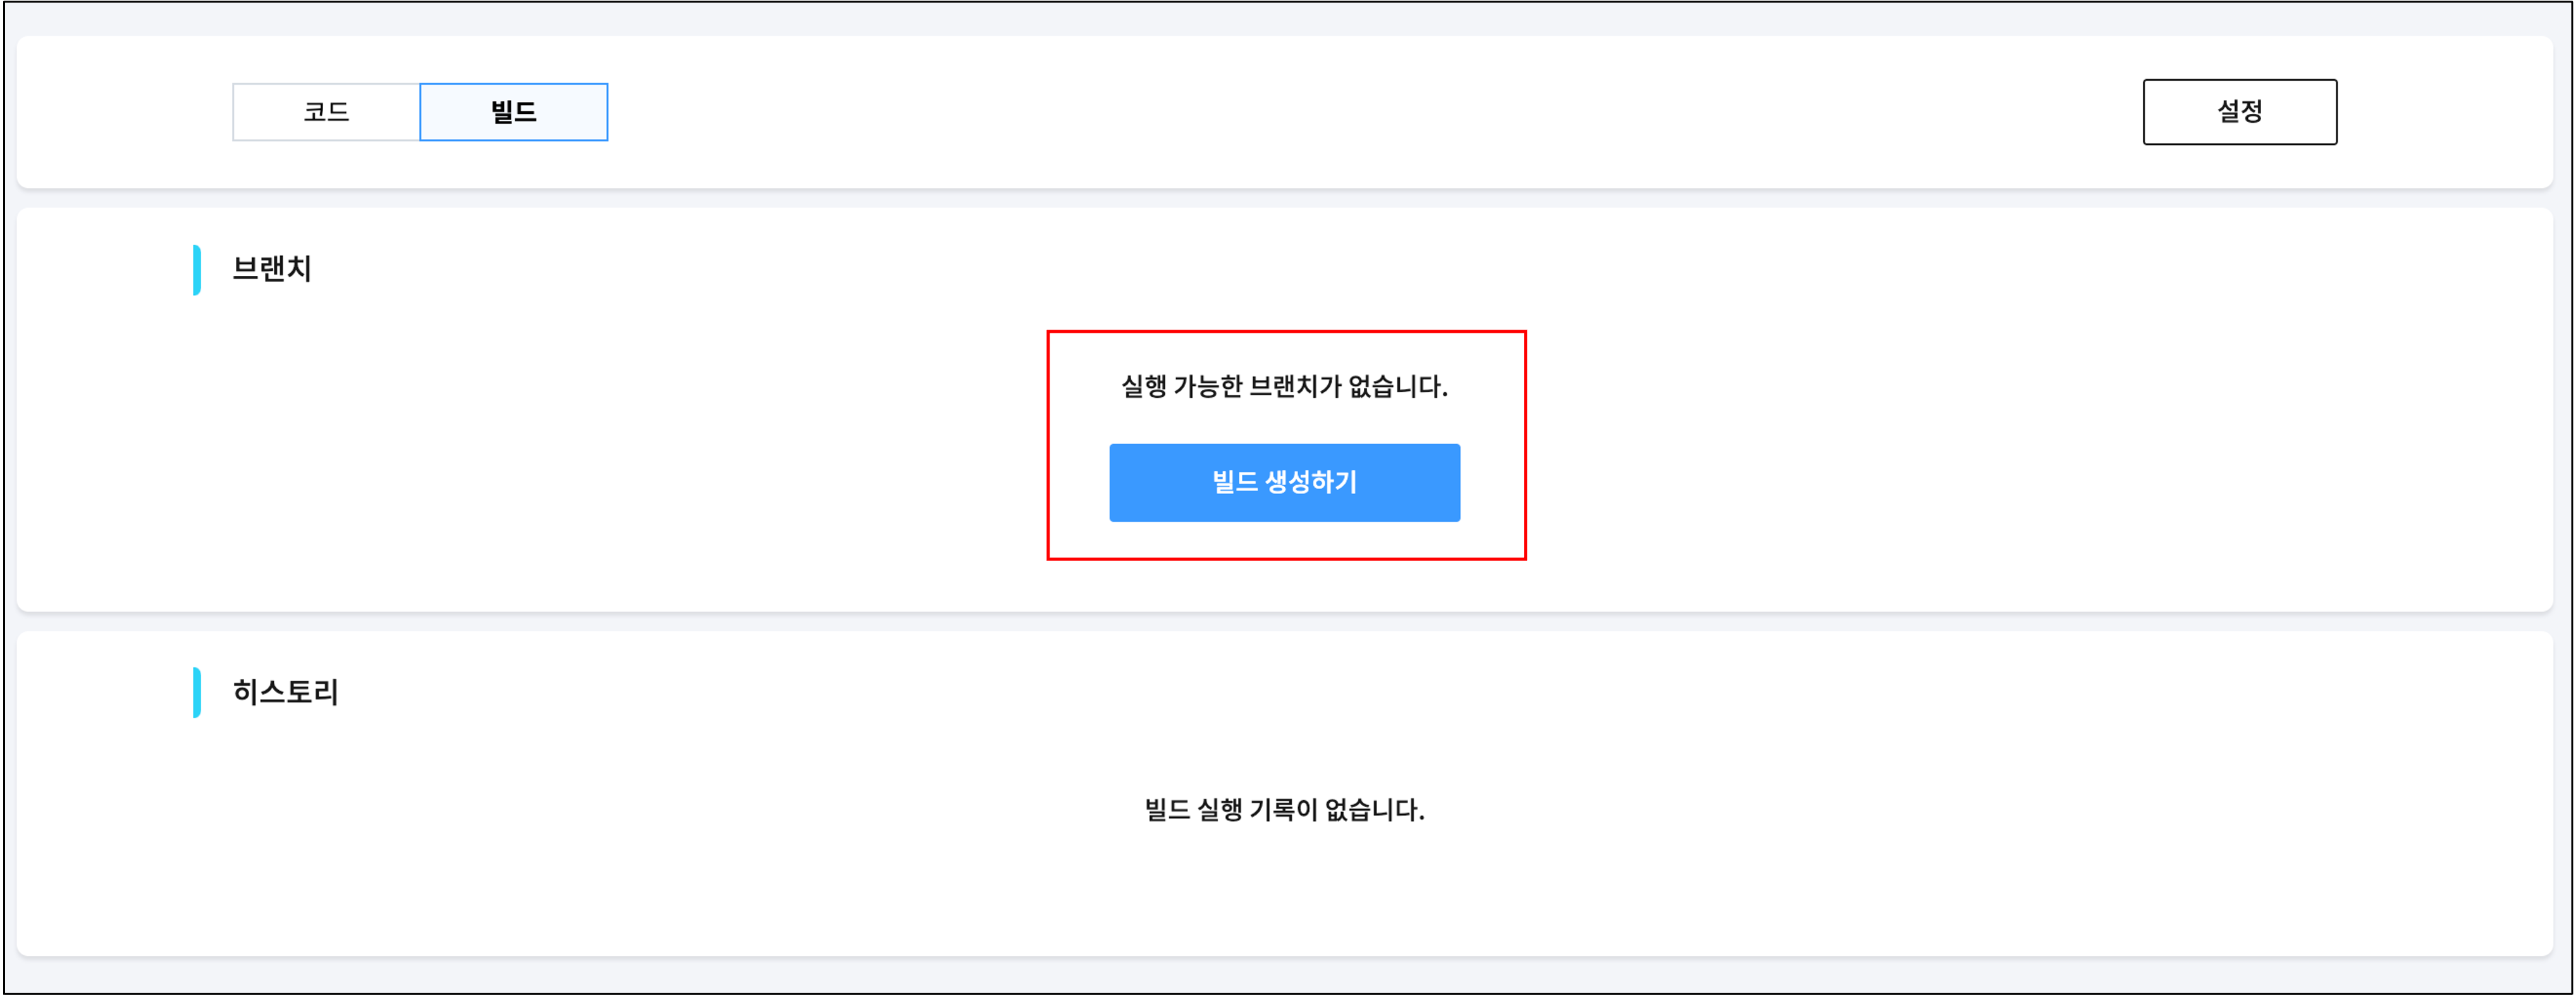
- [Project Build Initial Creation]
| For the first time after project creation, a build needs to be generated. And for the build to be generated normally, a valid build file must exist in the project's default branch. What is a build file? It is a file that defines how to build the code in a project branch and must be located in the source code of the branch to be built. For information on how to write a build file (Jenkinsfile), please refer to this link. Once the build generation is complete, branches with a build file will automatically be considered build targets. |
¶ 4.3. Project Settings

| No. | Category | Description |
|---|---|---|
| 1 | Screen Overview | View and manage project information. |
| 2 | Basic Information | Tab for viewing and modifying project information. This is the default tab screen when project settings are clicked. |
| 3 | Collaborators | Tab for viewing and managing the list of project collaborators. |
| 4 | Repository Mirror | Tab for managing the project's Push/Pull target Mirror repository. |
- [Project Basic Information Settings]
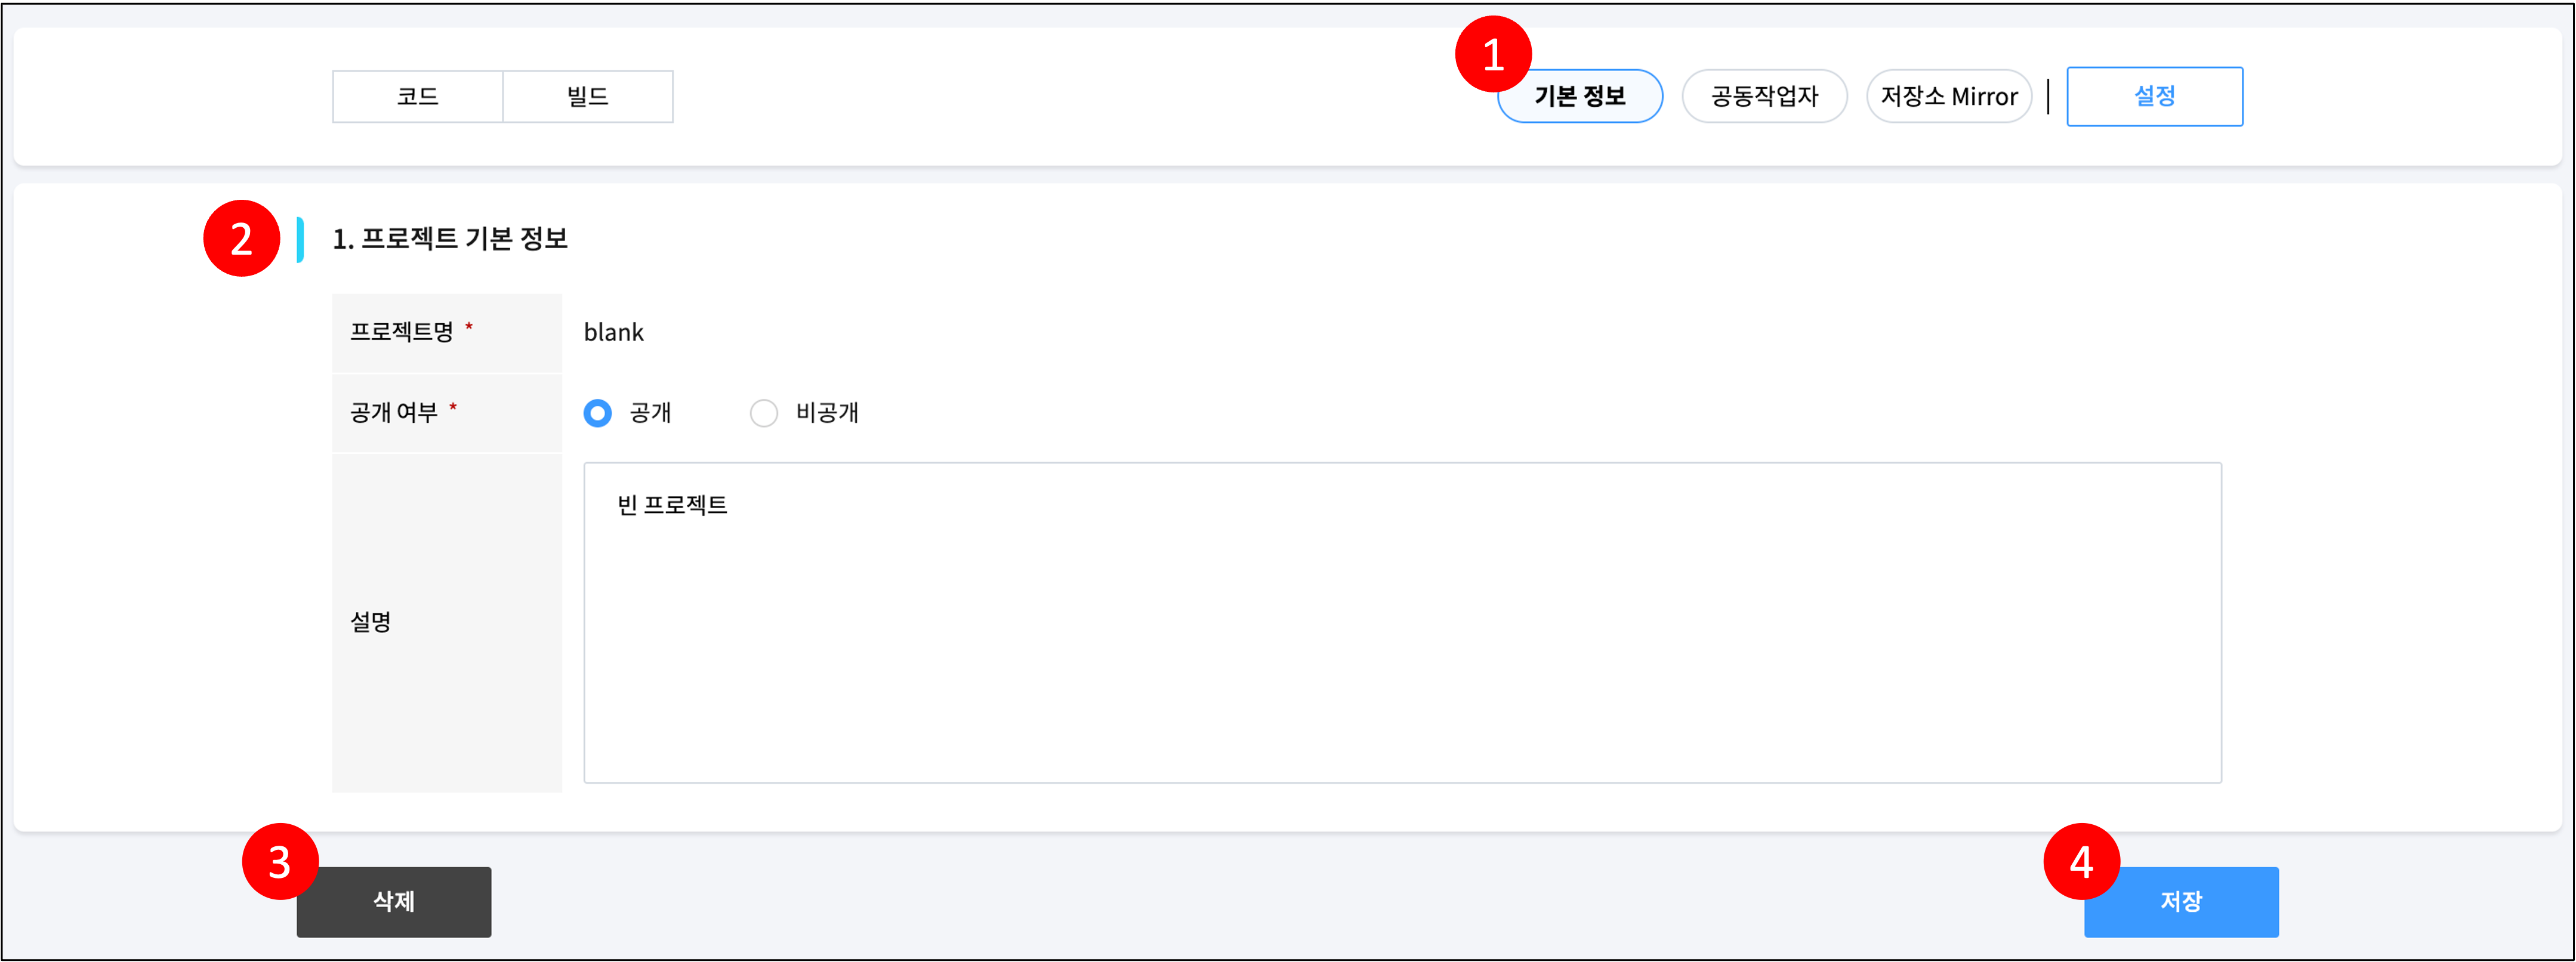
| No. | Category | Description |
|---|---|---|
| 1 | Screen Overview | Tab for viewing and managing project information. |
| 2 | Project Basic Information | View basic project information. (1) Project Name: Cannot be changed after creation. (2) Public/Private: Set whether to make the project public to team members within the workspace. If the project is private, only you and project collaborators can access it. (3) Description: Write a description for the project. |
| 3 | Delete | Deletes the project. |
| 4 | Save | Saves the project with the entered information. |
- [Project Collaborator Settings]

| No. | Category | Description |
|---|---|---|
| 1 | Screen Overview | Tab for managing project collaborators. Collaborators are needed when you want to allow project access to team members within the same workspace if the project is private. (However, users with Workspace Owner permission can access it even if not designated as collaborators.) |
| 2 | Collaborators | View the list of collaborators. You can check the collaborator's name, ID, and email information. |
| 3 | Add Member | Add collaborators in the following order: (1) Search by name or ID and select the target person you want to add as a collaborator. (2) Select the "Add Member" button. Only team members within the workspace can be designated as collaborators. For workspace team member management, please refer to this link. |
| 4 | Delete | Select "Delete" to remove the collaborator from the project. |

- [Project Repository Mirror Settings]
| No. | Category | Description |
|---|---|---|
| 1 | Screen Overview | Tab for managing the project's Push/Pull target Mirror repository. |
| 2 | Repository Push Mirror | Manage the target repository to which the contents of the current repository will be pushed. Select the Add button to add a target repository. Selecting the Synchronize button overwrites the target repository with the contents of the current repository. (Refer to the content below for repository registration.) |
| 3 | Repository Pull Mirror | Pulls the history up to the present from the target repository specified at the time of project import into the current repository. It can be used by pressing the Synchronize button. |
- [Add Project Push Mirror Repository]
| No. | Category | Description |
|---|---|---|
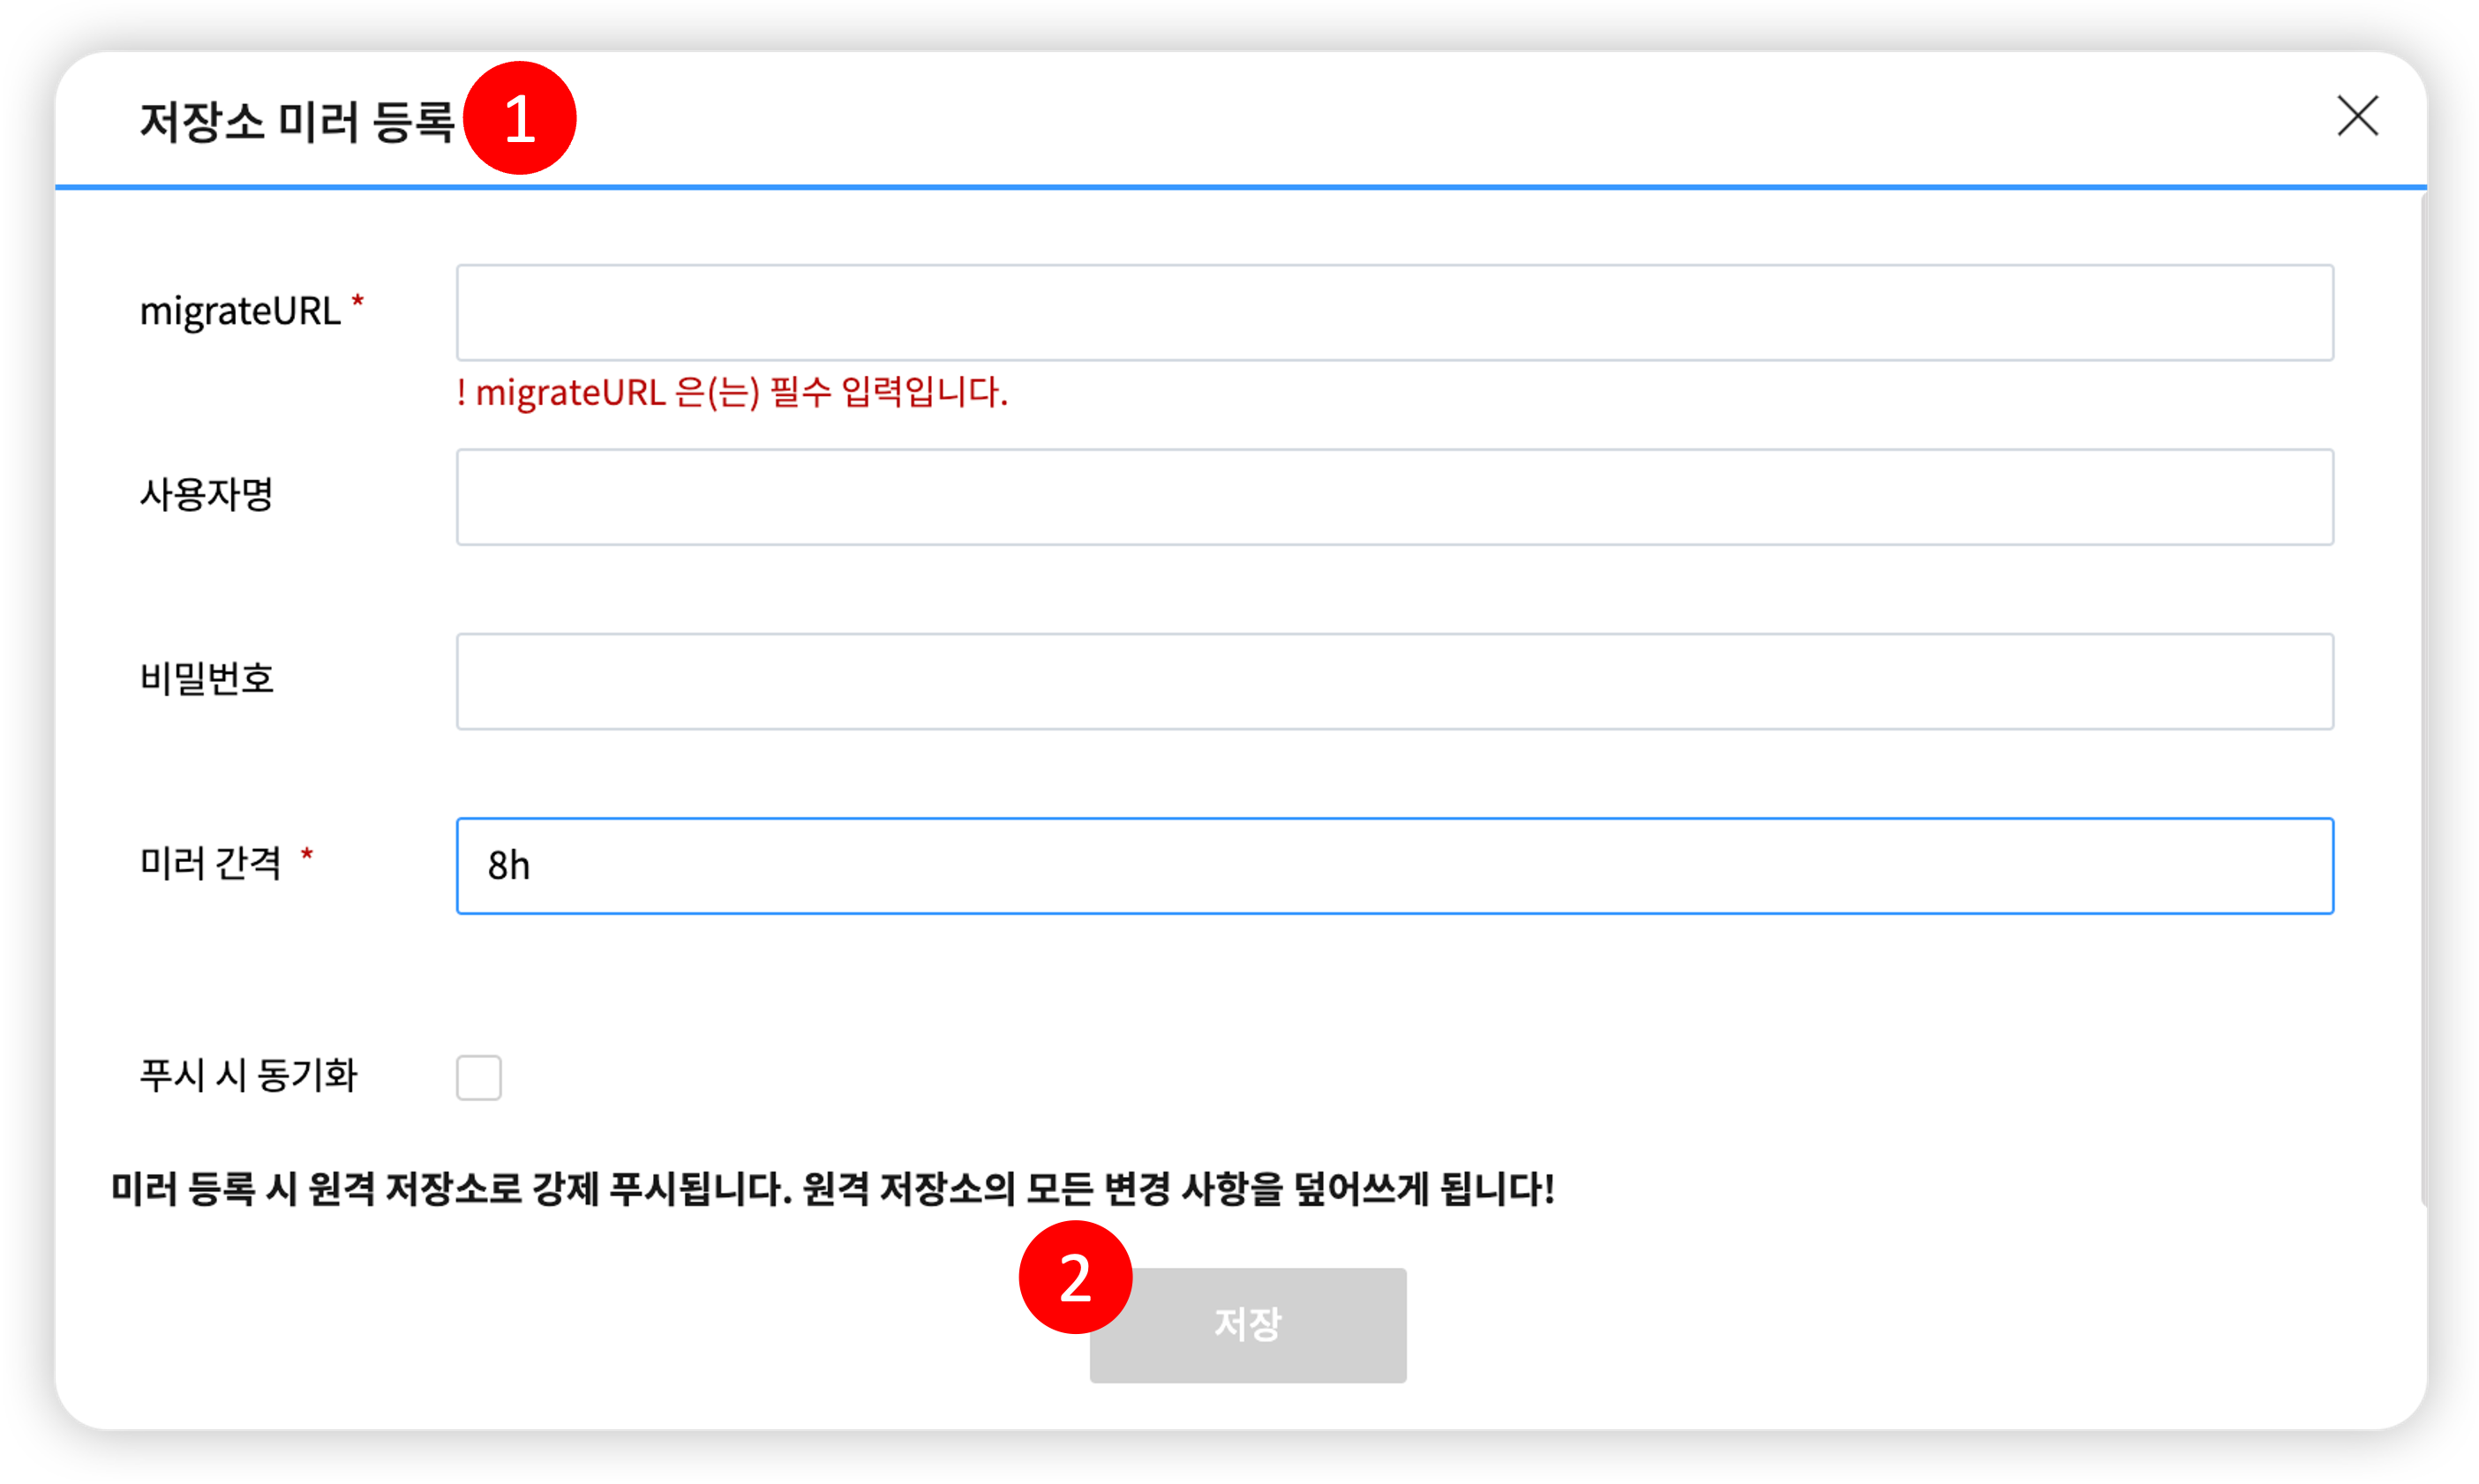
| 1 | Screen Overview | This pop-up window appears when you select the Add button in Repository Push Mirror. |
| 2 | Add Push Mirroring Target | Enter the following items in the pop-up window and select the Save button. (Caution: When registering a mirror, it will be forcibly pushed to the remote repository. All changes in the remote repository will be overwritten.) (1) migrateURL: Enter the URL of the target repository. (2) Username, Password: Enter the user information that can access the target repository. (3) Mirror Interval: You can set the synchronization interval (h: hour, m: minute, s: second). Automatic synchronization will proceed at this interval. (At this time, the mirror interval must be at least 10 minutes.) (4) Synchronize on Push: If selected, it will be synchronized at every push point. |
¶ 5. Development Environment
| No. | Category | Description |
|---|---|---|
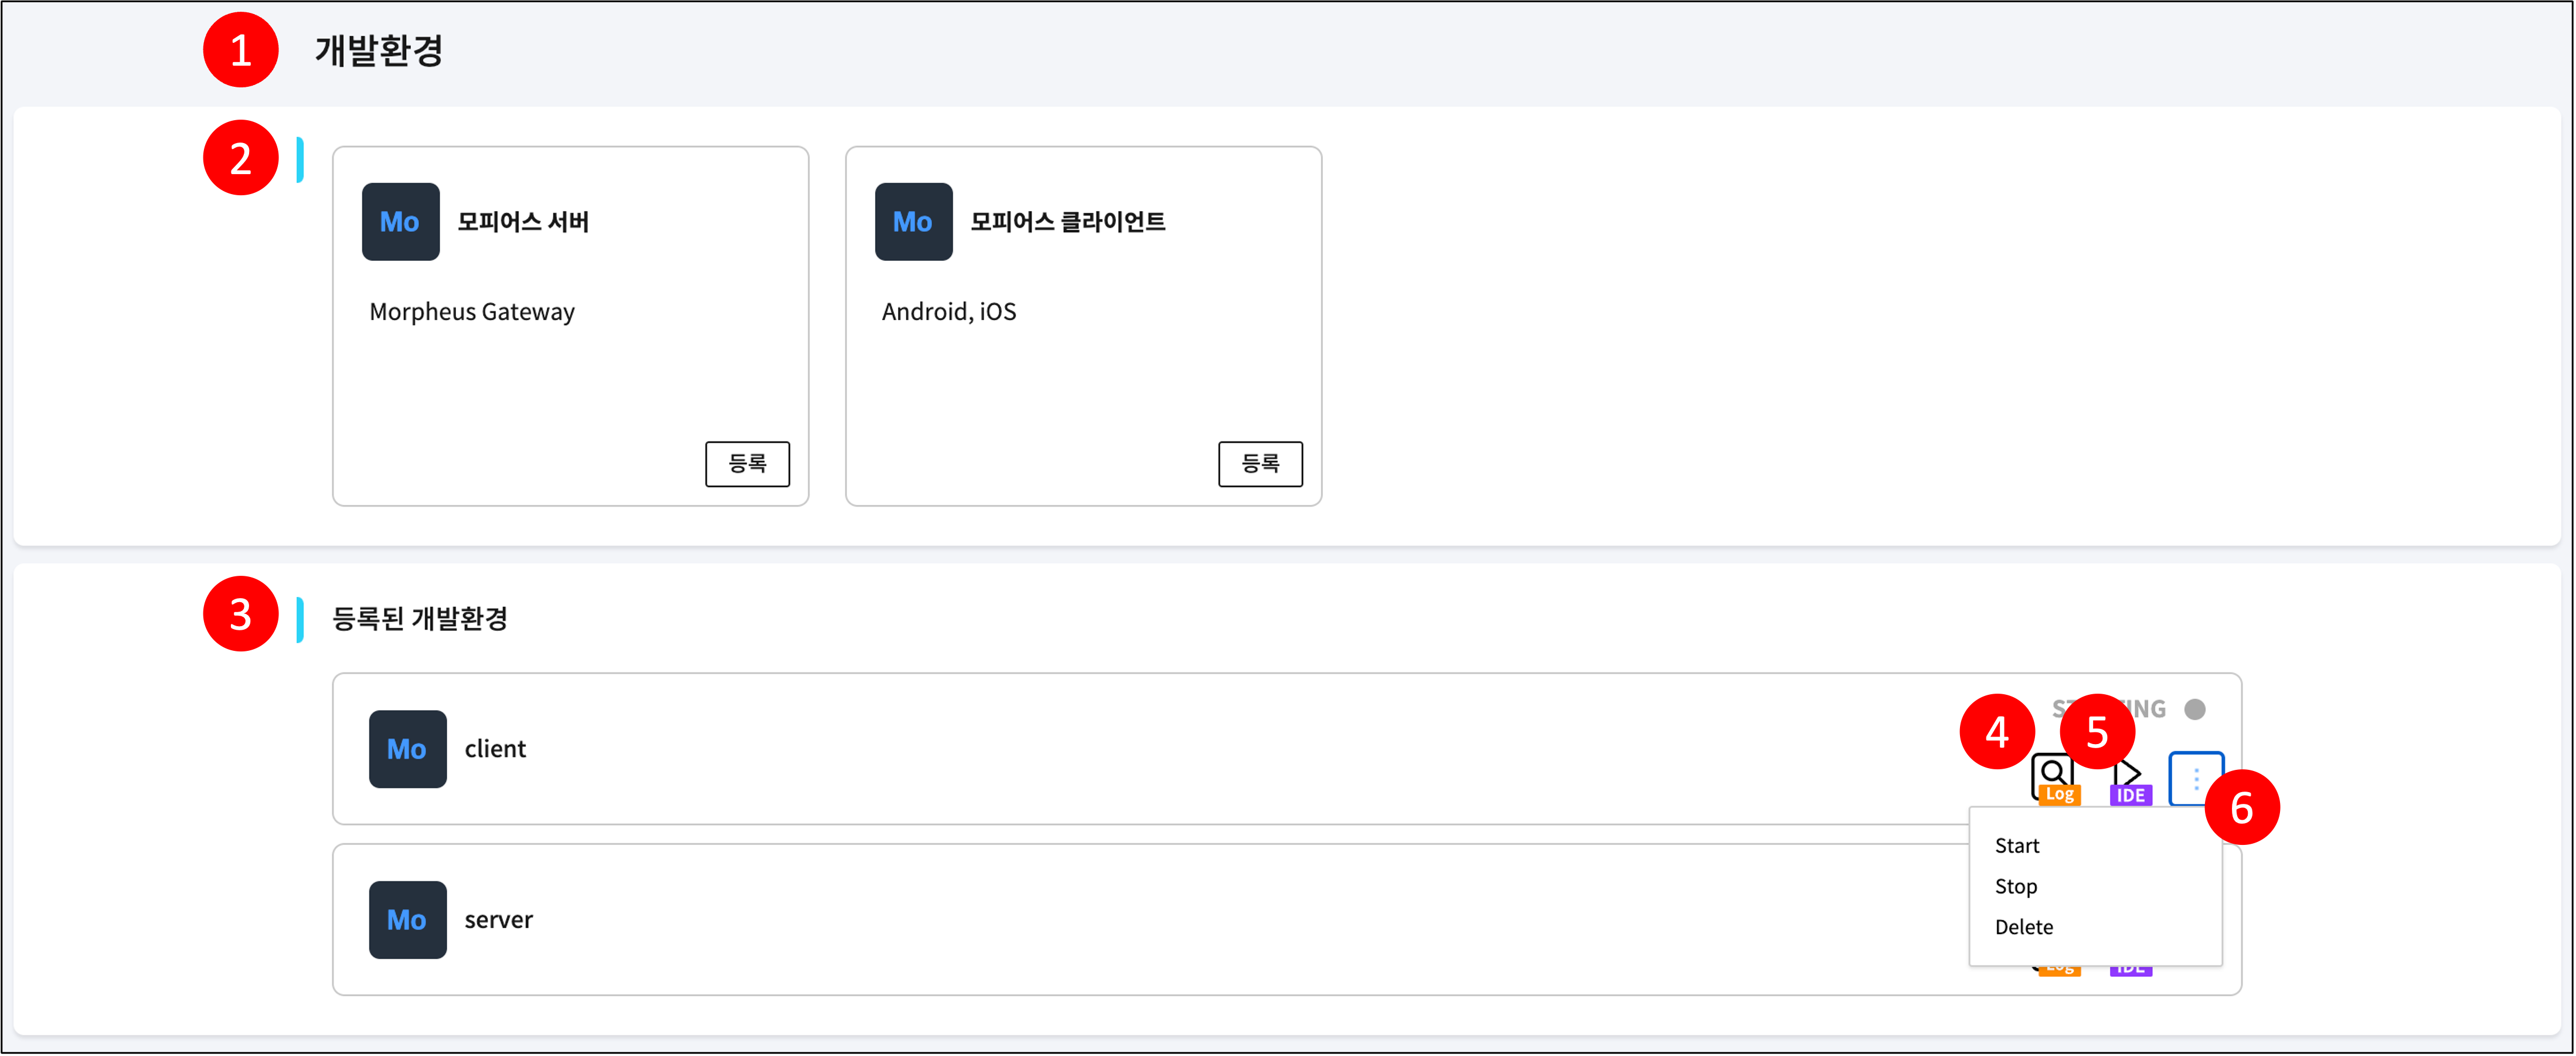
| 1 | Screen Overview | Screen to view and manage the project development environment. Provides an environment where you can actually develop registered projects. |
| 2 | Register | Register a development environment. (Reference) |
| 3 | Registered Development Environments | View registered development environments. |
| 4 | Logs | View development environment logs. |
| 5 | IDE | Opens the environment (IDE) required for program development in the browser. You can view, manage, and run project code in this IDE. (Reference) |
| 6 | More | Start, Stop, Delete the development environment. |
¶ 5.1 Register Development Environment
| No. | Category | Description |
|---|---|---|
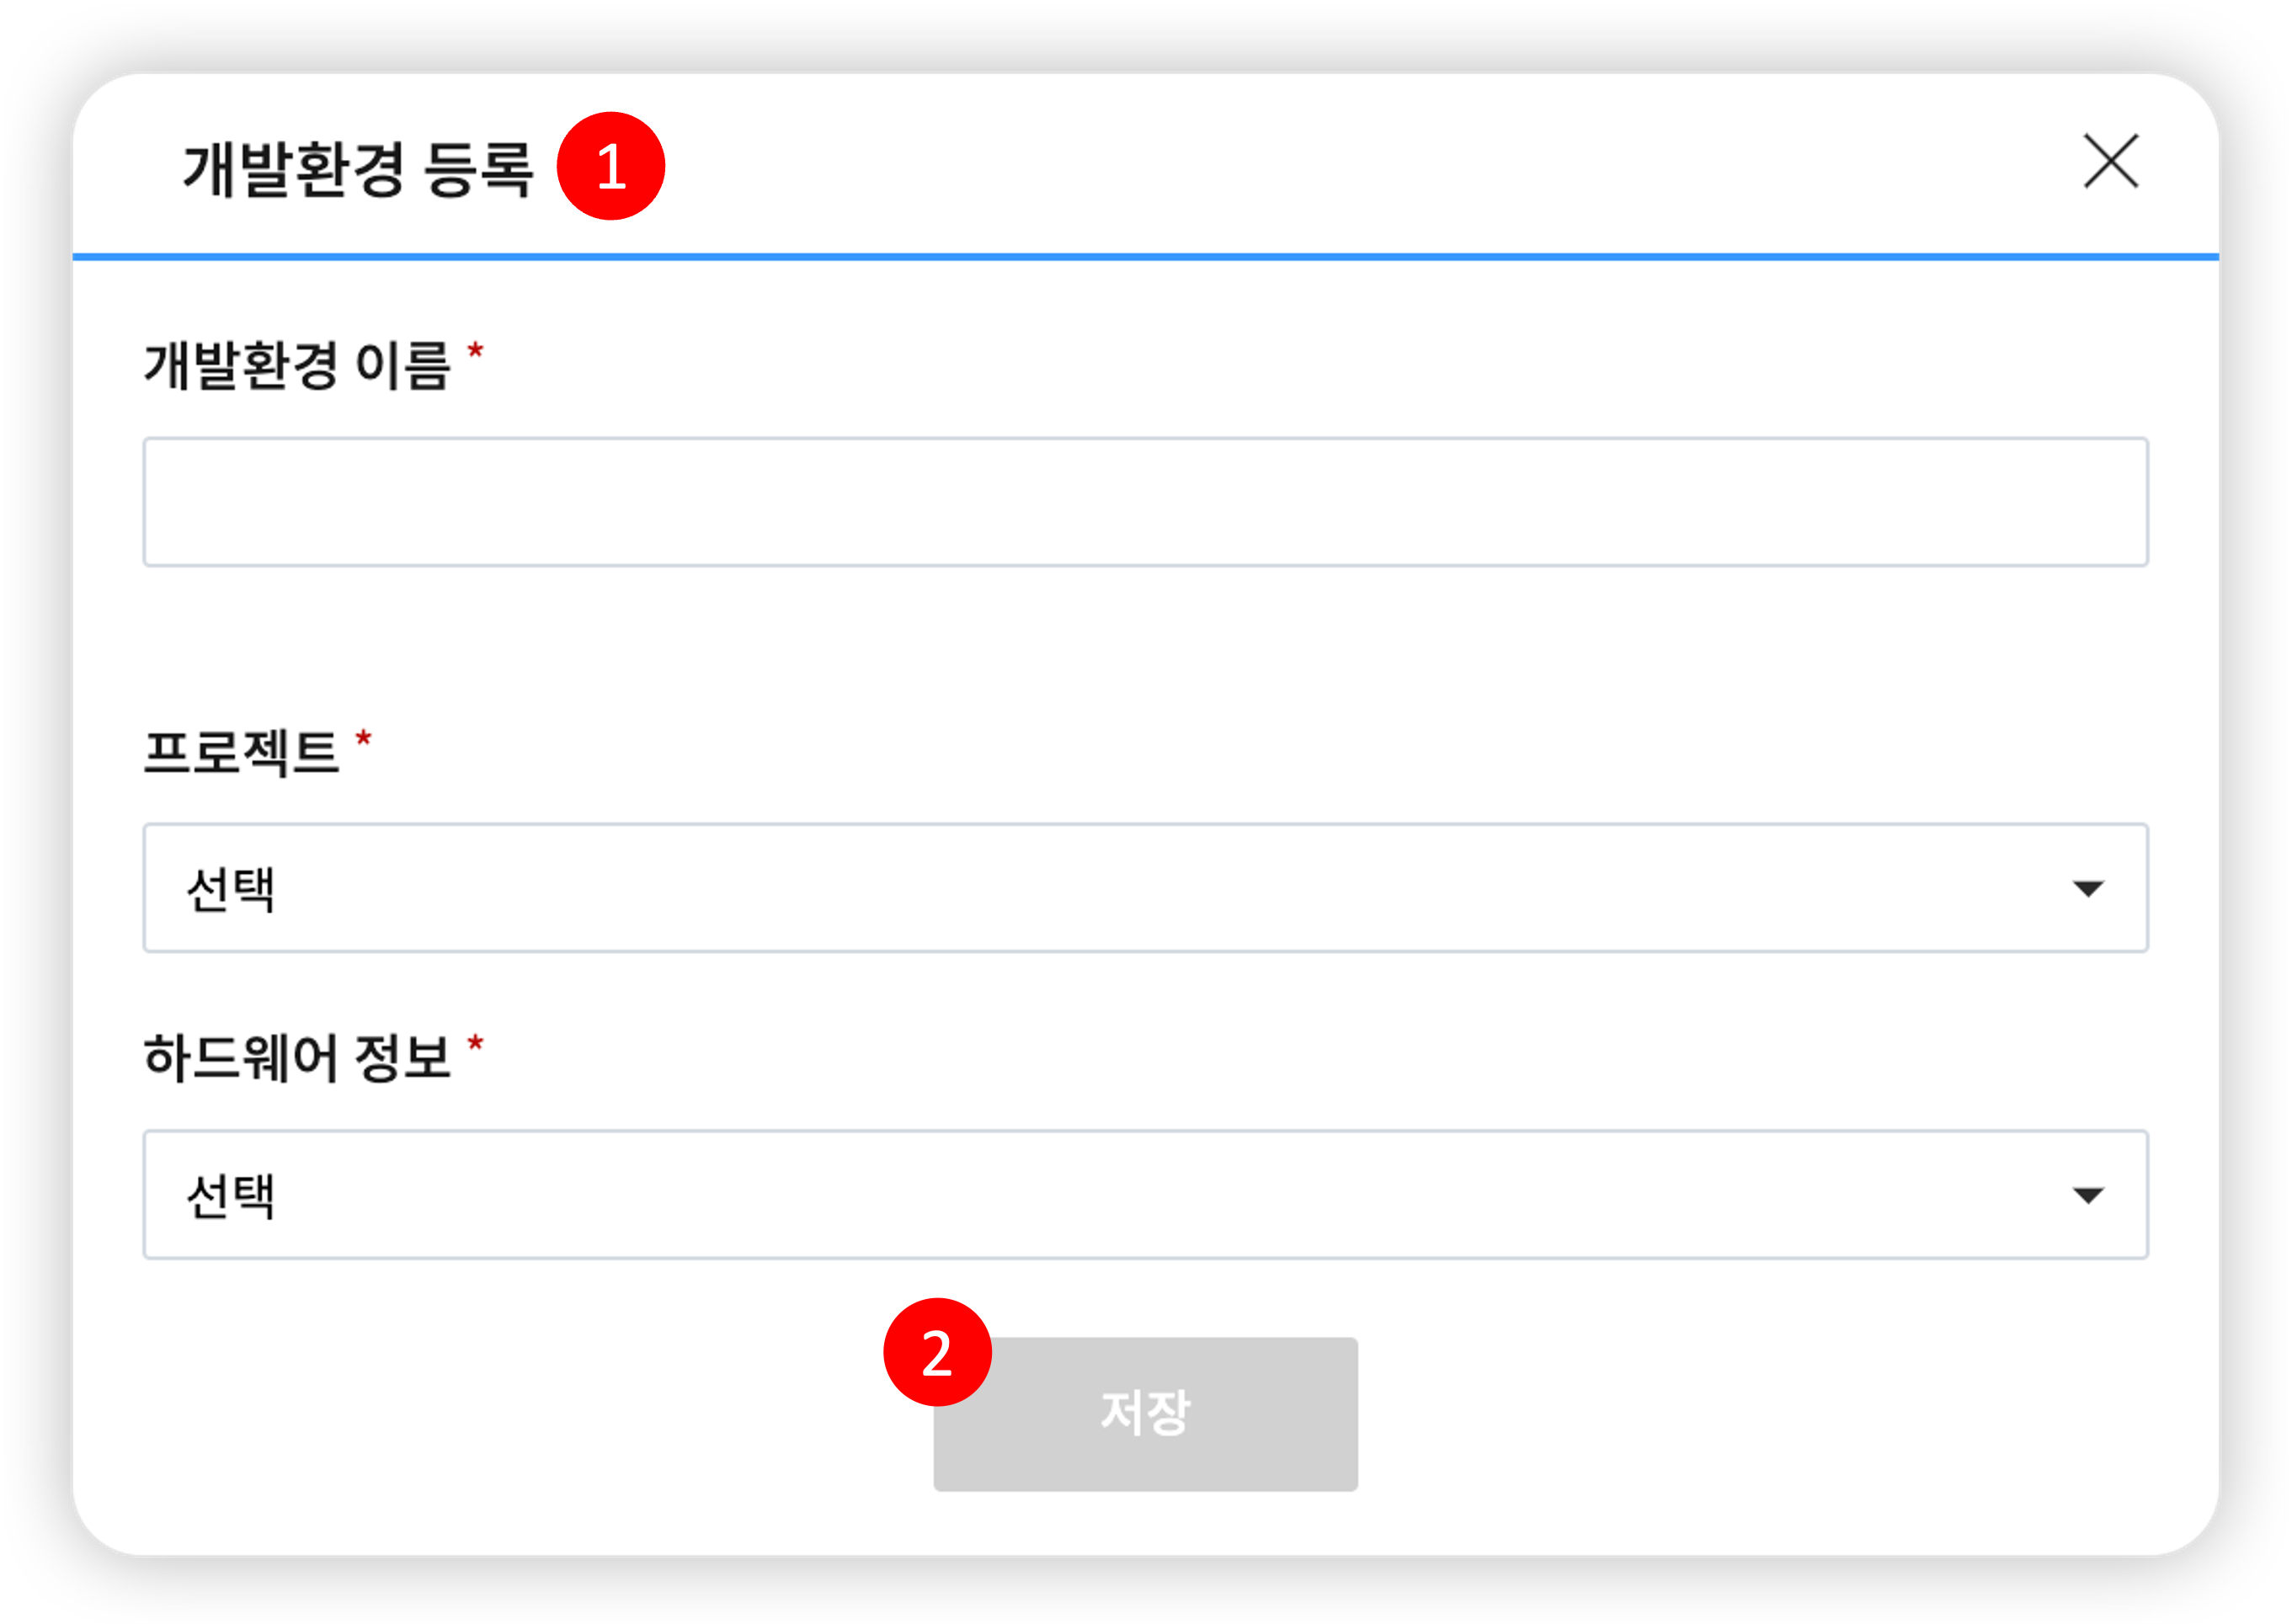
| 1 | Screen Overview | Register a development environment. (1) Development Environment Name: Required field. (2) Project: Required field. A project targeted for development environment creation must exist. Project creation is possible on the project home screen. (3) Hardware Information: Required field. Select resources considering the case of installing plugins in the development environment. Development environments consume significant resources, so it is recommended to terminate and delete the environment when not in use. |
| 2 | Save | Registers the development environment with the entered content. |
¶ 5.2 Run Development Environment IDE
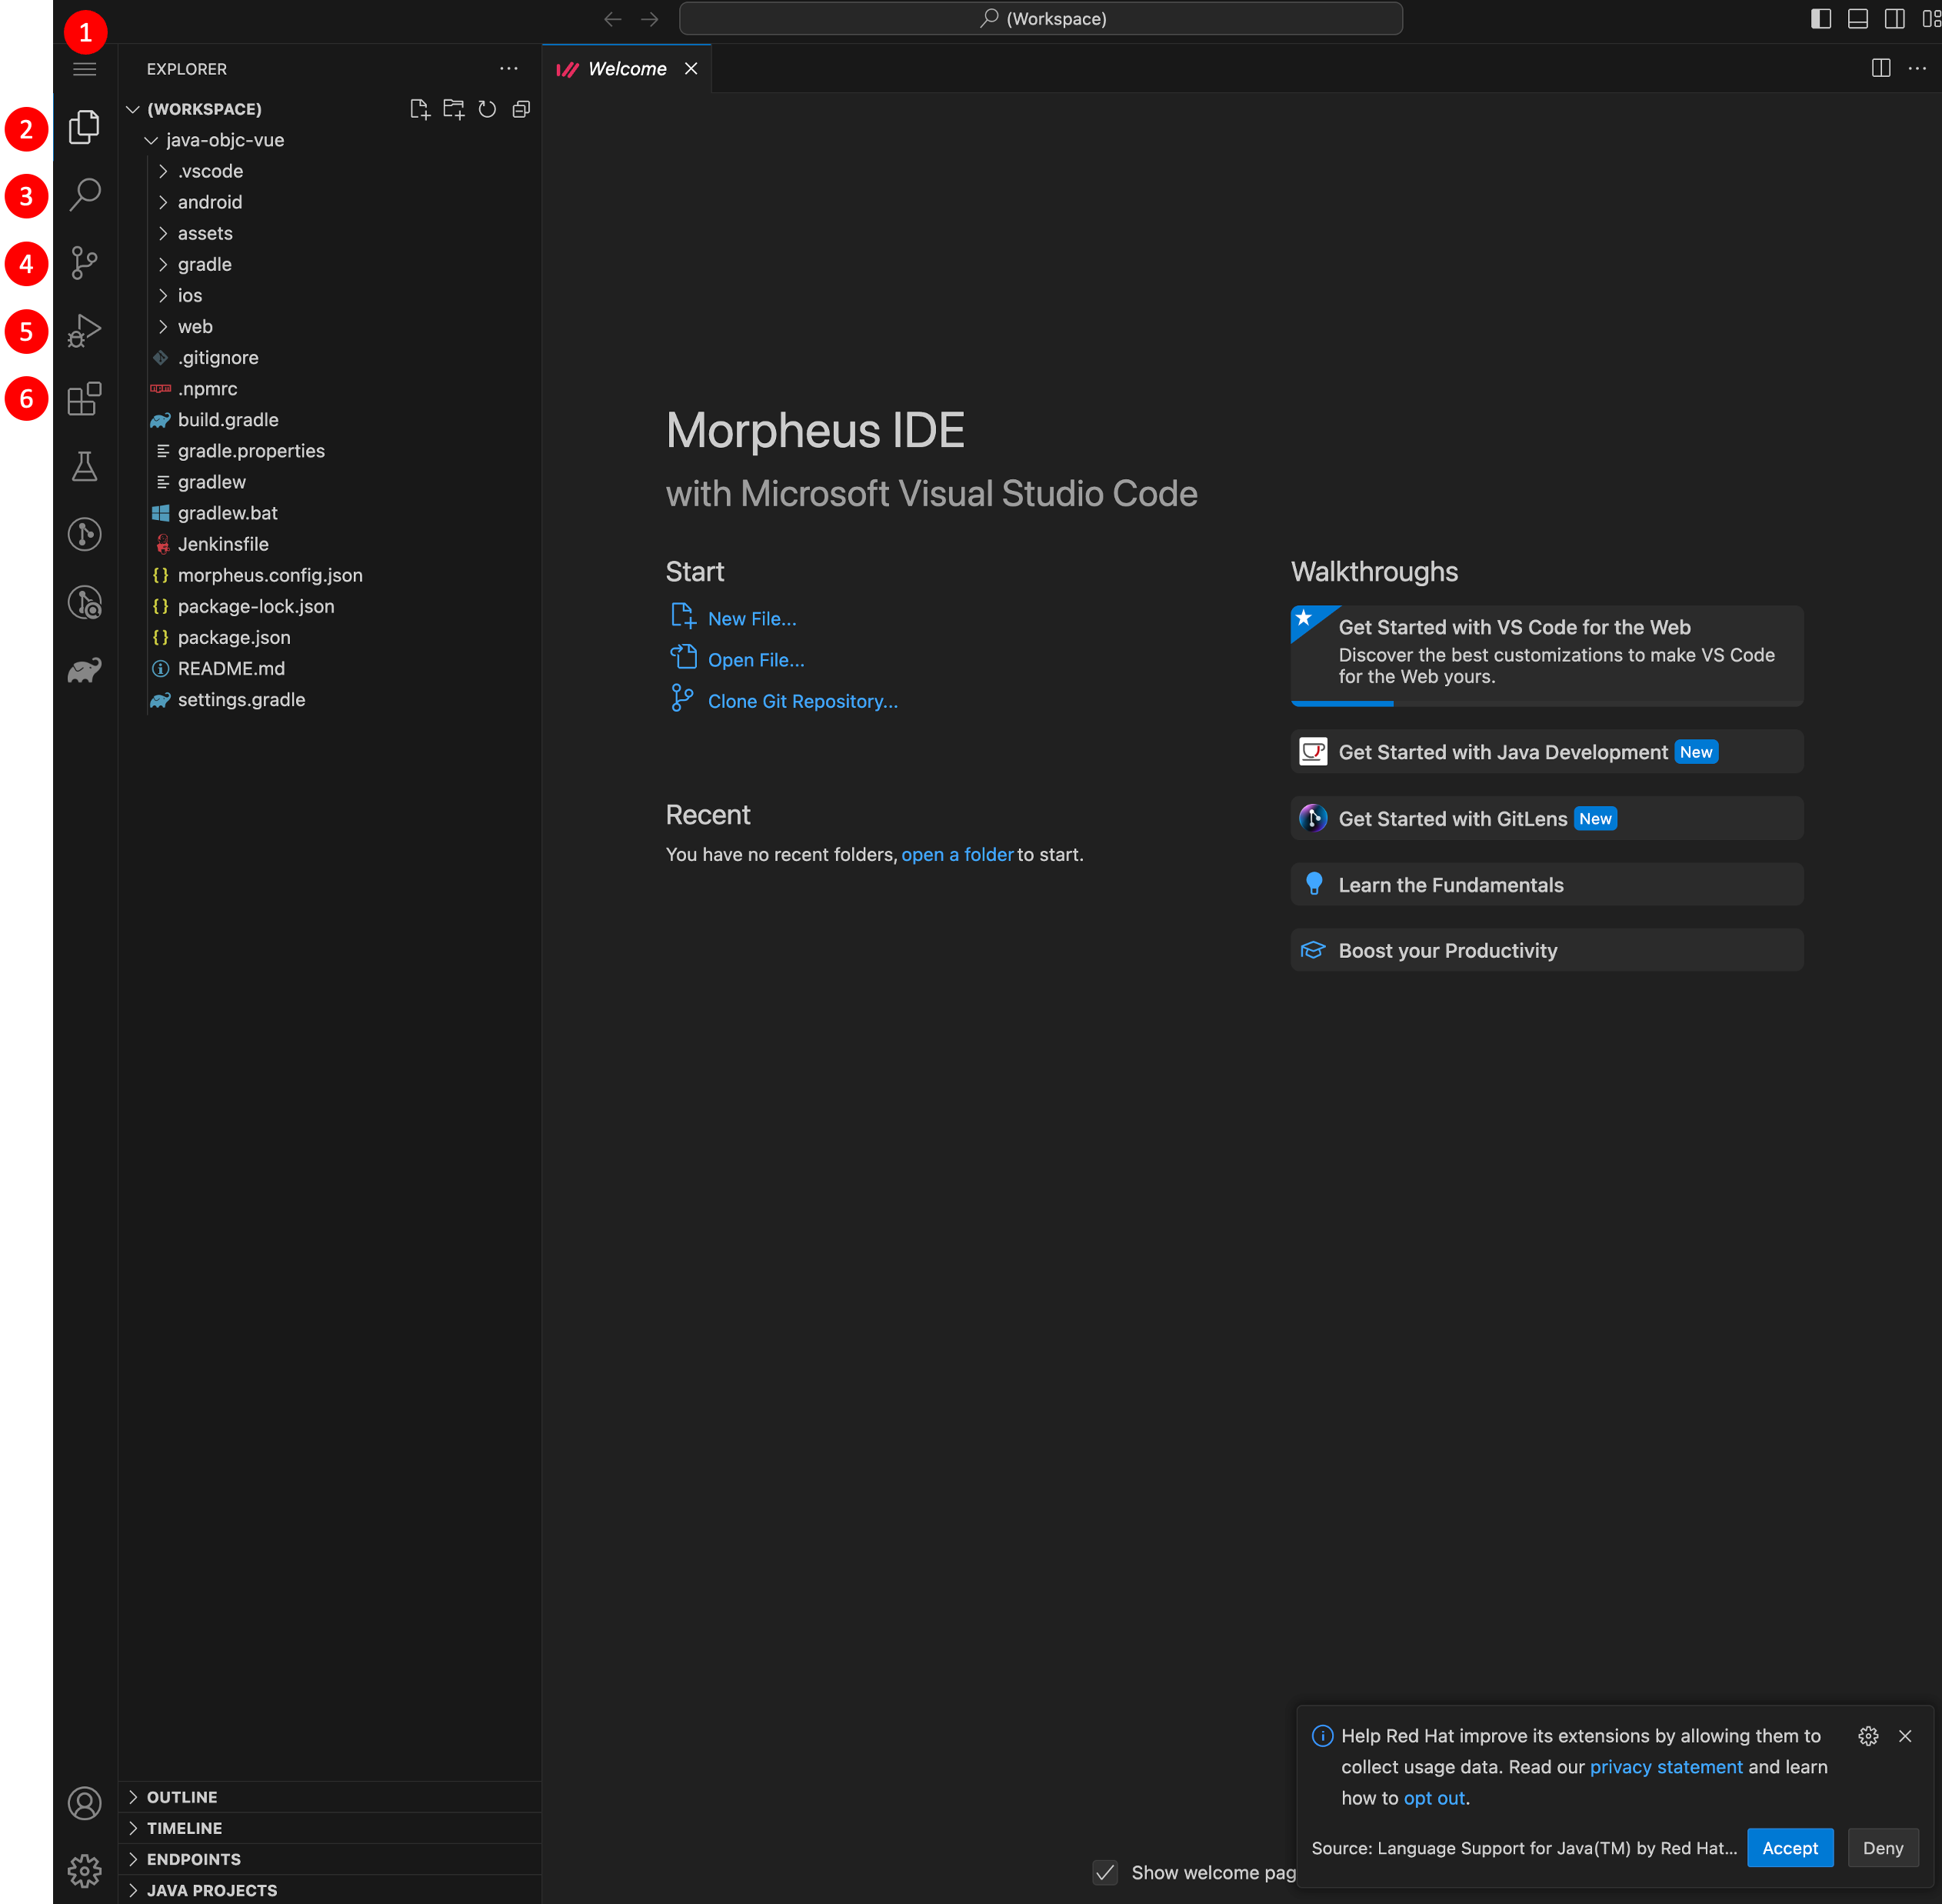
| No. | Category | Description |
|---|---|---|
| 1 | Screen Overview | Opens a Web IDE window where you can check and actually run the source code within the project. |
| 2 | Source Code | Check the source code within the project. Selecting it allows you to view and edit the detailed content of the source code on the right. |
| 3 | Search | Search for source code within the project. |
| 4 | Version Control | After writing and modifying source code, reflect it with a version control tool (Git). |
| 5 | Run | Run the source code. |
| 6 | Install Extensions | Install programs necessary for the IDE environment. |
¶ 6. Team Members

| No. | Category | Description |
|---|---|---|
| 1 | Screen Overview | Screen for managing team members. Team members refer to users who can access within the workspace. For details on team member permissions, please refer to "(Reference) Team Member Permissions". |
| 2 | Add Member | Add team members in the following order: (1) Search for a user by name or ID and select the target person you want to add as a team member. (2) Select the "Add Member" button. |
| 3 | Team Members | View registered team members. |
| 4 | Edit Team Member | Selecting this opens a pop-up window where you can edit team member information. (Refer to the "Edit Team Member" image below) |

- [Edit Team Member]
| No. | Category | Description |
|---|---|---|
| 1 | Screen Overview | Pop-up window for editing a team member. |
| 2 | Delete | The member is removed from the team. |
| 3 | Save | The member's permission information is changed. |
¶ (Reference) Team Member Permissions
- Team member permissions define the accessible permissions within the workspace menu.
| Category | Project | Development Environment | Device | Team Member | License Management |
|---|---|---|---|---|---|
| Owners | Read, Write | Read, Write | Read | Read, Write | Read, Write |
| Developers | Read, Write | Read, Write | Read | No Permission | Read |
¶ 7. License Management
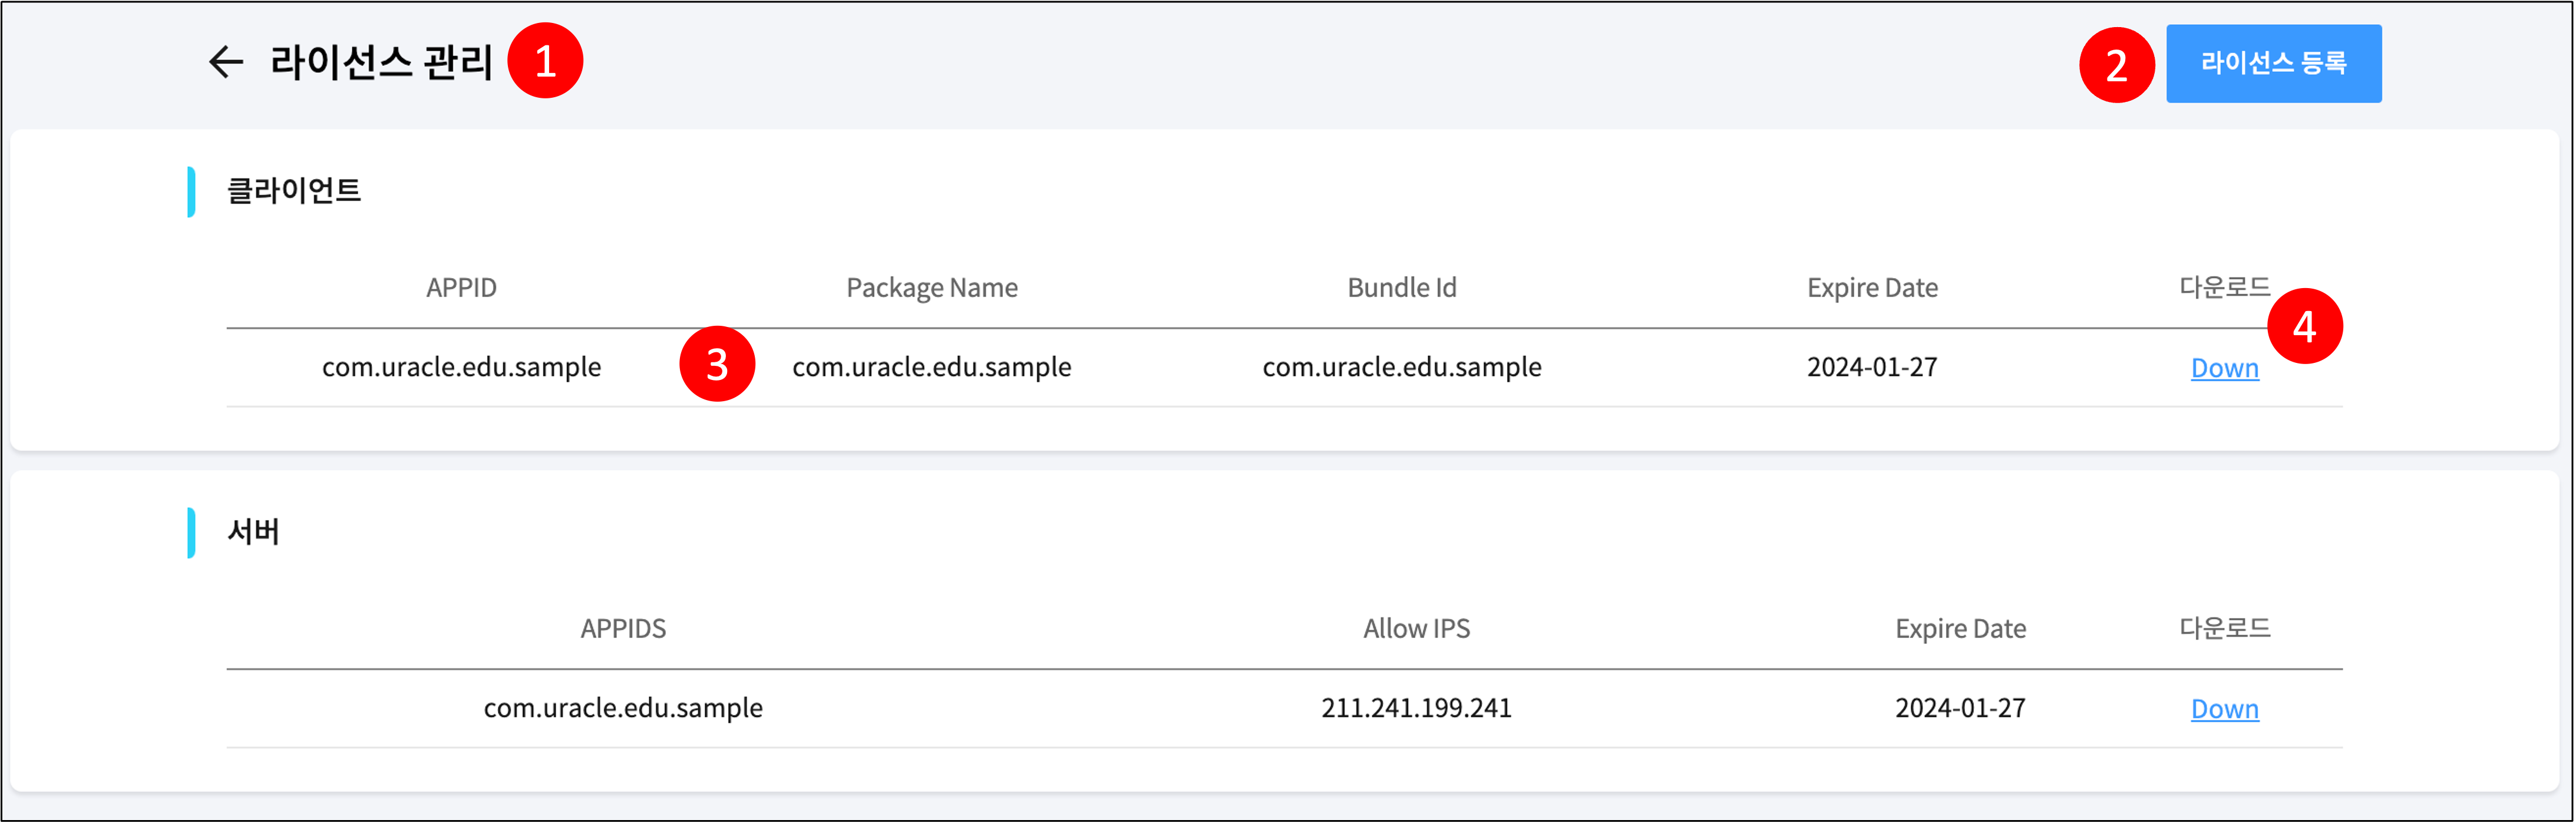
| No. | Category | Description |
|---|---|---|
| 1 | Screen Overview | Screen for viewing and managing licenses. Licenses are used for creating Morpheus projects. |
| 2 | Register | Register a license. (Refer to the "Upload License" image below) |
| 3 | Select | View the detailed content of the license. (Refer to the "License Details" image below) |
| 3 | Download | Download the license. |
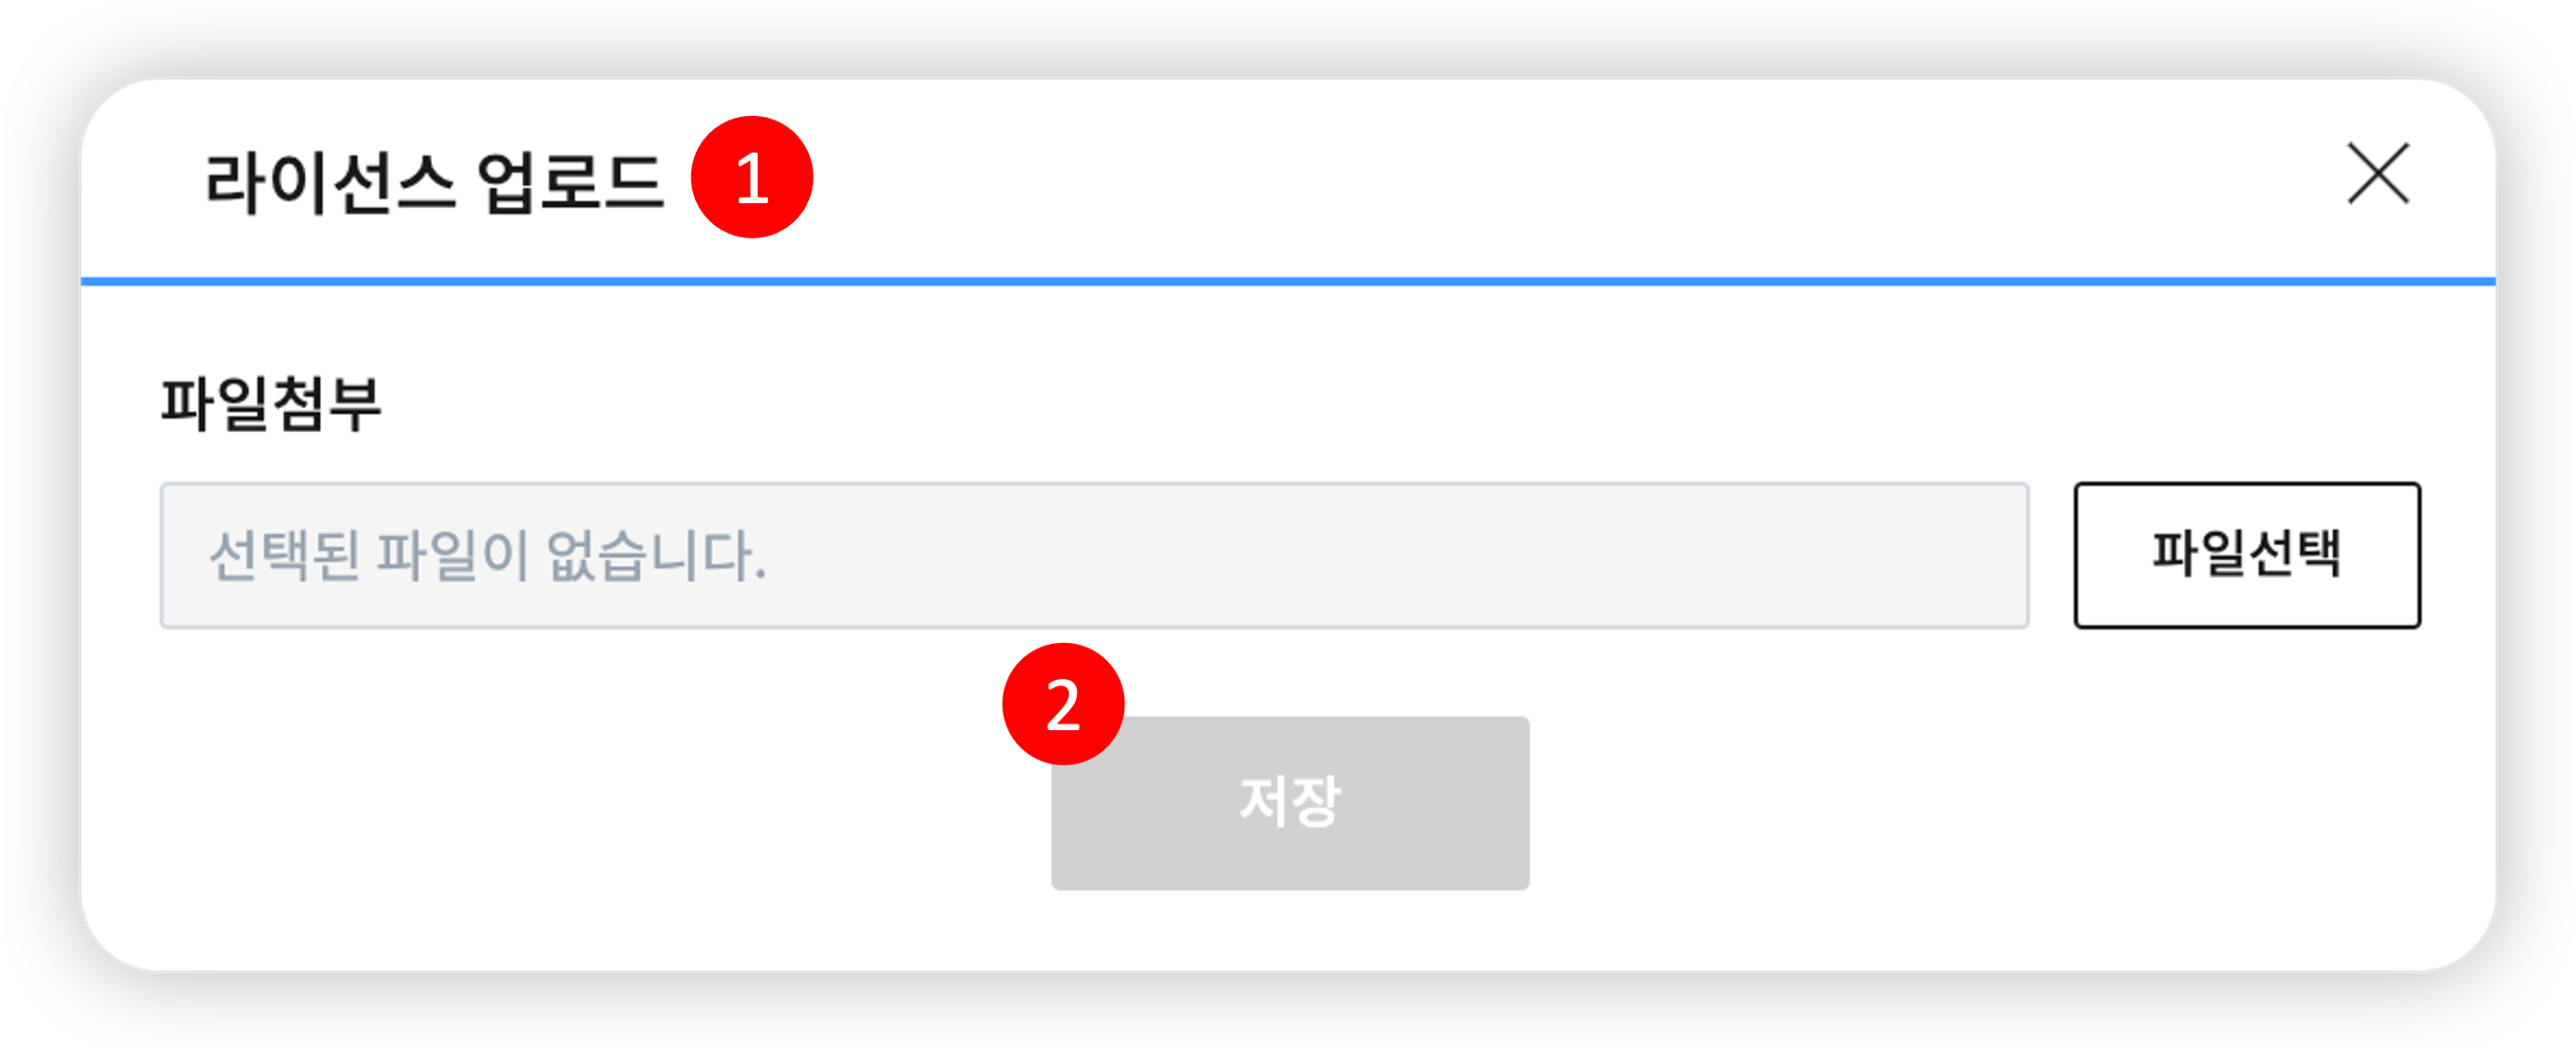
- [Upload License]
| No. | Category | Description |
|---|---|---|
| 1 | Screen Overview | Register a license. Only workspace administrators can register licenses. Please upload the license in compressed file format (zip) provided by Uracle. |
| 2 | Save | Registers the entered license. |
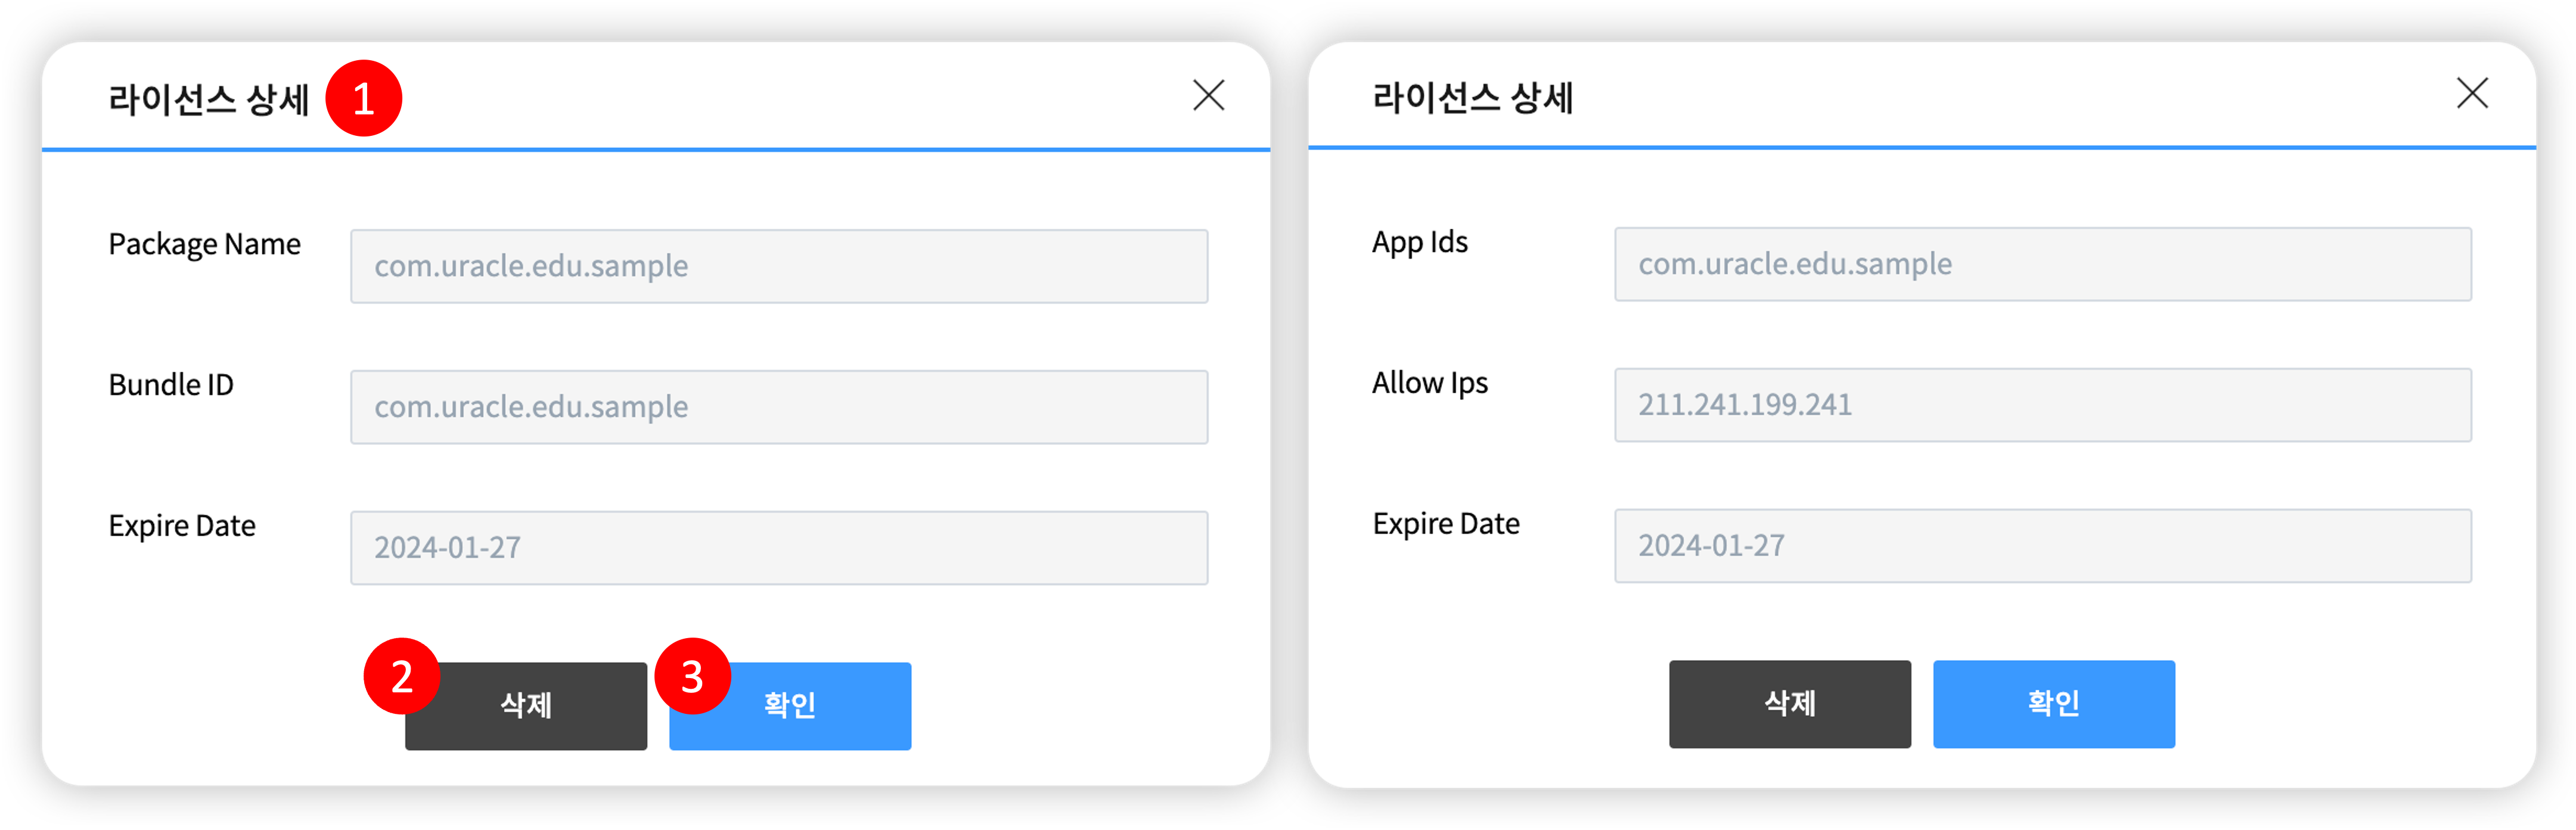
- [License Details]
| No. | Category | Description |
|---|---|---|
| 1 | Screen Overview | This pop-up window allows you to view the detailed content of a license and delete it. The left is the client license detail pop-up window, and the right is the server license detail pop-up window. |
| 2 | Delete | Deletes the registered license. Only workspace administrators can delete licenses. |
| 3 | Confirm | The window closes. |
¶ 8. Device
¶ 8.1 Emulator Management
| No. | Category | Description |
|---|---|---|
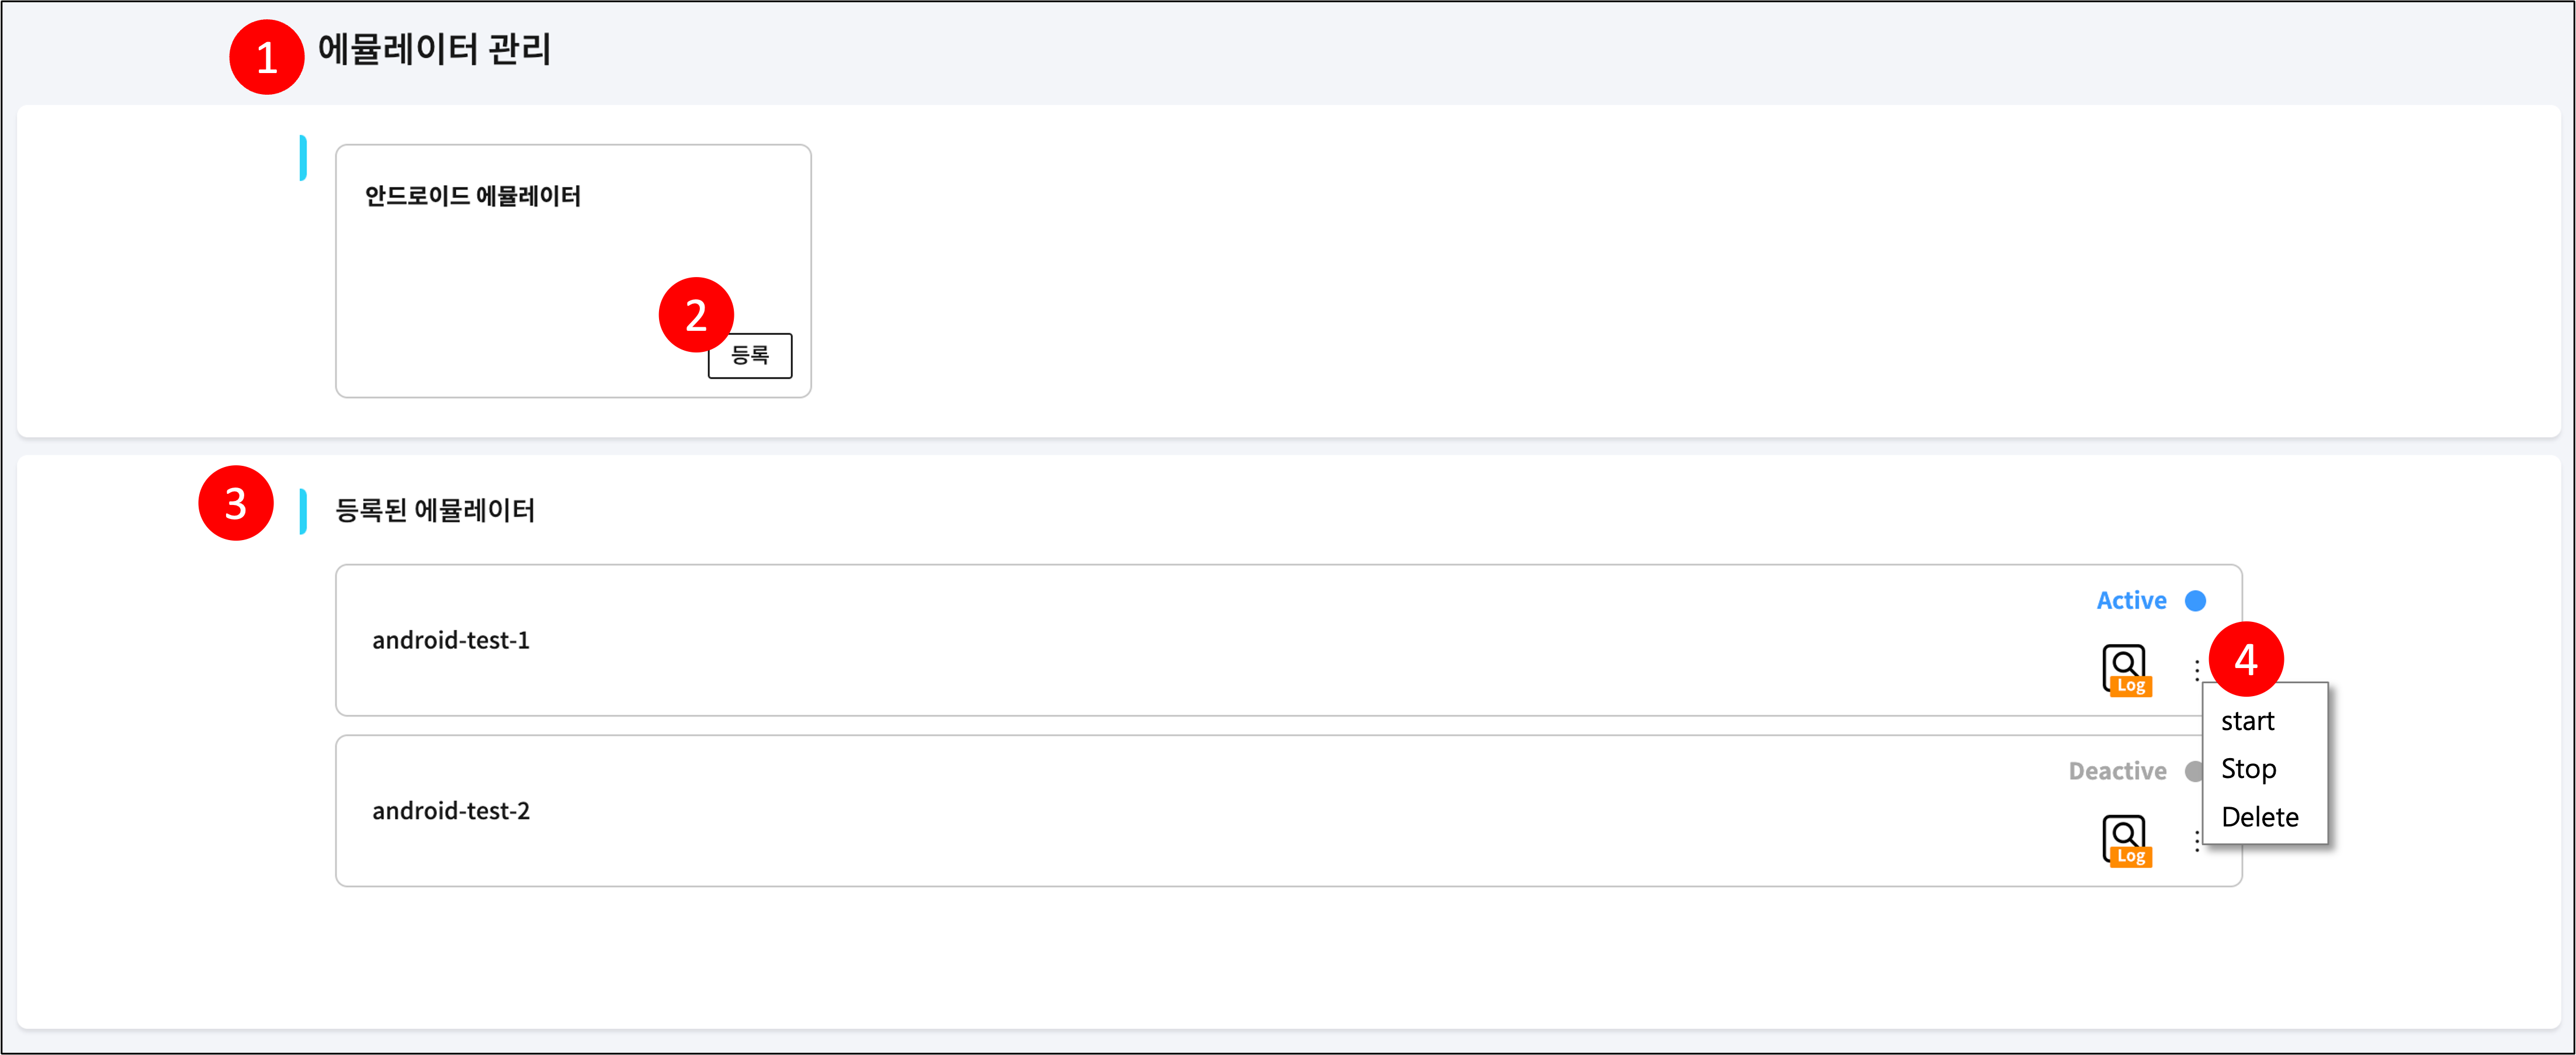
| 1 | Screen Overview | Screen for viewing and managing emulators. |
| 2 | Register | Register an emulator. (Refer to the "Register Emulator" image below) |
| 3 | Registered Emulators | View the list of emulators registered so far. |
| 4 | Run Emulator | Start, stop, delete the emulator. |
- [Register Emulator]
| No. | Category | Description |
|---|---|---|
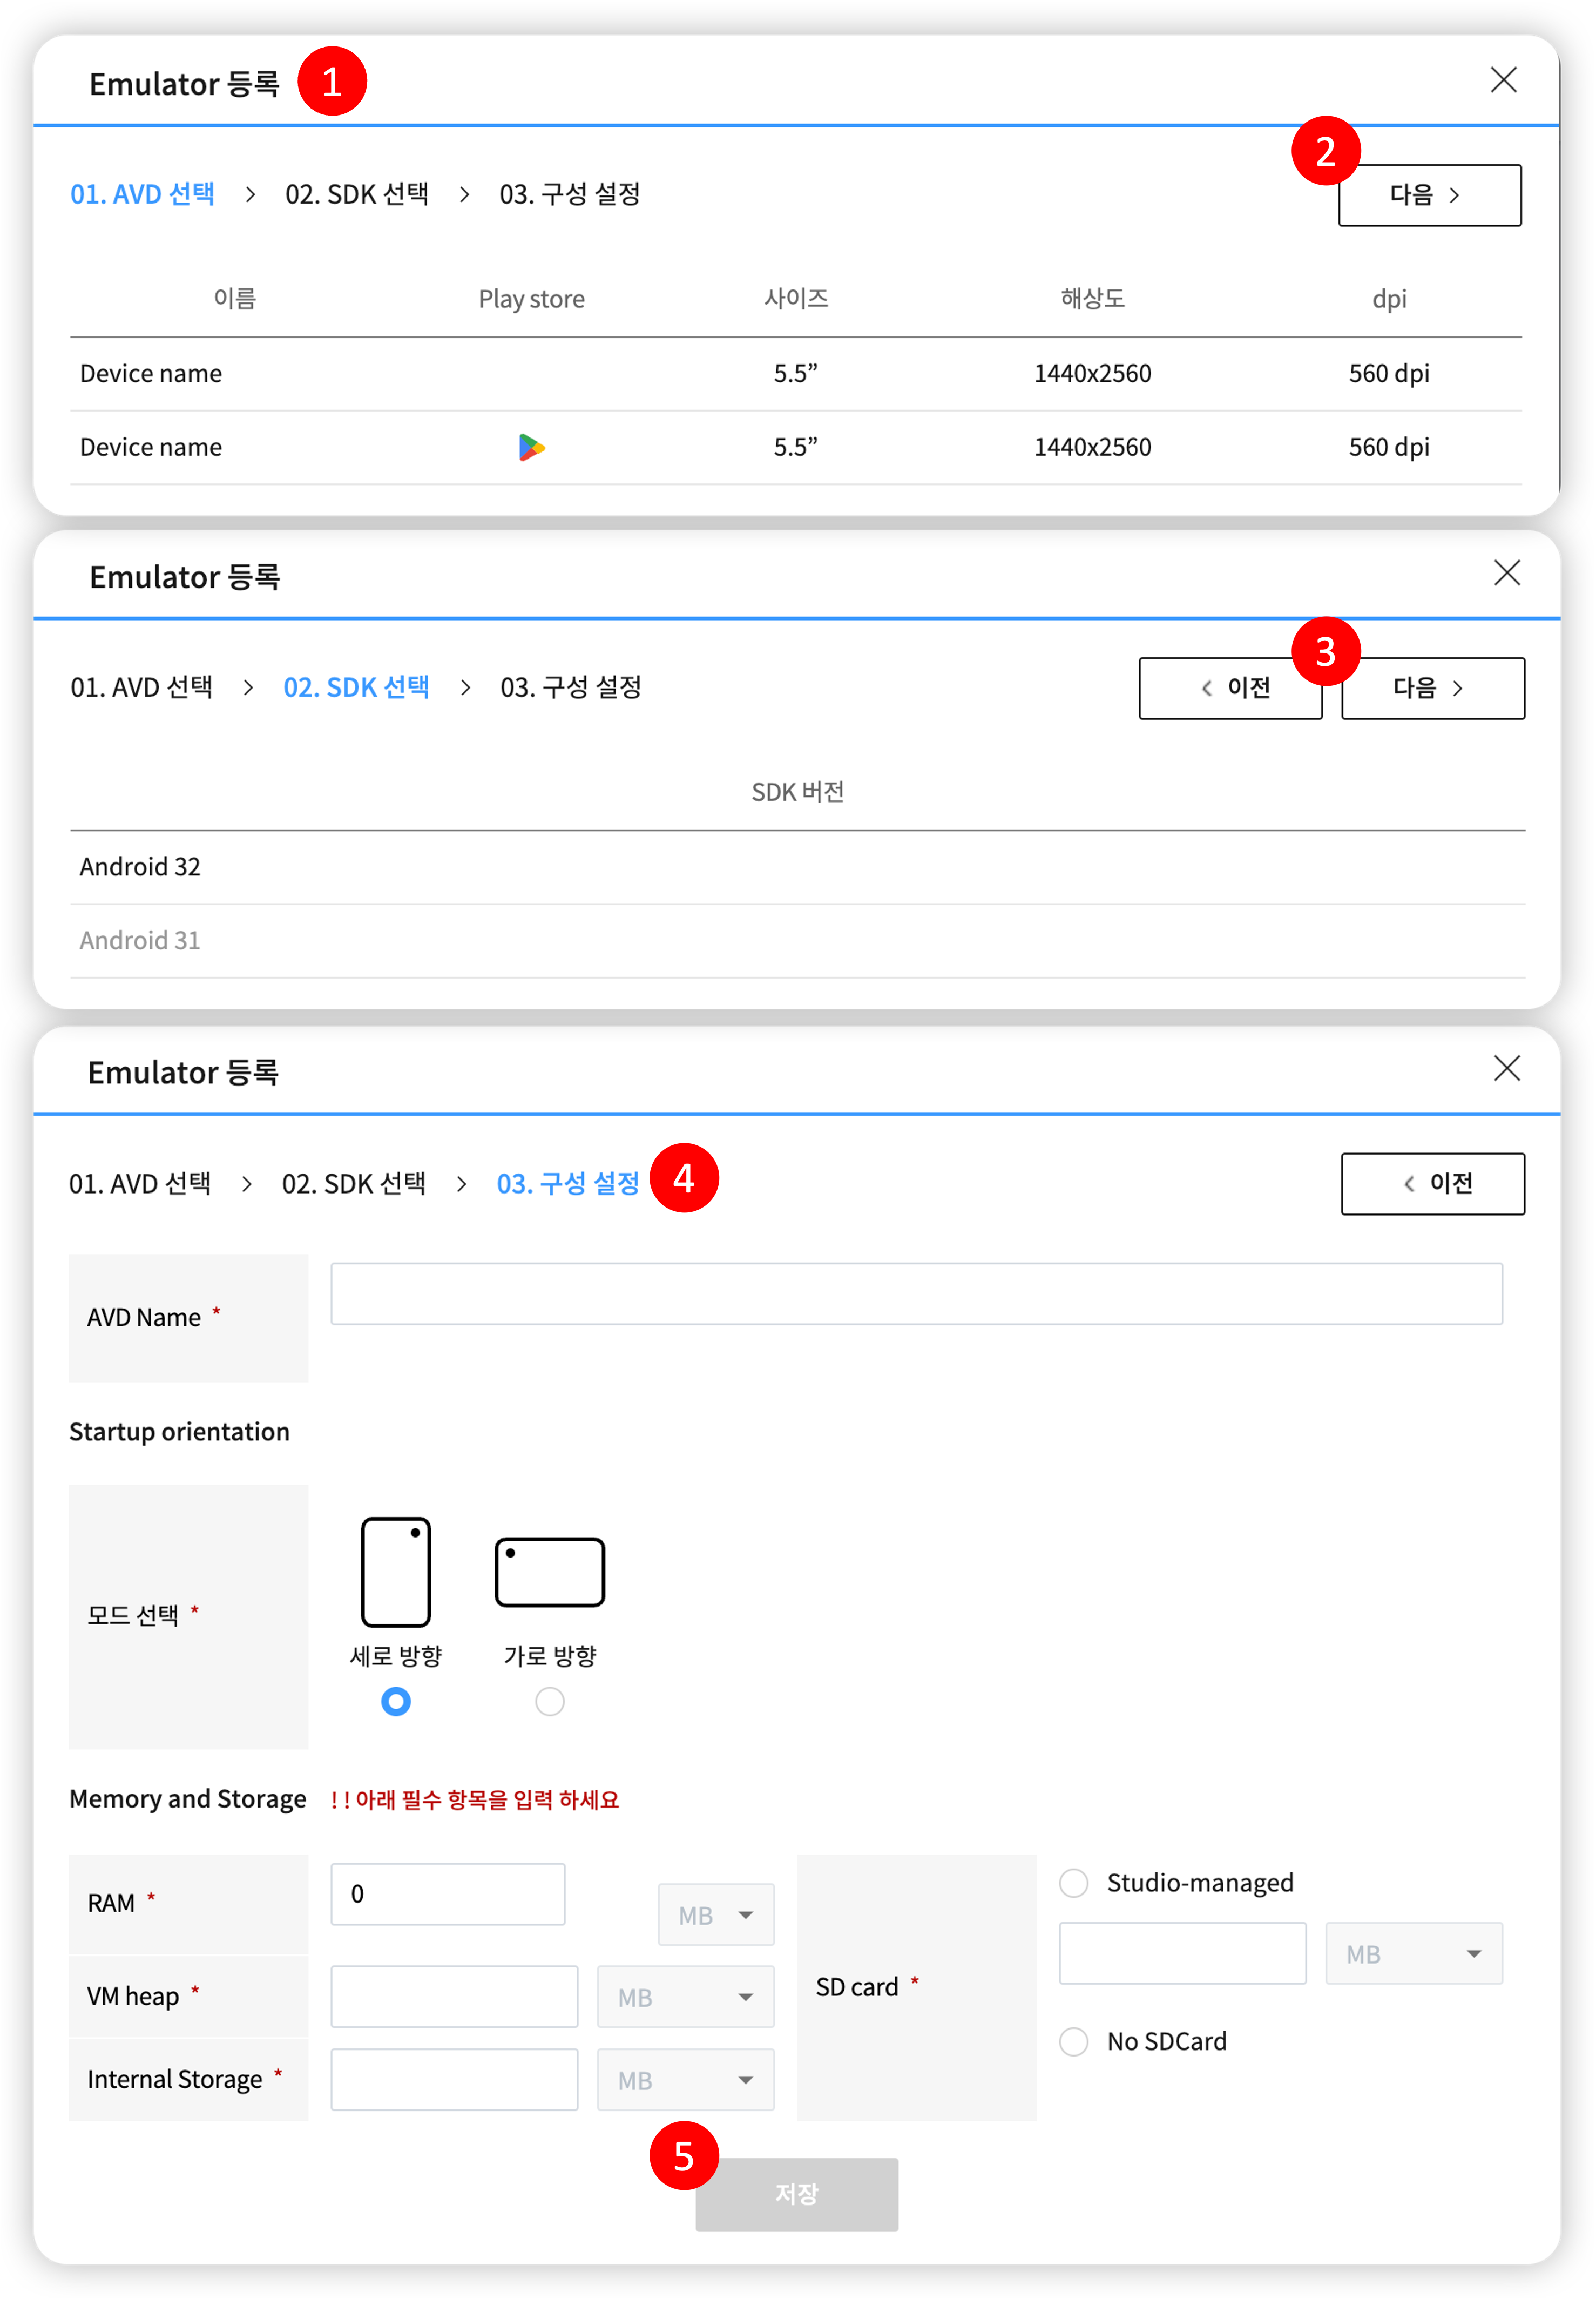
| 1 | Screen Overview | Pop-up window for registering an emulator. |
| 2 | Select AVD | Select the emulator model and then select the Next button. |
| 3 | Select SDK | Select the SDK version and then select the Next button. |
| 4 | Save | Enter the configuration settings and then select the Save button. (1) ADD Name: Required field. (2) Select startup orientation mode: Required field. (3) Memory and Storage: Required field. Please enter the specifications of the emulator model (RAM, VM heap, Internal Storage, SD Card). |
¶ 8.2 STF Device List
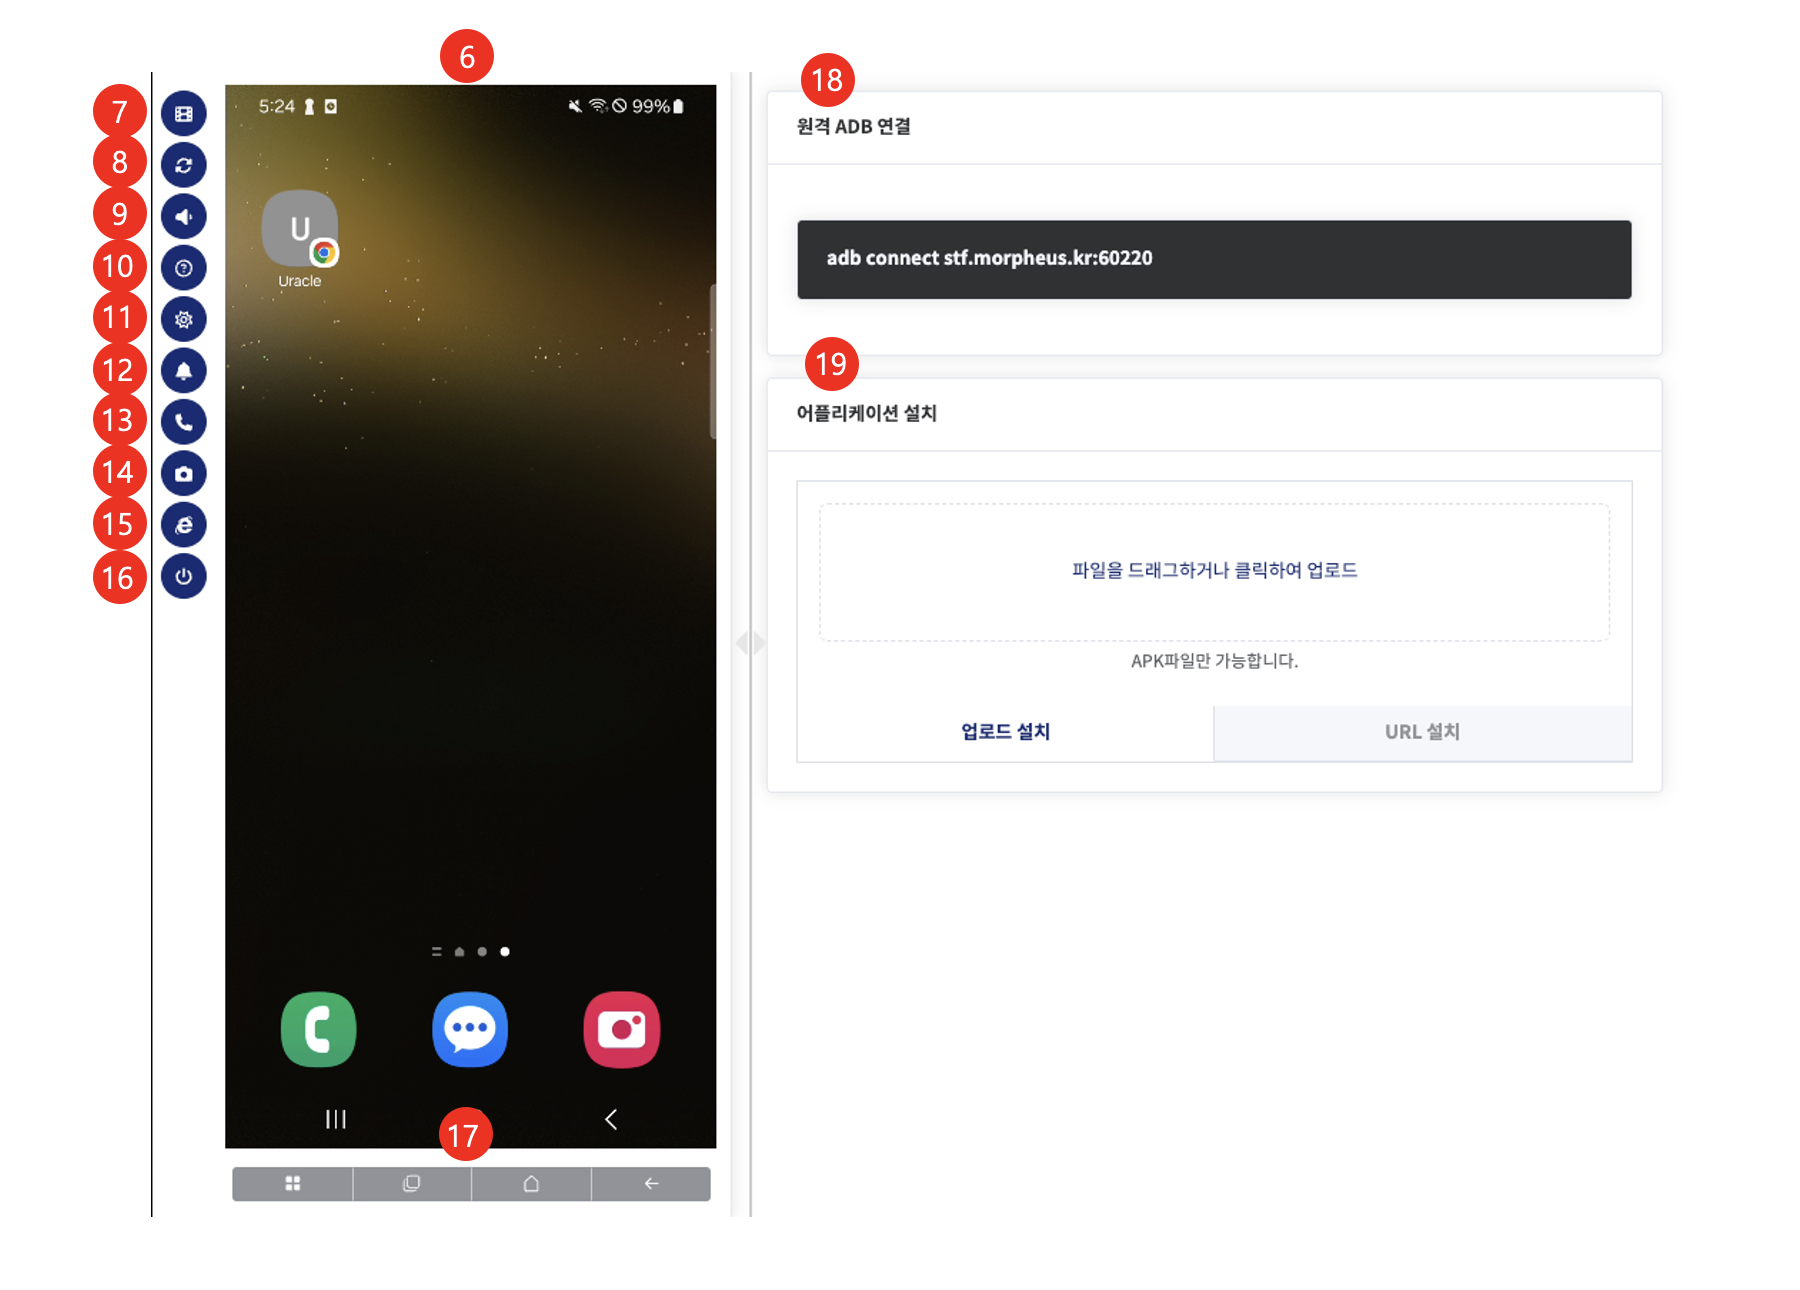
| No. | Category | Description |
|---|---|---|
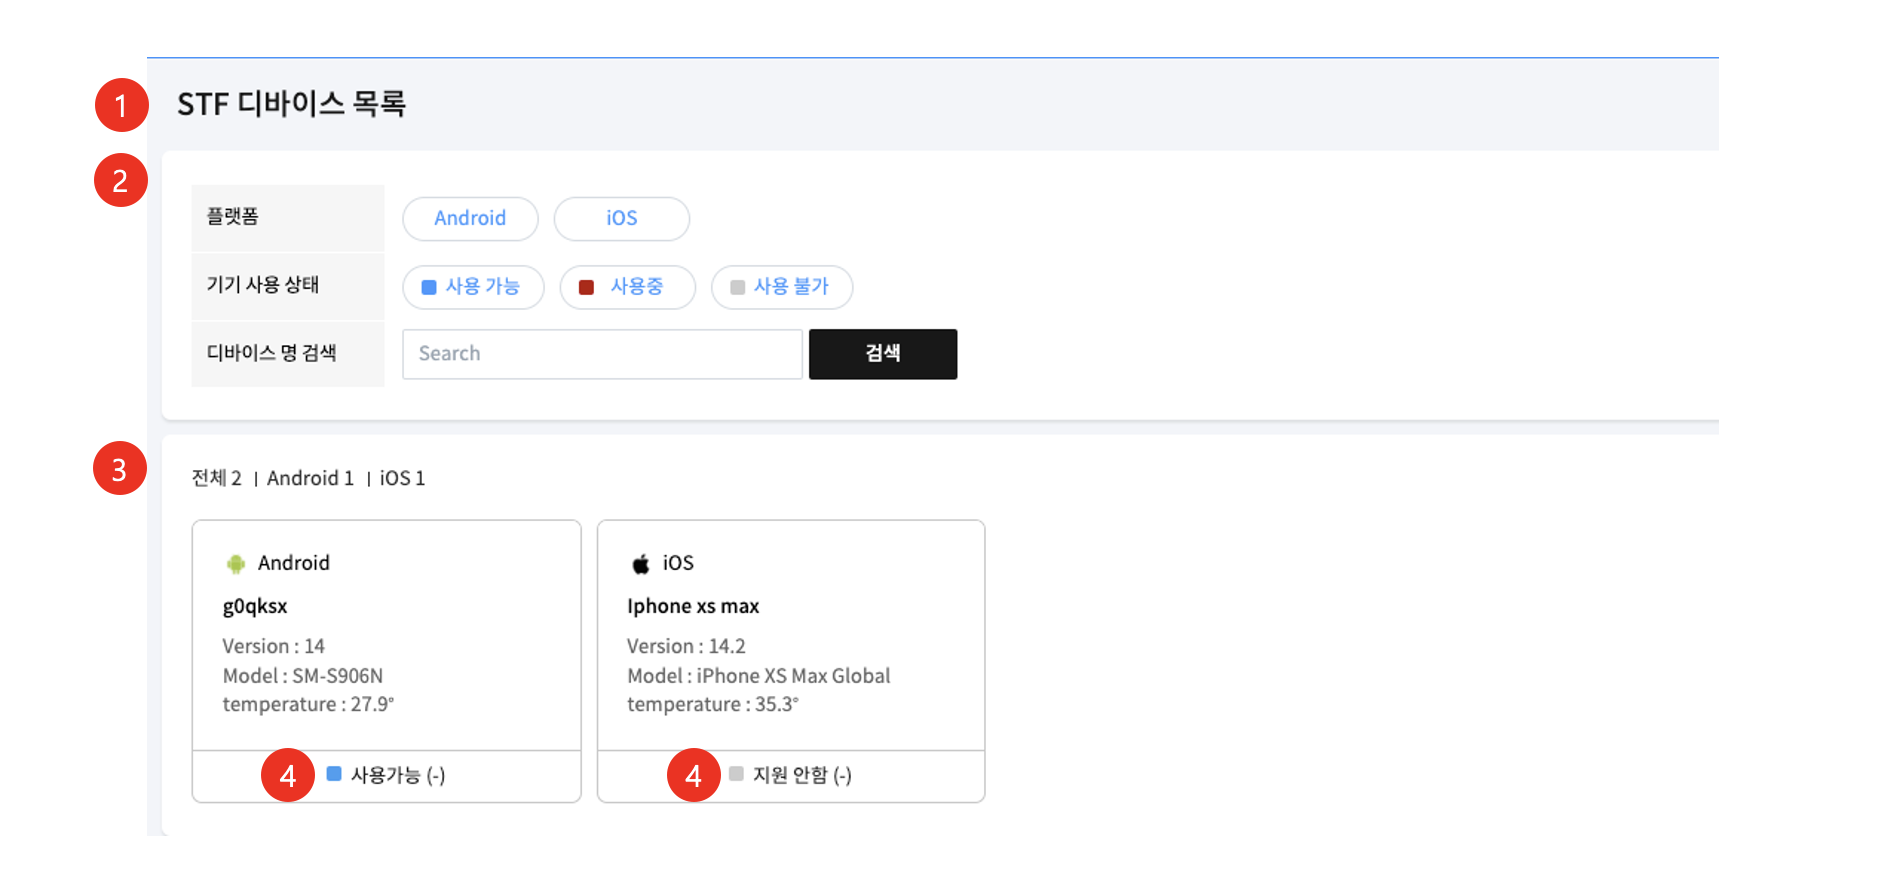
| 1 | Screen Overview | Screen for viewing and managing the STF target list. Registration is possible through the Emulator Management menu. |
| 2 | Search Conditions | Enter the search conditions and then select the "Search" button. |
| 3 | View List | View the STF target list. Selecting it opens the STF environment where you can test the device in your browser. |
| 4 | Check Device Status | You can check the device's connection status and real-time status. |
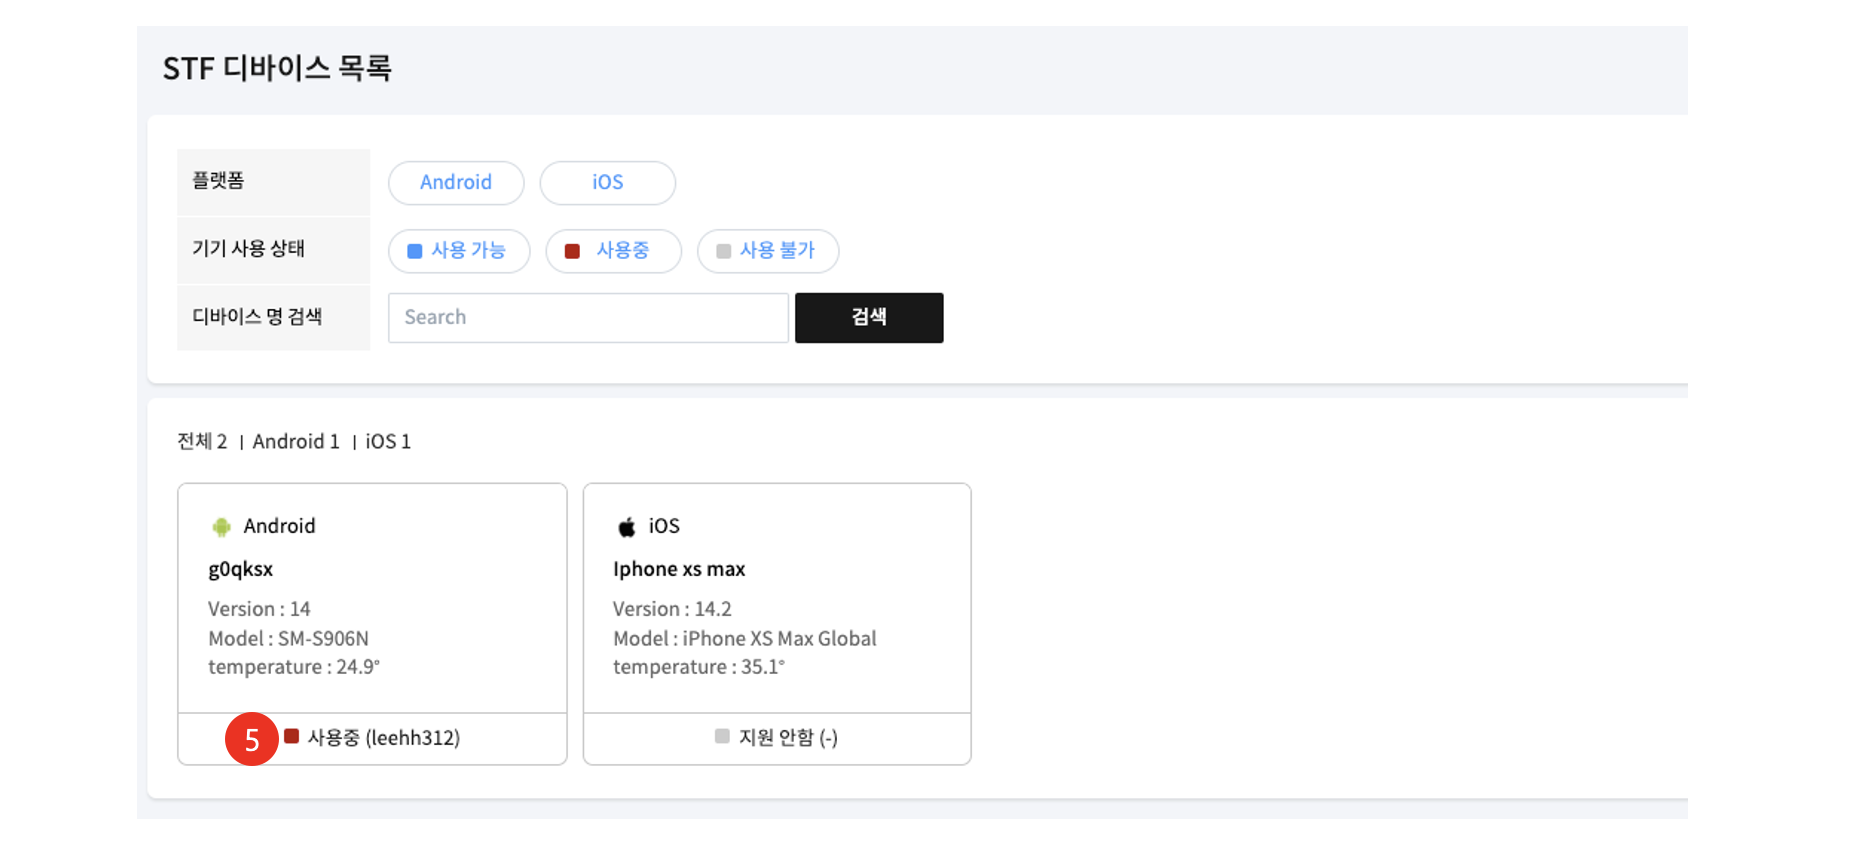
| 5 | Device Occupancy Management | If a specific user is occupying a device, other users' access is restricted, allowing exclusive use. |
| 6 | Remote Device Control | You can remotely operate the device with a mouse through a web browser. |
| 7 | Remote Screen Quality | Depending on the network environment, you can switch the screen to high or low quality for smooth remote control. |
| 8 | Screen Rotation Control | You can switch and control the device screen orientation (landscape/portrait) in a remote environment. |
| 9 | Audio Operation | Unsupported feature |
| 10 | Device Information Shortcut | You can navigate to a screen where you can check the main information of the device at a glance. |
| 11 | Screen Brightness Control | You can remotely adjust the display brightness of the device. |
| 12 | Screen Volume Control | You can remotely control the audio volume of the device. |
| 13 | Phone App Shortcut | You can run the device's phone application in a remote environment. |
| 14 | Camera App Shortcut | You can remotely run the device's camera application and check the camera screen. |
| 15 | Browser Shortcut | You can remotely run the default browser on the device. |
| 16 | Lock Button Support | You can remotely lock and unlock the device screen. |
| 17 | Physical Button Support | You can remotely control basic physical button functions such as task switching, home, and back. |
| 18 | Remote ADB Connection Information | Provides remote ADB connection information for the device, which can be used for development or testing. |
| 19 | Remote App Installation | Users can remotely install applications on the device through a web browser. |
¶ 9. Settings
¶ 9.1 SDK Environment Settings
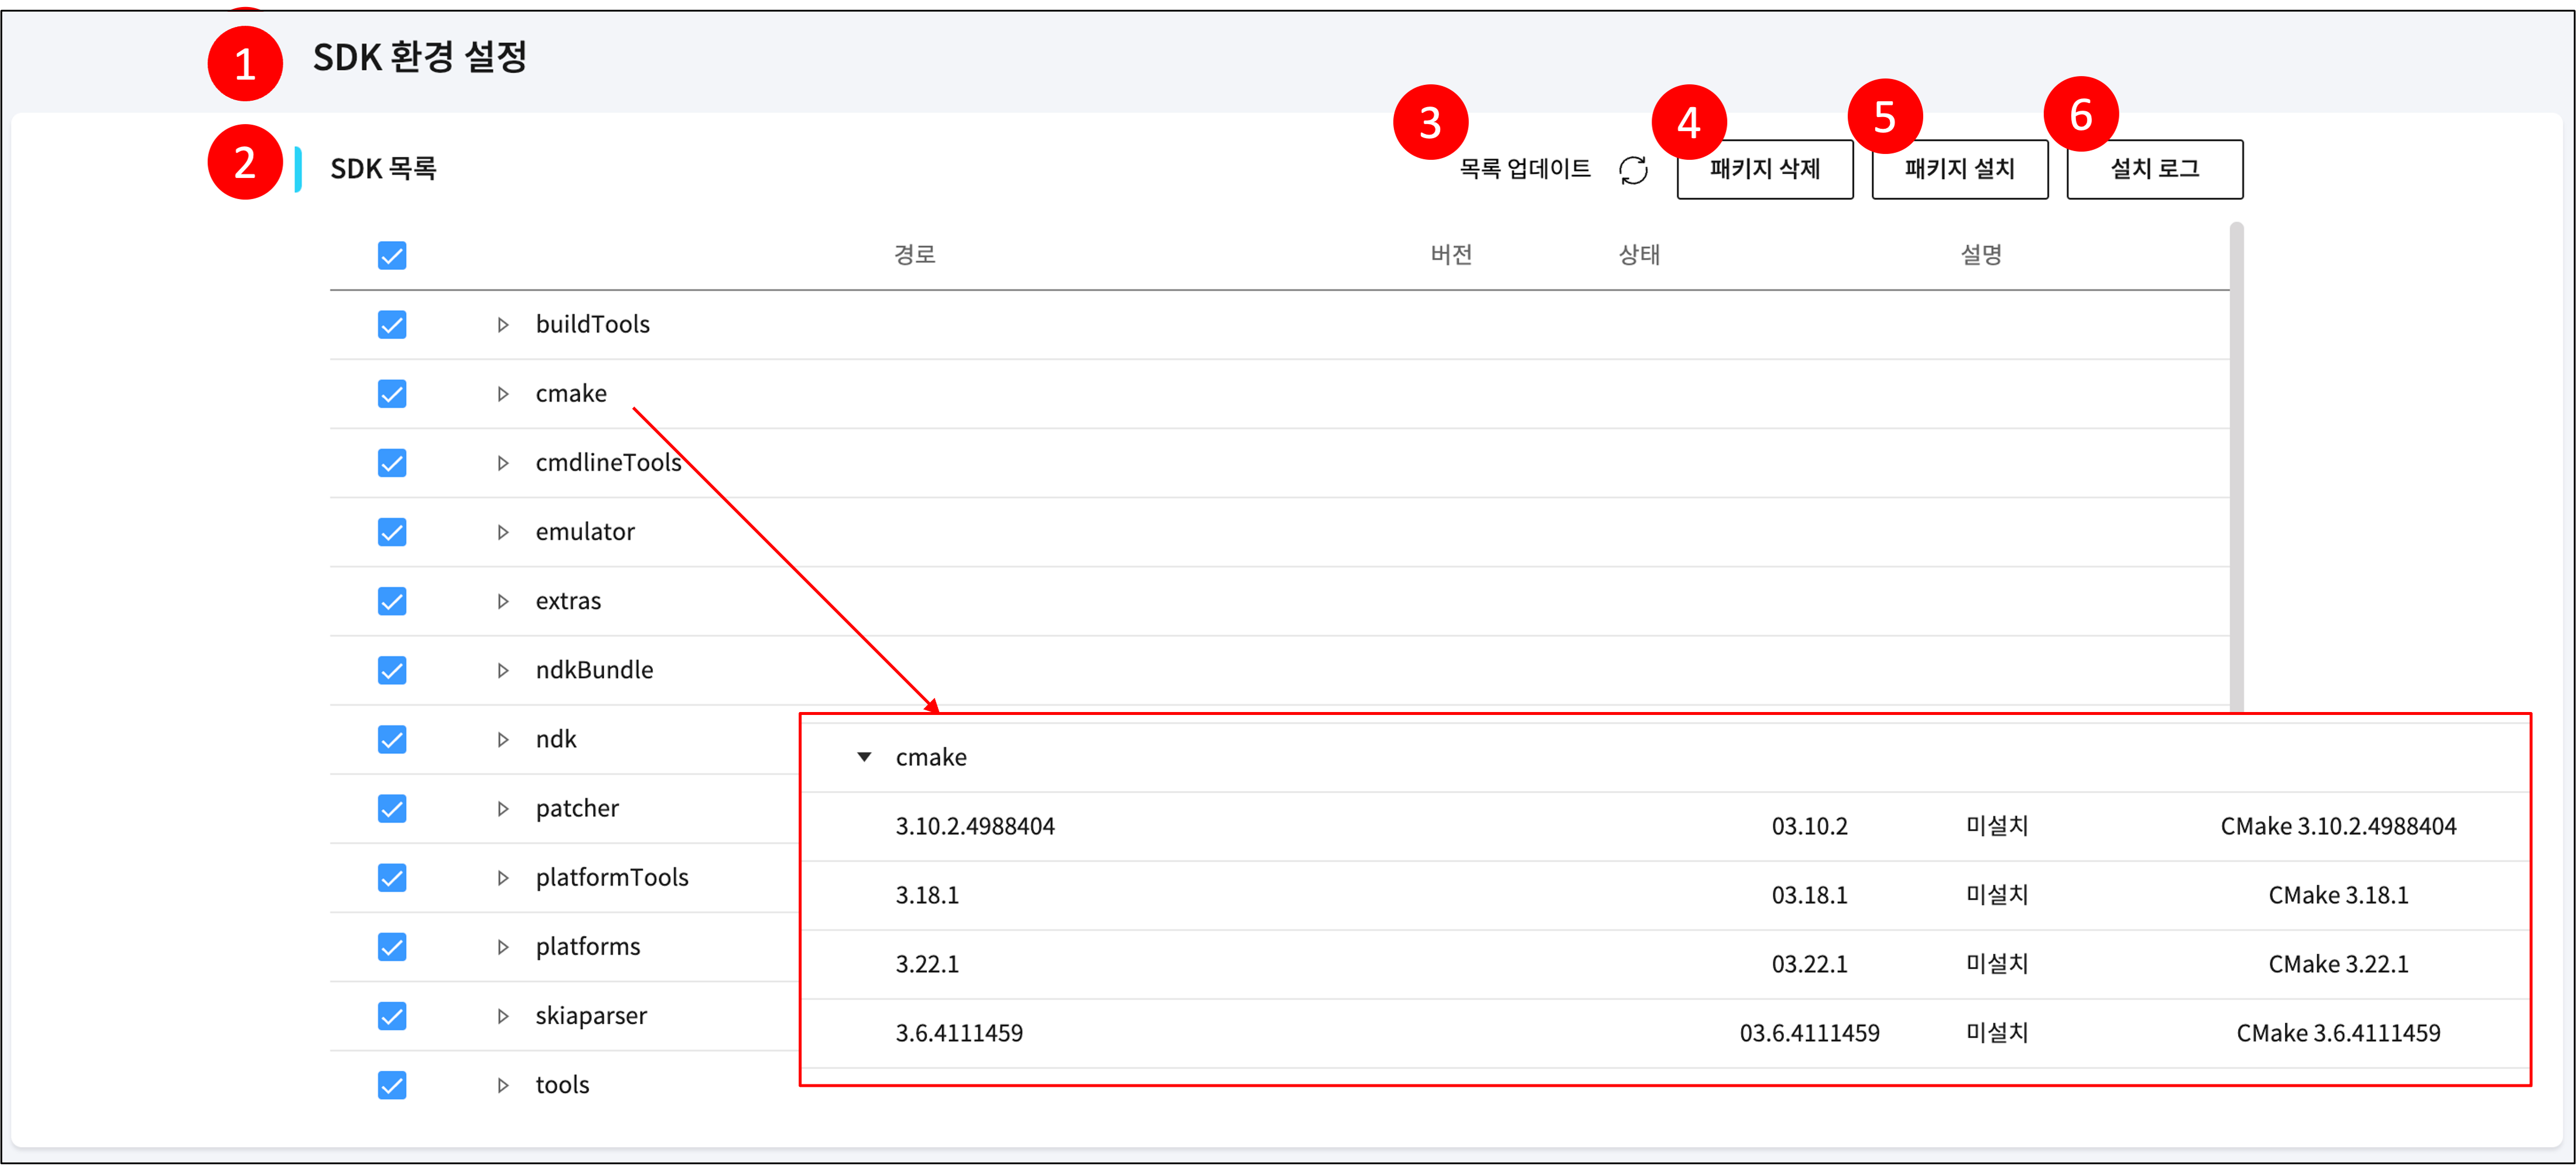
| No. | Category | Description |
|---|---|---|
| 1 | Screen Overview | Screen for viewing and managing SDKs required for the project Development Environment and Device. |
| 2 | SDK List | View the SDK list. Selecting each item allows you to check the detailed version and status of that SDK. |
| 3 | Update List | The list of SDKs installed so far is updated. |
| 4 | Delete Package | The package selected from the SDK list is deleted. |
| 5 | Install Package | The package selected from the SDK list is installed. |
| 6 | Installation Log | Check the SDK installation log. |
¶ 9.2 User Management
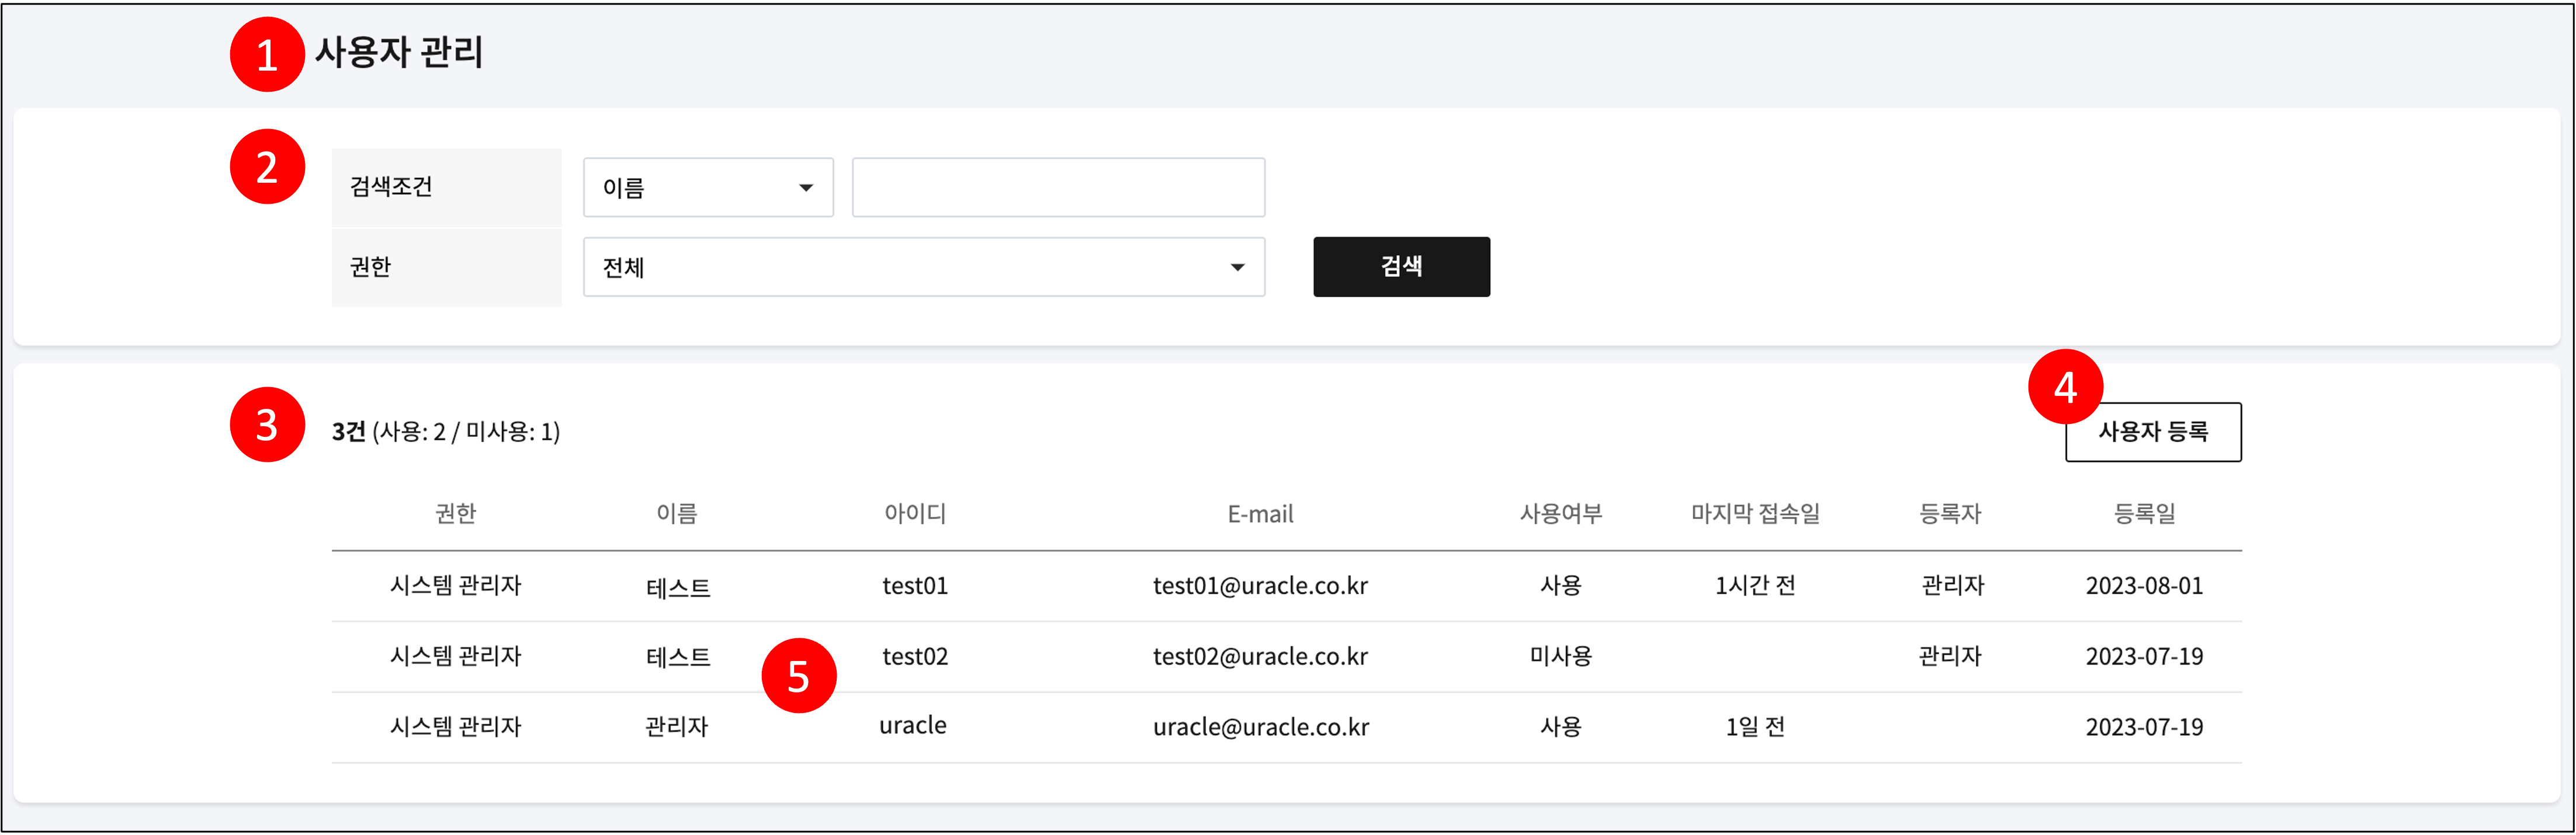
| No. | Category | Description |
|---|---|---|
| 1 | Screen Overview | Page for managing users. Only system administrators can access this page. |
| 2 | Search Conditions | Please enter the search conditions for the user list. (1) Search Condition: Name, ID, Email (2) Authority: System Administrator, Workspace Administrator, User (Reference Authority) |
| 3 | List | View the user list. |
| 4 | Register User | Register a user. (Refer to the "Register User" image below) |
| 5 | User Details | Check the detailed content of the selected user. (Refer to the "Edit User" image below) |
¶ 9.2.1 User Permissions
- User permissions include System Administrator, Workspace Administrator, and Developer.
| Category | Workspace | Device | Settings |
|---|---|---|---|
| System Administrator | Read, Write | ||
| Workspace Administrator | Read, Write | Read | Read (SDK Environment Settings) |
| Developer | Read | Read | Read (SDK Environment Settings) |
| * For menu permissions within the workspace, please refer to this link. | |||
¶ 9.2.2 Register User
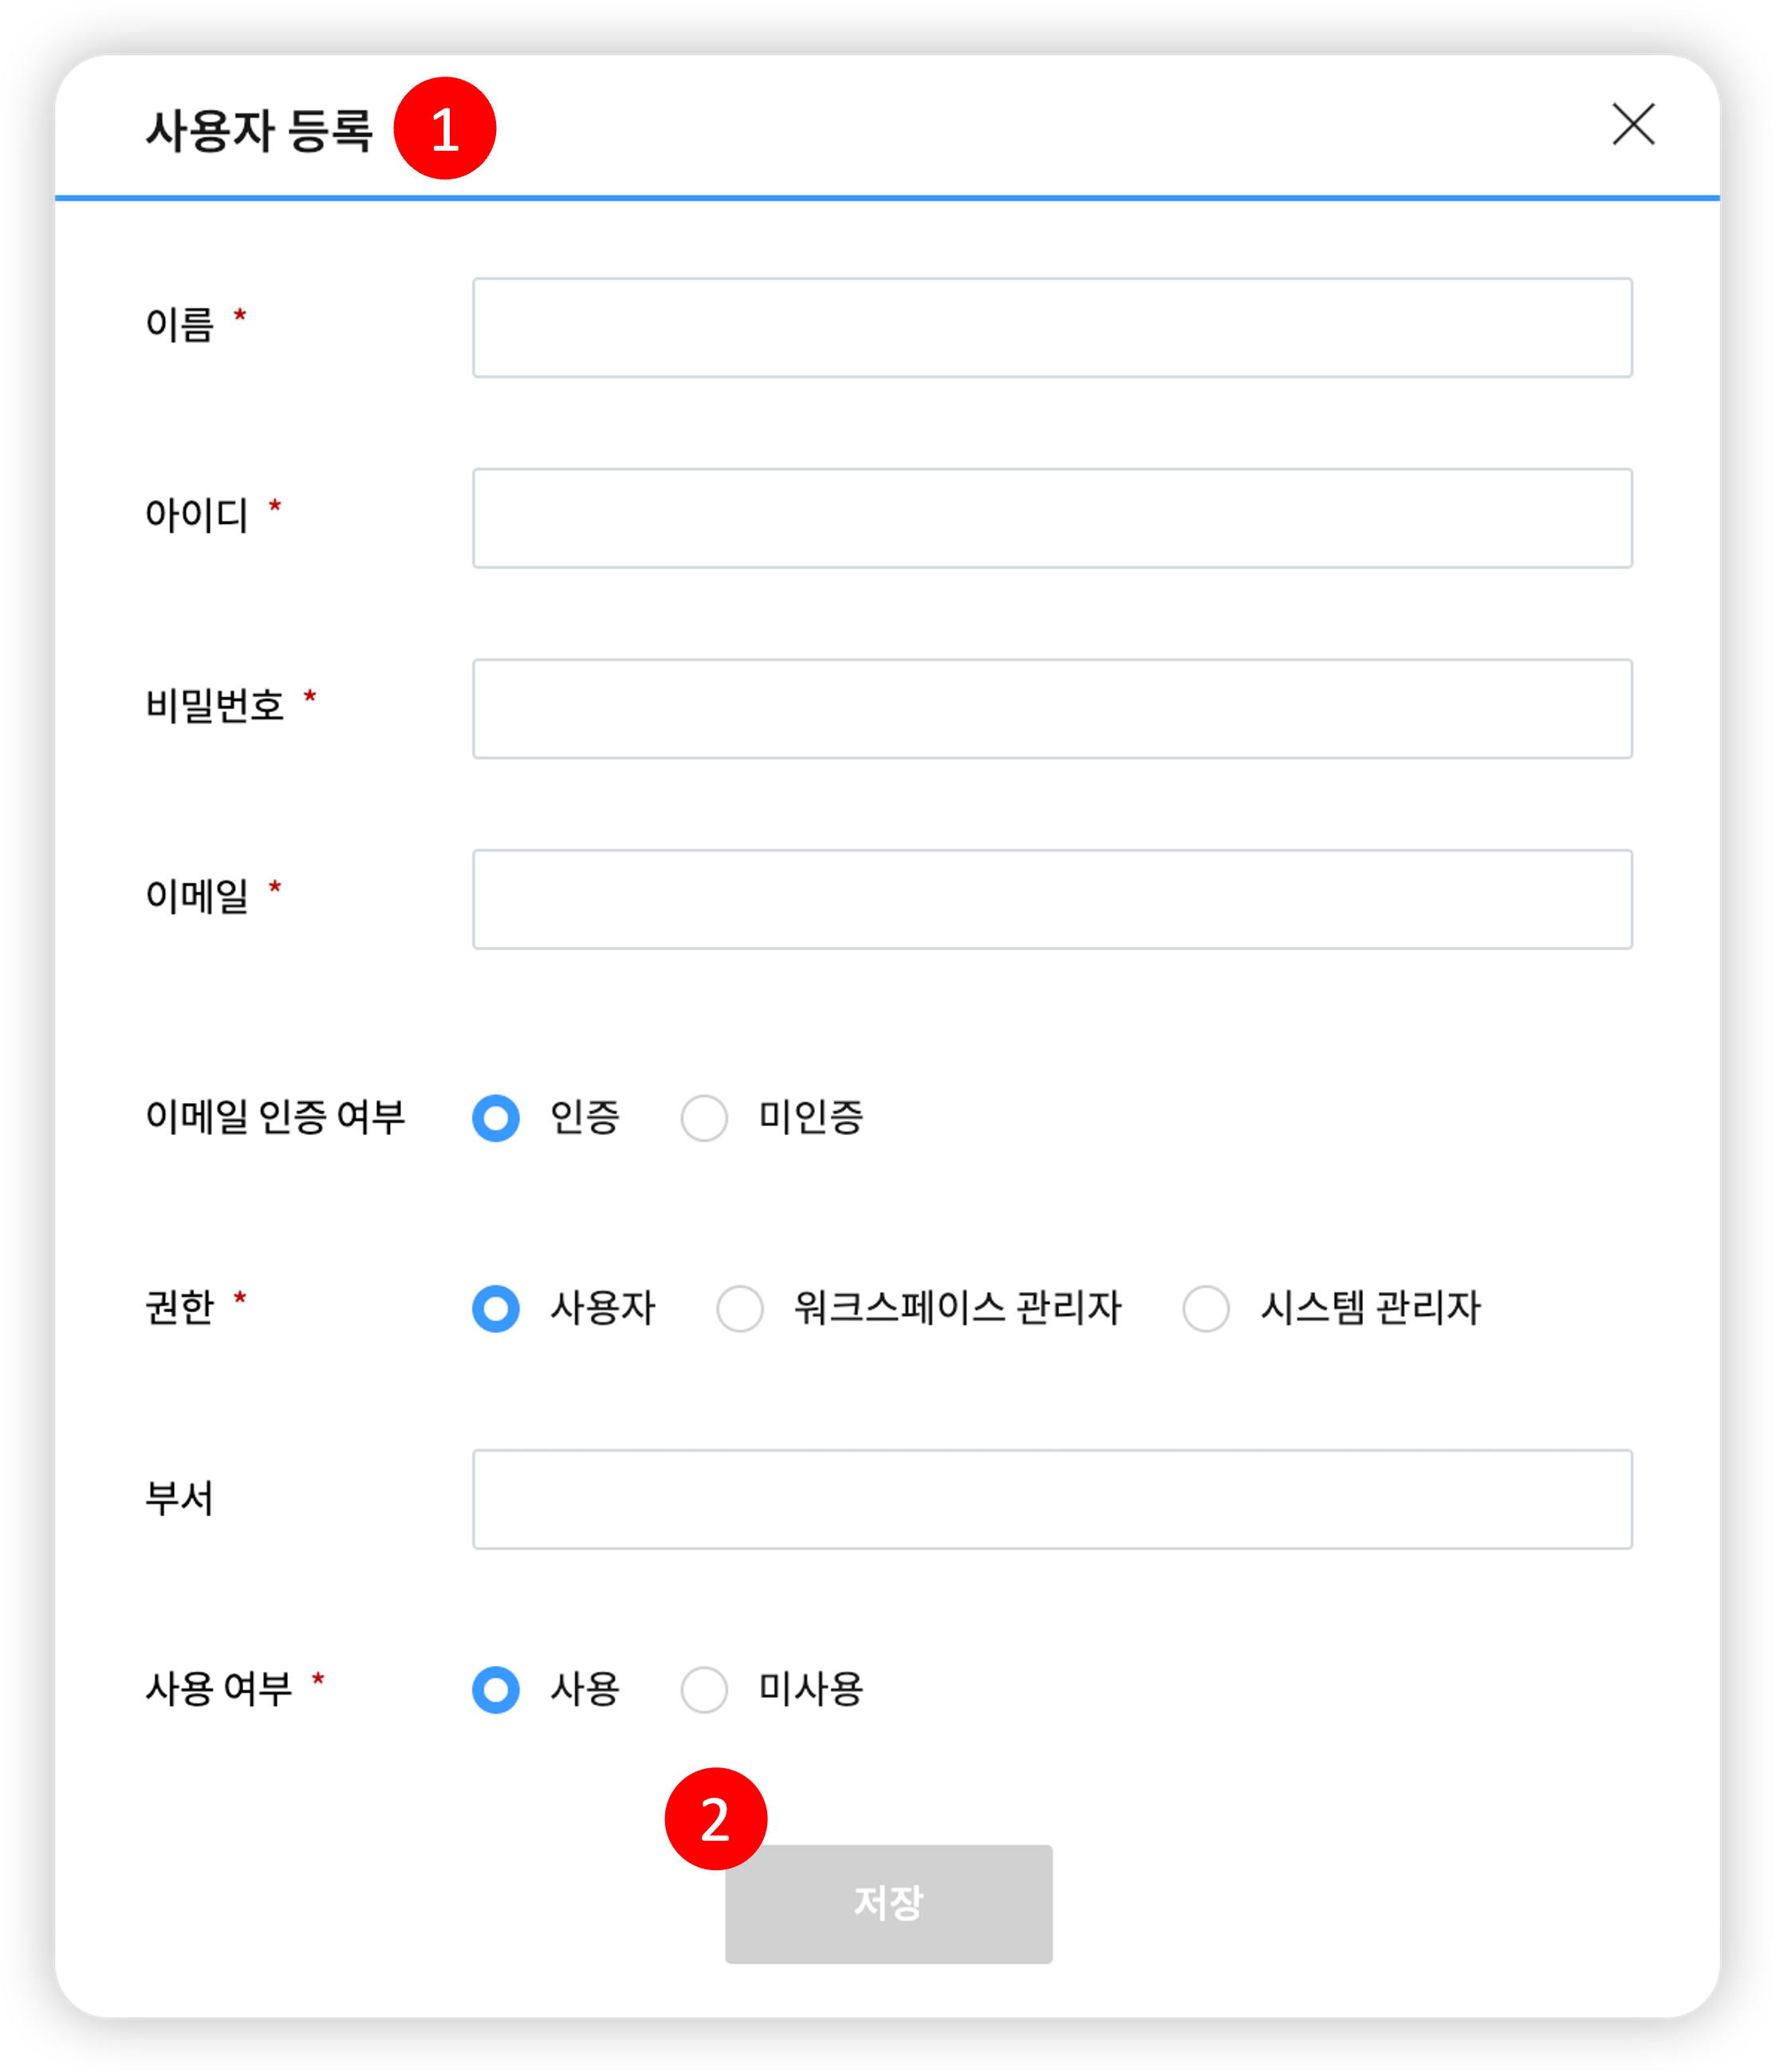
| No. | Category | Description |
|---|---|---|
| 1 | Screen Overview | Pop-up window for registering a user. Please enter the information of the user you want to register. (1) Name: Required field. (2) ID: Required field. (3) Password: Required field. Please enter a password that complies with the Password Policy. (4) Email: Required field. (5) Email Authentication Status: Optional field. If "Authenticated" is selected, the user will be activated without email authentication. If you have linked a mail server, selecting "Unauthenticated" is recommended. (6) Authority: Required field. (7) Department: Optional field. (8) Usage Status: Required field. Users who are not in use cannot log in. |
| 2 | Save | The user is registered with the information you entered. |
¶ 9.2.3 Edit User
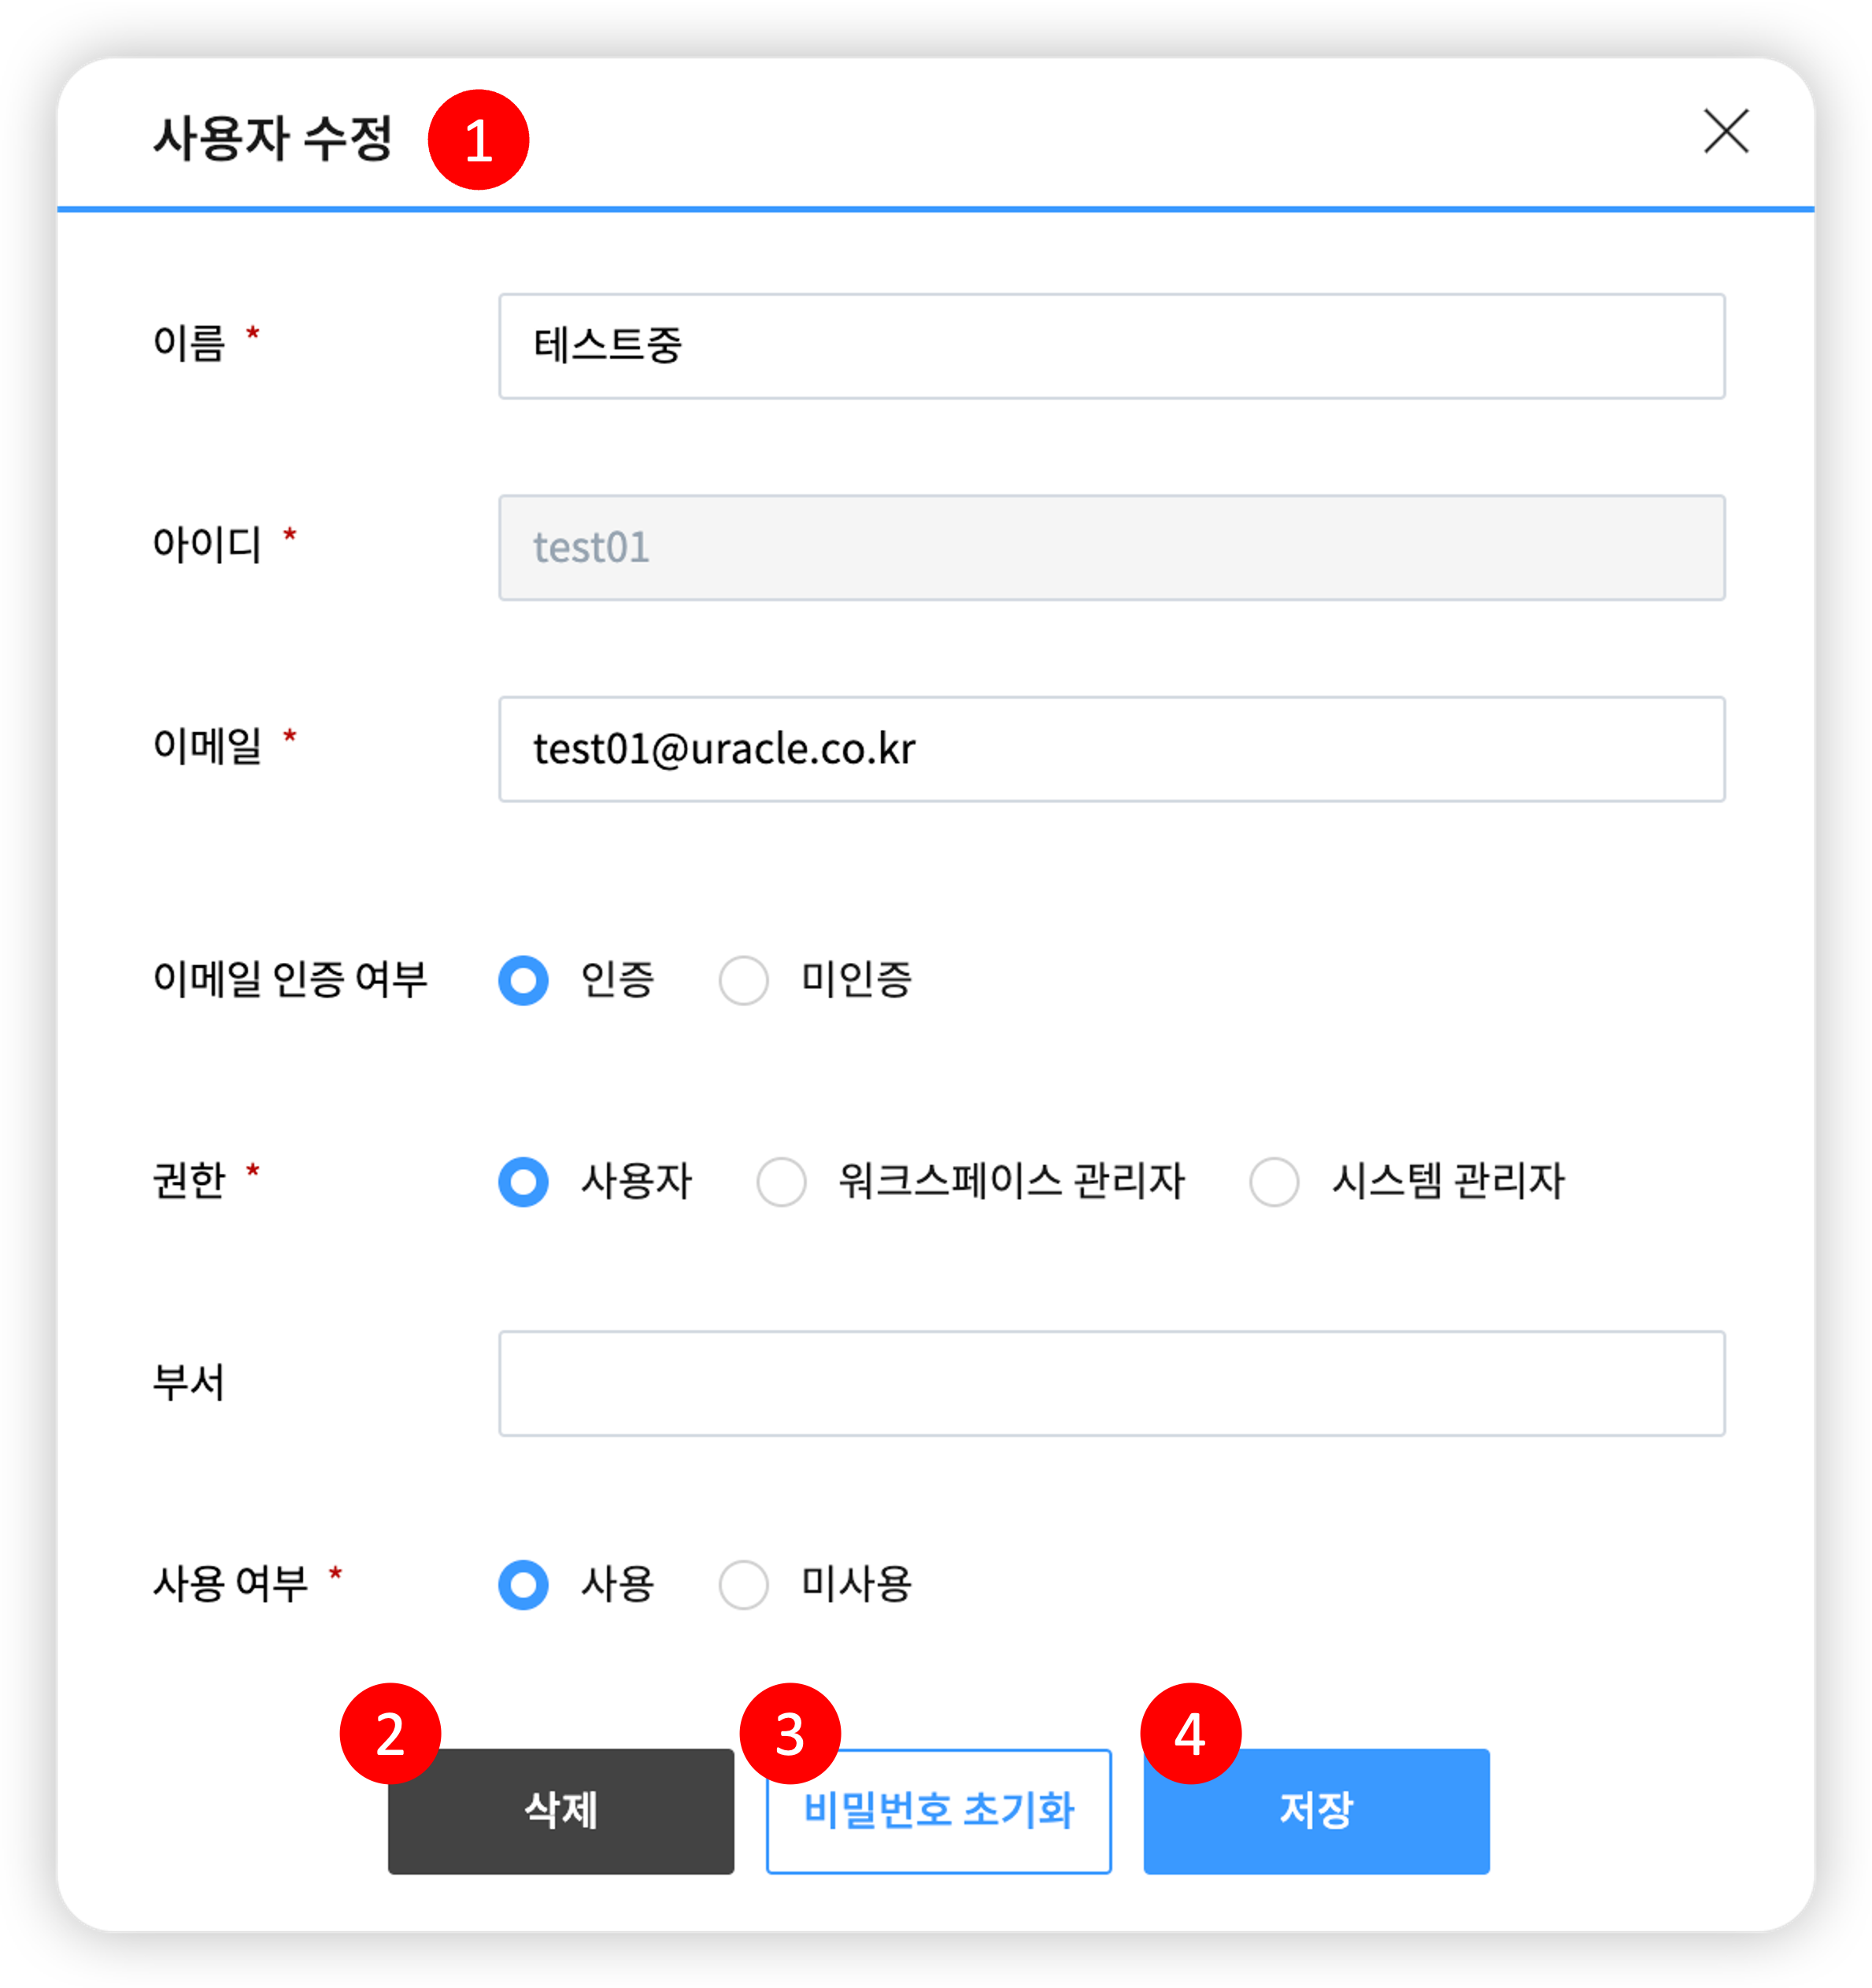
- [Edit User]
| No. | Category | Description |
|---|---|---|
| 1 | Screen Overview | Pop-up window for editing a user. Please enter the information of the user you want to edit. (1) Name: Required field. (2) ID: This field cannot be edited. (3) Email: Required field. (4) Email Authentication Status: Optional field. (5) Authority: Required field. (6) Department: Optional field. (7) Usage Status: Required field. Users who are not in use cannot log in. (Caution) When editing your own information, the email authentication status, authority, and usage status cannot be changed. |
| 2 | Delete | The user is deleted. |
| 3 | Reset Password | Resets the password. A link to change the password will be sent to the user's email. (Caution) In case of an invalid email, the user's password cannot be changed. Please change to valid email information before resetting the password. |
| 4 | Save | The user is modified with the entered information. |
¶ 9.3 Password Policy Management
| No. | Category | Description |
|---|---|---|
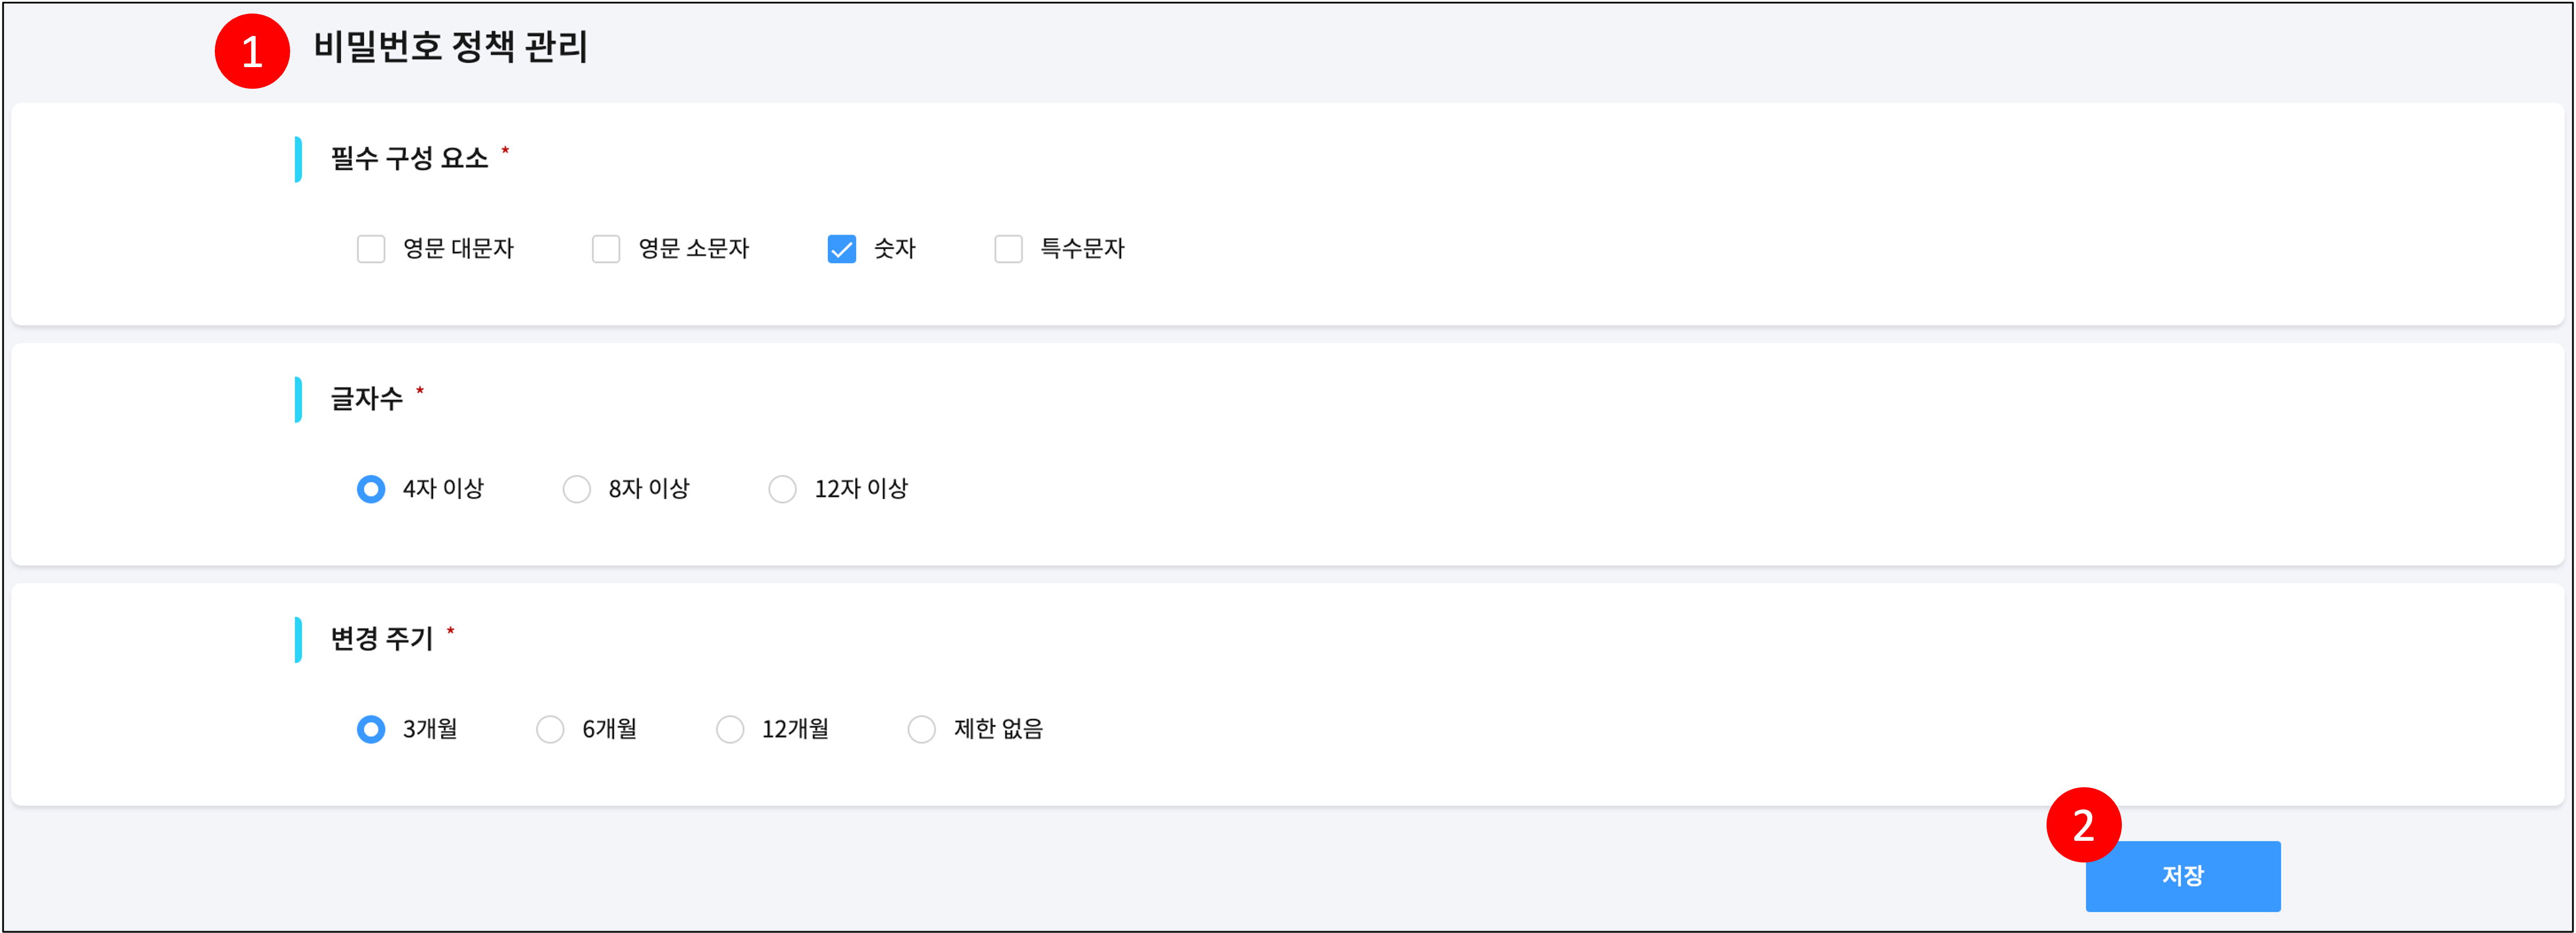
| 1 | Screen Overview | Page for managing password policies. You can set the required components, length, and change cycle of passwords. (1) Required Components: Defines the elements that must be included in the password. (2) Length: Defines the minimum length of the password. (3) Change Cycle: Defines the password change cycle. |
| 4 | Save | Saves the password policy with the entered information. |